LankaAds Customer Documentation
Official installation, administration, and operations guide for LankaAds — an internationally configurable Classifieds Marketplace platform.
Verified against Customer Baseline v1.0.0 (Build lka_build_v1.0.0_f688268).
1. Getting Started & Package Contents
Welcome to LankaAds. LankaAds is a comprehensive, self-hosted classified advertisements marketplace platform designed for high performance, reliability, and ease of management. It features a complete multi-tier moderation system, image watermark branding, manual bank transfer verification with deposit slip inspection, tiered subscription memberships, featured/urgent listing promotions, and cryptographically signed system updates.
Configurable Internationally (Shipped Defaults vs. Custom Adaptation)
LankaAds is built to be configured for any country or market worldwide:
- Shipped Defaults: Out of the box, the software includes pre-seeded Sri Lankan administrative geography (9 provinces, 25 districts, hundreds of cities) and default English and Sinhala (සිංහල) language dictionaries. These serve as ready-to-launch blueprints.
- International Adaptation: Any marketplace operator can easily customize the platform for any country, territory, or localized region by configuring their national currency (USD, EUR, GBP, LKR, AUD, CAD, INR, etc.), selecting their local timezone, adding or renaming categories and custom specification fields, creating local regions/cities in Settings → Locations, and tailoring translations.
Customer Package File Structure
When you extract your customer release archive, you will find the following clean directory structure:
lankaads/
├── app/                      # Backend PHP Application (Custom MVC architecture)
│   ├── Config/               # Database, Env, license keys & update trust store
│   ├── Controllers/          # REST API & web route controllers
│   ├── Core/                 # Request, Response, CSRF & Router primitives
│   ├── Middleware/           # Authentication, CORS, Rate-limiting & Maintenance
│   └── Services/             # StoreService, License, Crypto & Update engine
├── cli/                      # Customer CLI utilities (Setup token, cron, recovery)
│   ├── generate_setup_token.php  # Utility to generate storage/installer/setup_token.txt
│   ├── update_recovery.php       # Private update recovery & rollback tool
│   ├── cron.php                  # Scheduled task runner (ad expiry & maintenance)
│   ├── license_refresh.php       # Scheduled background license renewal
│   └── reset_admin_password.php  # Emergency administrator password reset utility
├── database/                 # SQL schemas & blueprints
│   └── install/              # schema.sql, seed.sql, triggers.sql
├── public/                   # Public Web Root (Domain Document Root)
│   ├── assets/               # Pre-compiled React bundle (app.js, app.css)
│   ├── uploads/              # Customer listing photos, banners, watermarks
│   ├── .htaccess             # Apache rewrite rules & security headers
│   ├── favicon.ico           # Platform default favicon
│   └── index.php             # Web entry point
├── storage/                  # Private application storage (Must be protected from HTTP)
│   ├── installer/            # setup_token.txt & installed.lock
│   ├── license/              # Cached license certificate & state
│   ├── logs/                 # Security & error logs
│   ├── receipts/             # Customer uploaded bank deposit slips
│   ├── sessions/             # File-based PHP sessions
│   └── updates/              # Pre-update backups & staging directory
├── .env.example              # Environment variables template
├── .htaccess                 # Shared hosting root redirect to public/
├── INSTALLATION.md           # Quick setup guide
└── UPDATE_GUIDE.md # System update reference guide1.0.0Build Identifier:
lka_build_v1.0.0_f688268Release Archive Checksum (SHA-256):
02cf08d4a1207c28e6a73b52a2fe21d073e1248db424213e7a48f32d6b2d6227
2. Server & Hosting Requirements
LankaAds runs efficiently on standard Linux shared hosting with cPanel, DirectAdmin, Plesk, Cloud VPS, or dedicated servers. The built-in Web Installer automatically audits your server environment in Step 1 before proceeding.
| Component | Requirement | Purpose / Verified Code Implementation |
|---|---|---|
| PHP Runtime | PHP 8.1, 8.2, or 8.3 (64-bit recommended) | Strict typing, fibers, and modern PHP cryptographic functions. (PHP 8.0 and older are not supported). |
| MySQL / MariaDB | MySQL 8.0+ or MariaDB 10.4+ | Full support for InnoDB storage engine, cascading foreign keys, and utf8mb4 character collation. |
| PDO & PDO_MySQL | ext-pdo, ext-pdo_mysql |
Prepared statements and SQL injection prevention via App\Config\Database. |
| OpenSSL Extension | ext-openssl |
Cryptographic verification of license certificates and author-signed system update packages via UpdateSignatureVerifier. |
| cURL Extension | ext-curl |
Outbound HTTPS communication on port 443 for remote license activation and periodic validity renewals. |
| Multibyte String | ext-mbstring |
Accurate handling and validation of Unicode text, international characters, and Sinhala script. |
| JSON Extension | ext-json |
REST API payload serialization, JSON configuration storage, and manifest parsing. |
| Fileinfo Extension | ext-fileinfo |
Binary magic-byte MIME type inspection for listing photos and bank transfer deposit slips (prevents malicious file renames). |
| GD or Imagick | ext-gd or ext-imagick |
Automatic image resizing, thumbnail generation, orientation correction, and PNG watermark alpha blending. |
| Web Server | Apache 2.4+ with mod_rewrite (or Nginx) |
Front-controller routing via public/.htaccess. Nginx sample configurations are also fully supported. |
MySQL Database User Privileges
When creating your MySQL user in cPanel or phpMyAdmin, you only need to grant standard data and table structure permissions. High-risk administrative privileges are intentionally not required:
Required Table Privileges
SELECT, INSERT, UPDATE, DELETE, CREATE, ALTER, INDEX, DROP, REFERENCES.
NOT Required
CREATE DATABASE, SUPER, GRANT OPTION, and TRIGGER are never needed on shared hosting.
Directory Permissions
Set directory permissions to 0755 (or 0775) and files to 0644. Never use 0777 on any directory. The installer and application need write access to:
- Application root directory (to atomically write
.envwith0600permissions upon installation completion). storage/and all subdirectories (storage/installer/,storage/license/,storage/sessions/,storage/logs/,storage/receipts/,storage/updates/).public/uploads/and subdirectories (public/uploads/listings/,public/uploads/banners/,public/uploads/watermarks/,public/uploads/footer/).
3. cPanel & Server Installation Walkthrough
LankaAds includes a browser-based, self-contained 5-step Web Installer Wizard located at /install. You do not need SSH, terminal access, or command-line experience to install LankaAds.
Creating the MySQL Database & User in cPanel
Before launching the web installer, create an empty MySQL database and dedicated database user in your hosting control panel:
Step-by-Step cPanel Database Creation
- Log in to your cPanel dashboard.
- Under the Databases section, click MySQL® Databases (or MySQL® Database Wizard).
- Create New Database: Enter a database name (e.g.
cpaneluser_lankaads) and click Create Database. Ensure the database is newly created and completely empty (0 tables). - Create Database User: Scroll to MySQL Users → Add New User. Enter a dedicated username (e.g.
cpaneluser_lkauser), generate a strong random password, and click Create User. Save this password securely. - Assign User to Database: Scroll to Add User to Database. Select your newly created user and database from the dropdowns, then click Add.
- Set Privileges: In the privilege list, check the standard privileges:
SELECT,INSERT,UPDATE,DELETE,CREATE,ALTER,INDEX,DROP,REFERENCES(or select ALL PRIVILEGES on standard shared hosting), then click Make Changes. - Note down your connection credentials for Step 2 of the Web Installer:
- Database Host: Usually
localhostor127.0.0.1on cPanel. - Database Port:
3306 - Database Name: Full prefixed name (e.g.
cpaneluser_lankaads). - Database Username: Full prefixed username (e.g.
cpaneluser_lkauser). - Database Password: The password you assigned to this user.
- Database Host: Usually
Supported Hosting File Layouts
Choose the placement method that matches your cPanel configuration:
Document Root Pointed to public/
Upload the package outside the public web root (e.g. /home/username/lankaads/) and set your domain or subdomain Document Root in cPanel to /home/username/lankaads/public. This ensures core code and private storage remain completely outside the web root.
Standard cPanel public_html/
If your cPanel account forces the primary domain to public_html/, upload the package directly into public_html/. The included root .htaccess automatically routes requests into public/, while nested .htaccess files strictly block direct access to .env, storage/, and app/.
Split cPanel Layout
Place app/, database/, and storage/ in /home/username/lankaads_core/ (above public_html) and place the contents of public/ inside public_html/. Define LANKAADS_ROOT at the top of public_html/index.php.
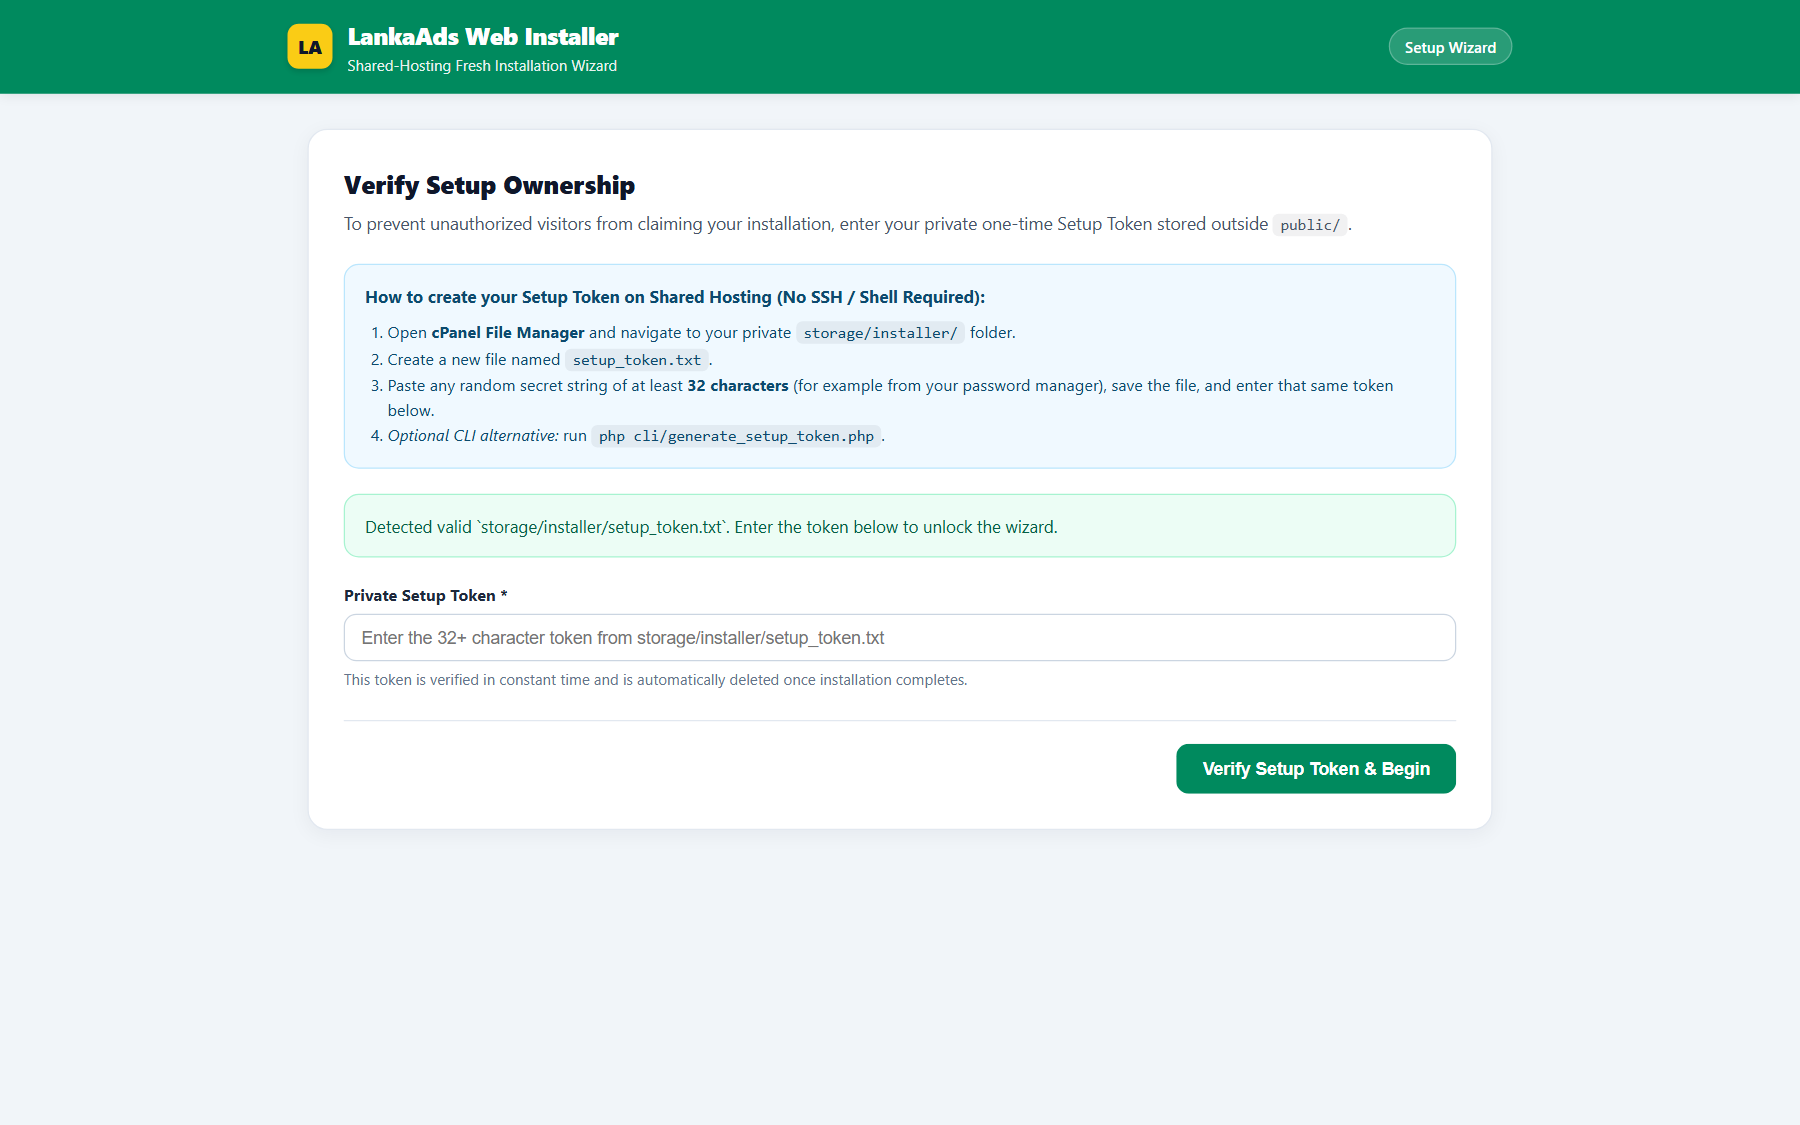
The Private One-Time Setup Token
To prevent unauthorized strangers from visiting a freshly pointed domain and running the installer before you do, LankaAds is protected by a one-time Setup Token stored outside the public directory.
- Open cPanel → File Manager and navigate to your application's
storage/installer/folder. - Click + File and create a new file named
setup_token.txt. - Paste any random secret string of at least 32 characters (for example generated by your password manager) into
setup_token.txtand save it. - Set file permissions to
0600(or0640). - Optional CLI method (if SSH is enabled): run
php cli/generate_setup_token.phpfrom the application root.
As soon as installation is completed in Step 5, the installer automatically deletes setup_token.txt and creates storage/installer/installed.lock.
Step-by-Step Installation Walkthrough
Navigate to https://yourdomain.com/install in your web browser. Visiting your homepage before installation automatically redirects you to the installer.
Gate 0: Setup Ownership Verification
Security Gate
Enter the private token you created in storage/installer/setup_token.txt and click Verify Setup Token & Begin. The token is checked in constant time, your session is regenerated, and Step 1 unlocks.
Step 1: Server Requirements & Permissions
Audit Complete
The installer runs real-time checks on your PHP version (≥ 8.1), required extensions (PDO, OpenSSL, cURL, mbstring, JSON, fileinfo, GD/Imagick), directory permissions (.env root, storage/*, public/uploads/*), pre-built frontend bundles, and the bundled RSA license key trust store.
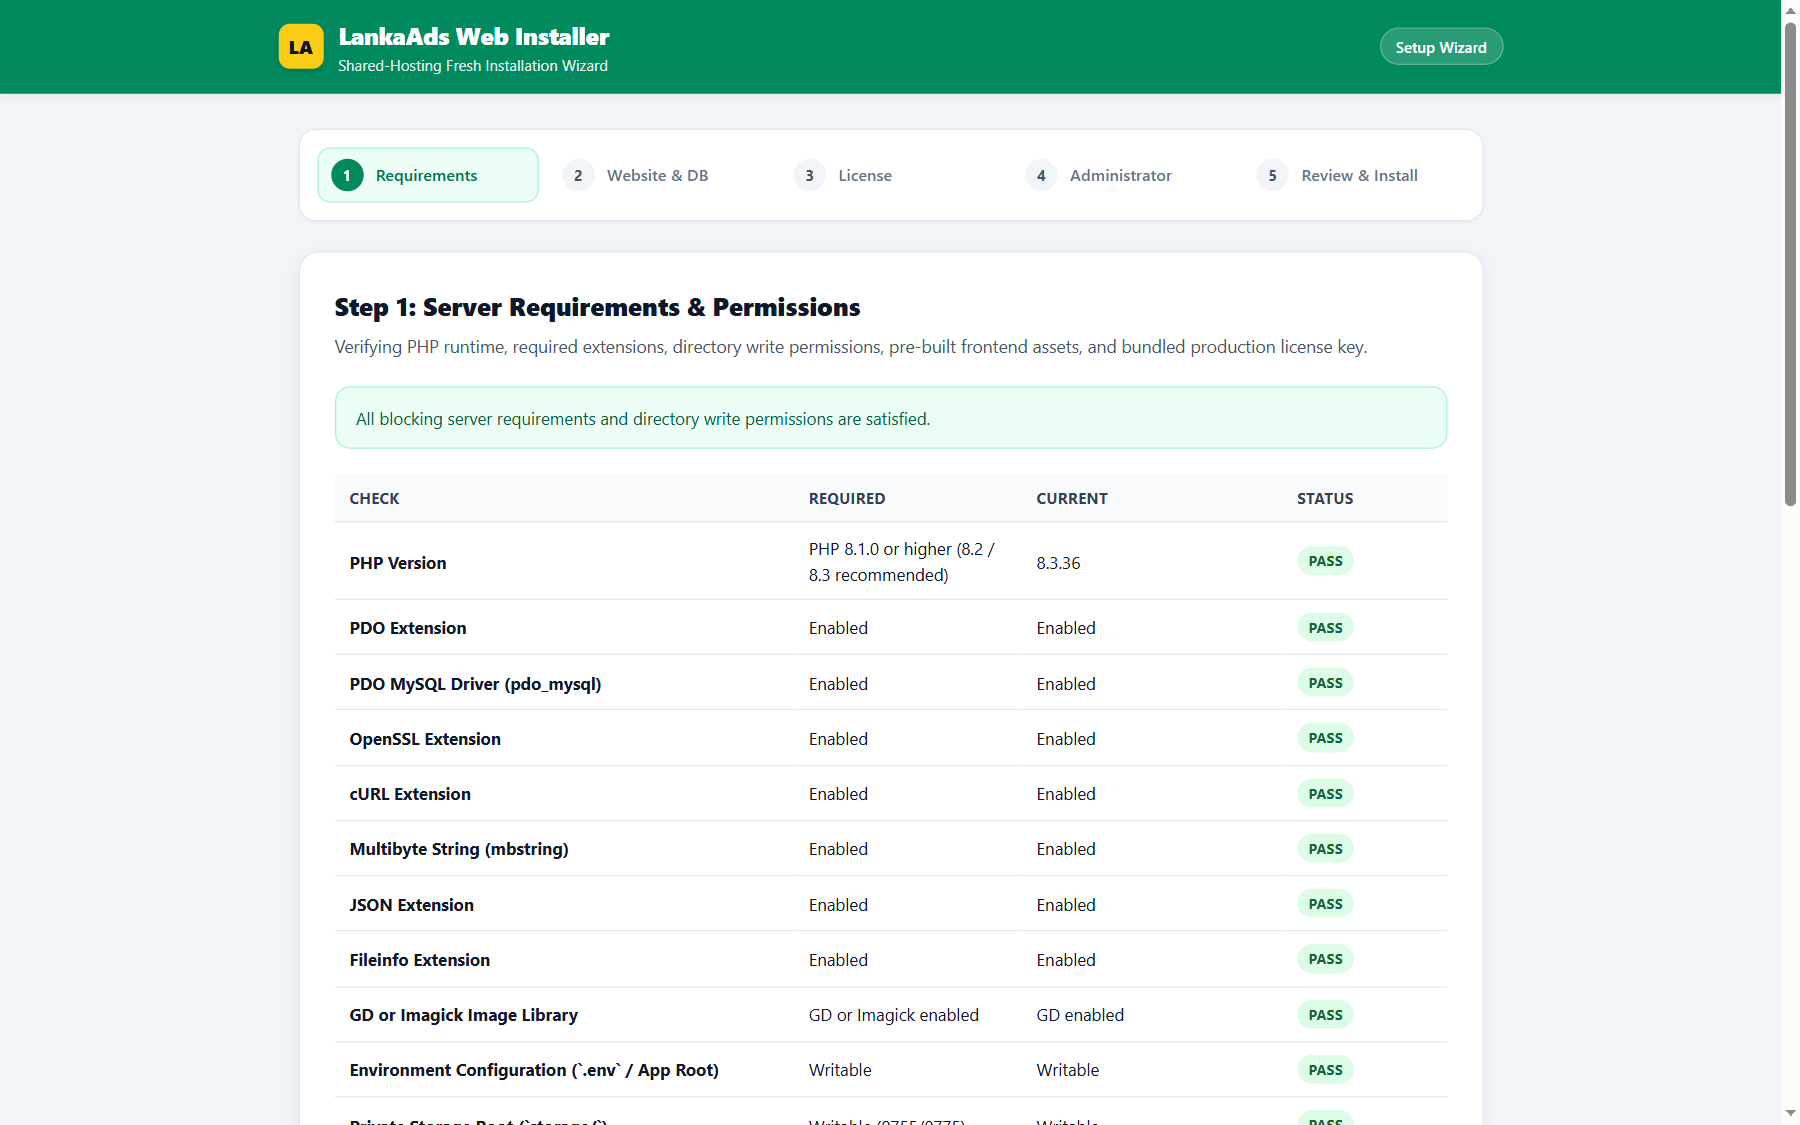
Click Continue to Website & Database → once all blocking requirements show green checkmarks.
Step 2: Website & MySQL Database Configuration
ConfigurationConfigure your marketplace identity and database connection credentials:
- Website Title: Your site name (e.g.
LankaAds Classifieds). - Canonical Installation URL: Your full website URL with
https://(e.g.https://yourdomain.com). No trailing slash. - Default Timezone: Select your timezone (defaults to
Asia/Colombo, configurable for any international timezone). - Default Currency: Choose your single platform currency (
USD,EUR, orLKR). - Database Connection: Host (
127.0.0.1orlocalhost), Port (3306), Database Name, Username, and Password.
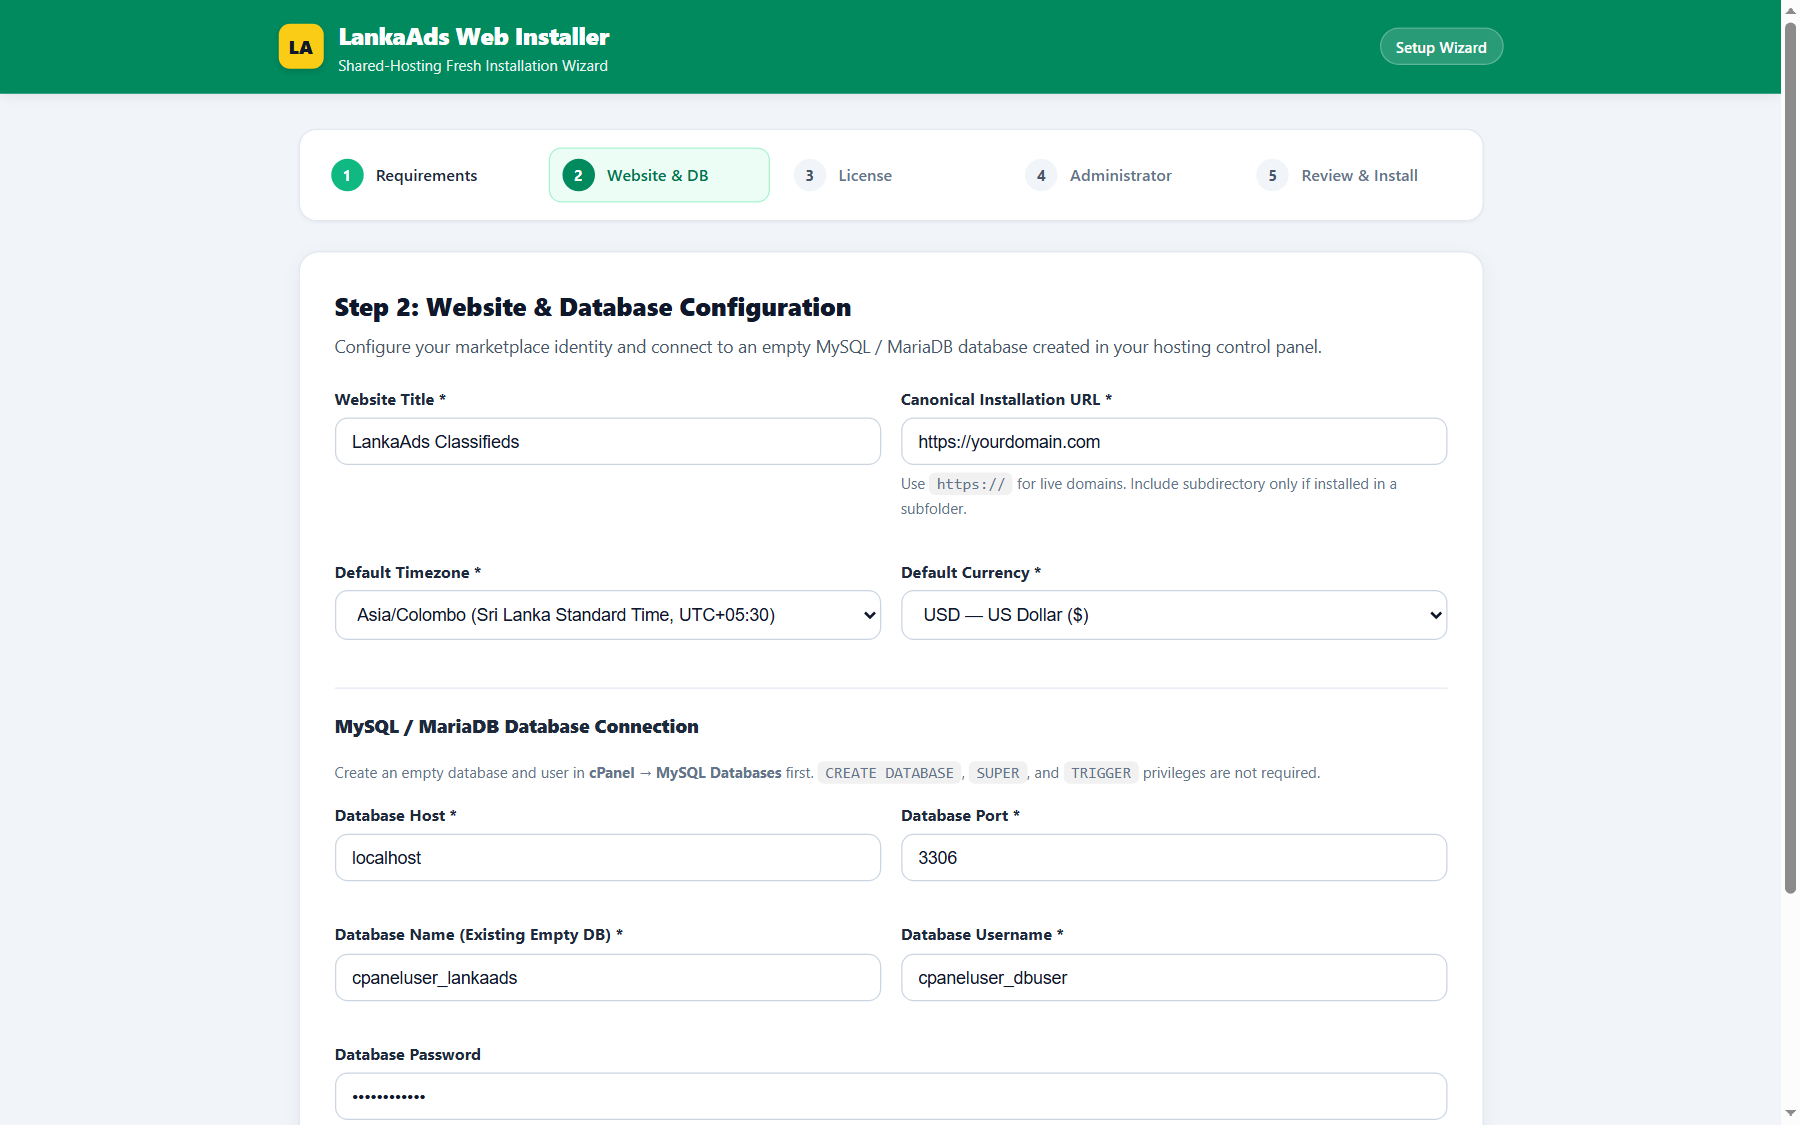
Click Test Connection & Continue →. The installer tests MySQL connectivity, verifies UTF-8 collation, and tests table creation permissions.
Step 3: License Activation
Domain Binding
The installer displays your normalized domain host, base path, and persistent installation ID. Enter your Envato Purchase Code (UUID) or Author-Issued Manual License Code (LKA-MAN-...).
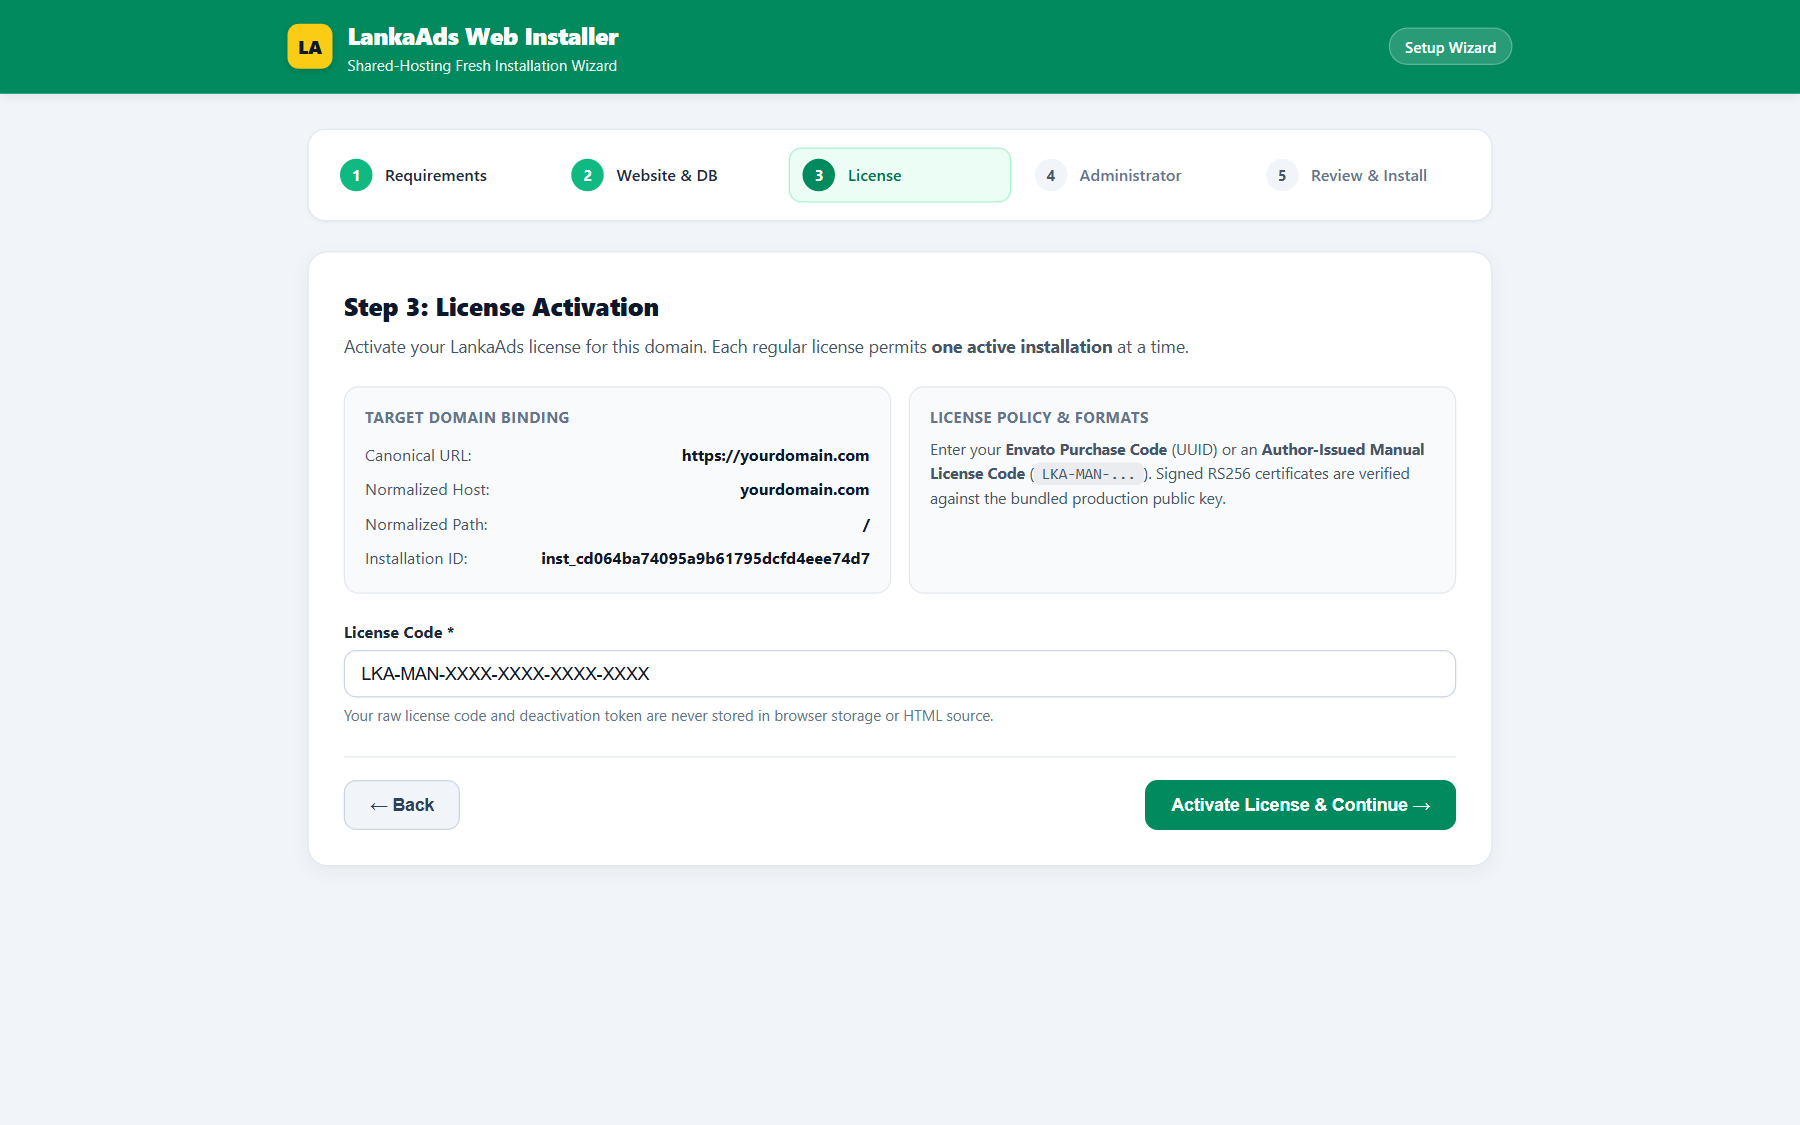
Click Activate License & Continue →. The installer validates your license with the author's licensing service and stores the validated certificate locally in storage/license/license_state.json.
Step 4: Administrator Account Creation
Super AdminCreate your primary Super Administrator account. Enter your Full Name, Email Address, and a strong password (minimum 8 characters, containing at least one letter and at least one number or symbol).
PBKDF2-HMAC-SHA512 (100,000 iterations).
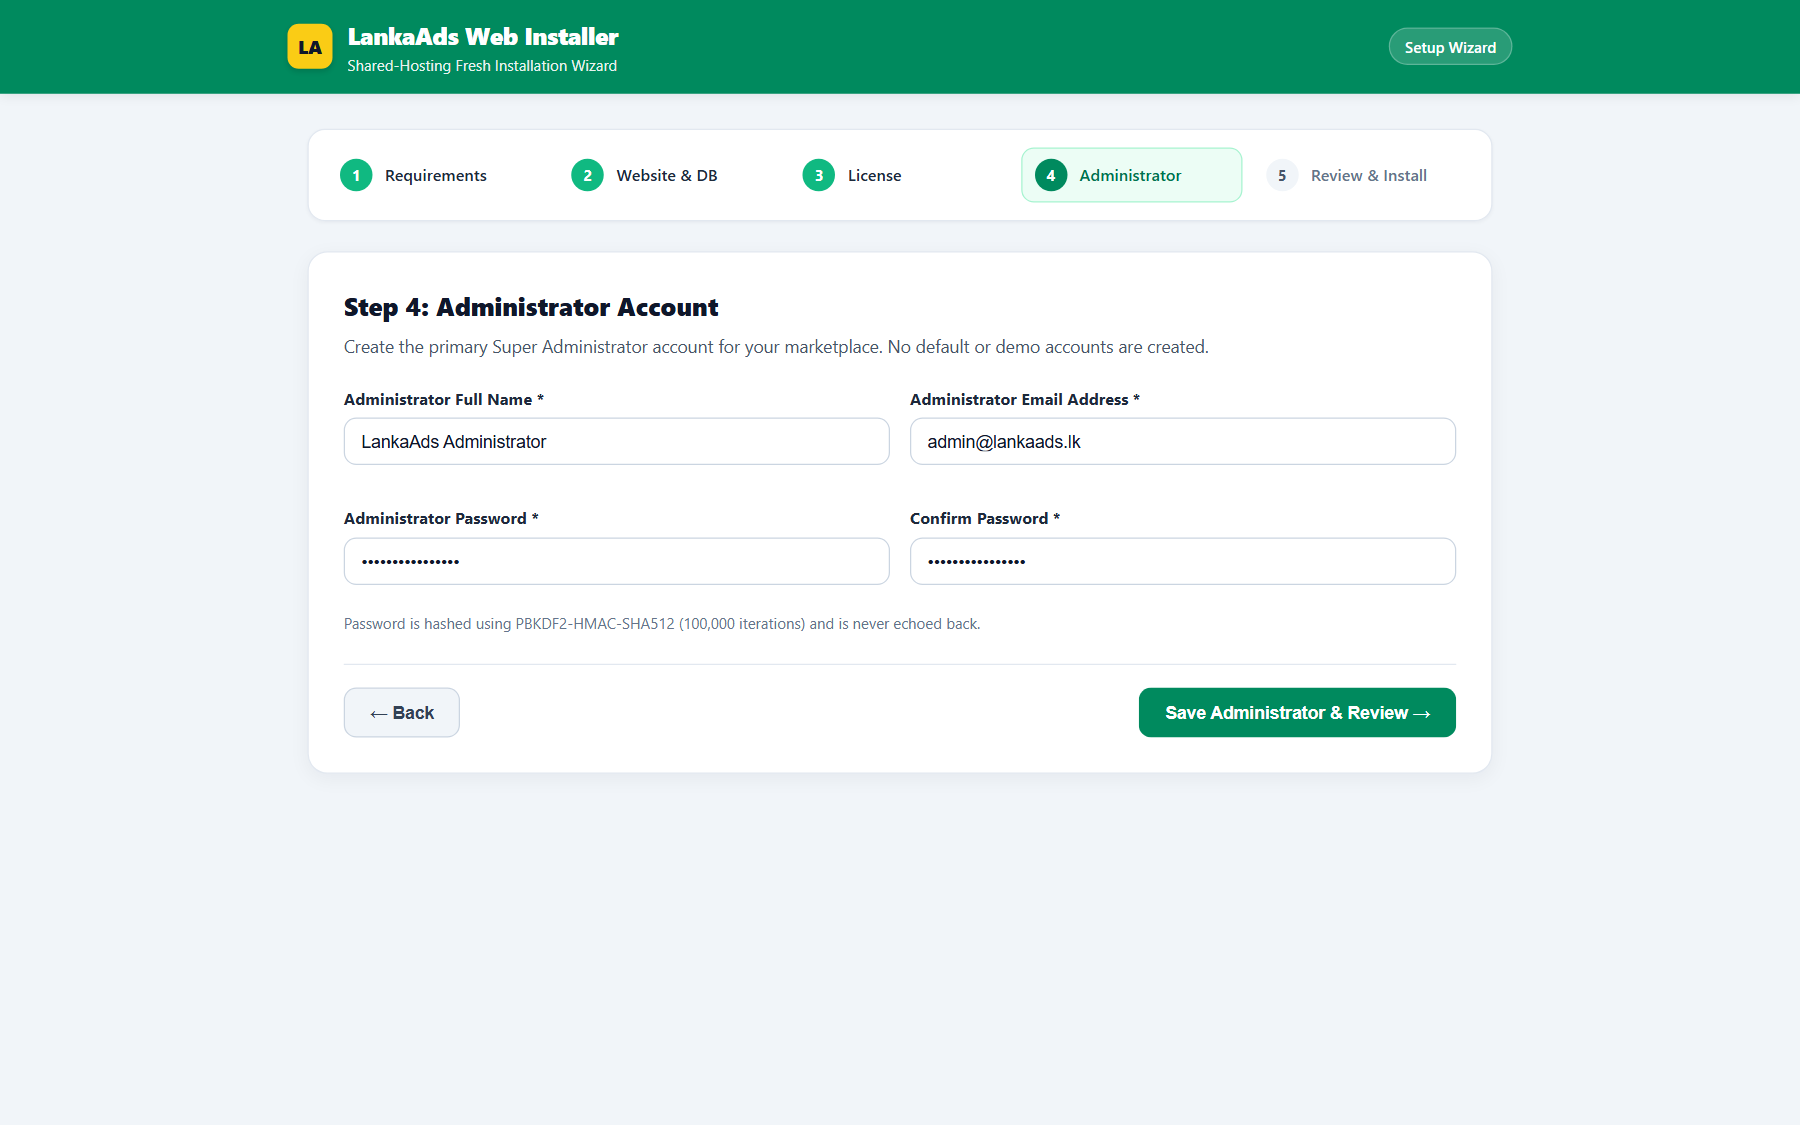
Click Save Administrator & Review →.
Step 5: Review & Execute Installation
ExecutionReview the non-sensitive configuration summary: Site Title, Canonical URL, Timezone, Currency, MySQL credentials, License Status, and Administrator Email.
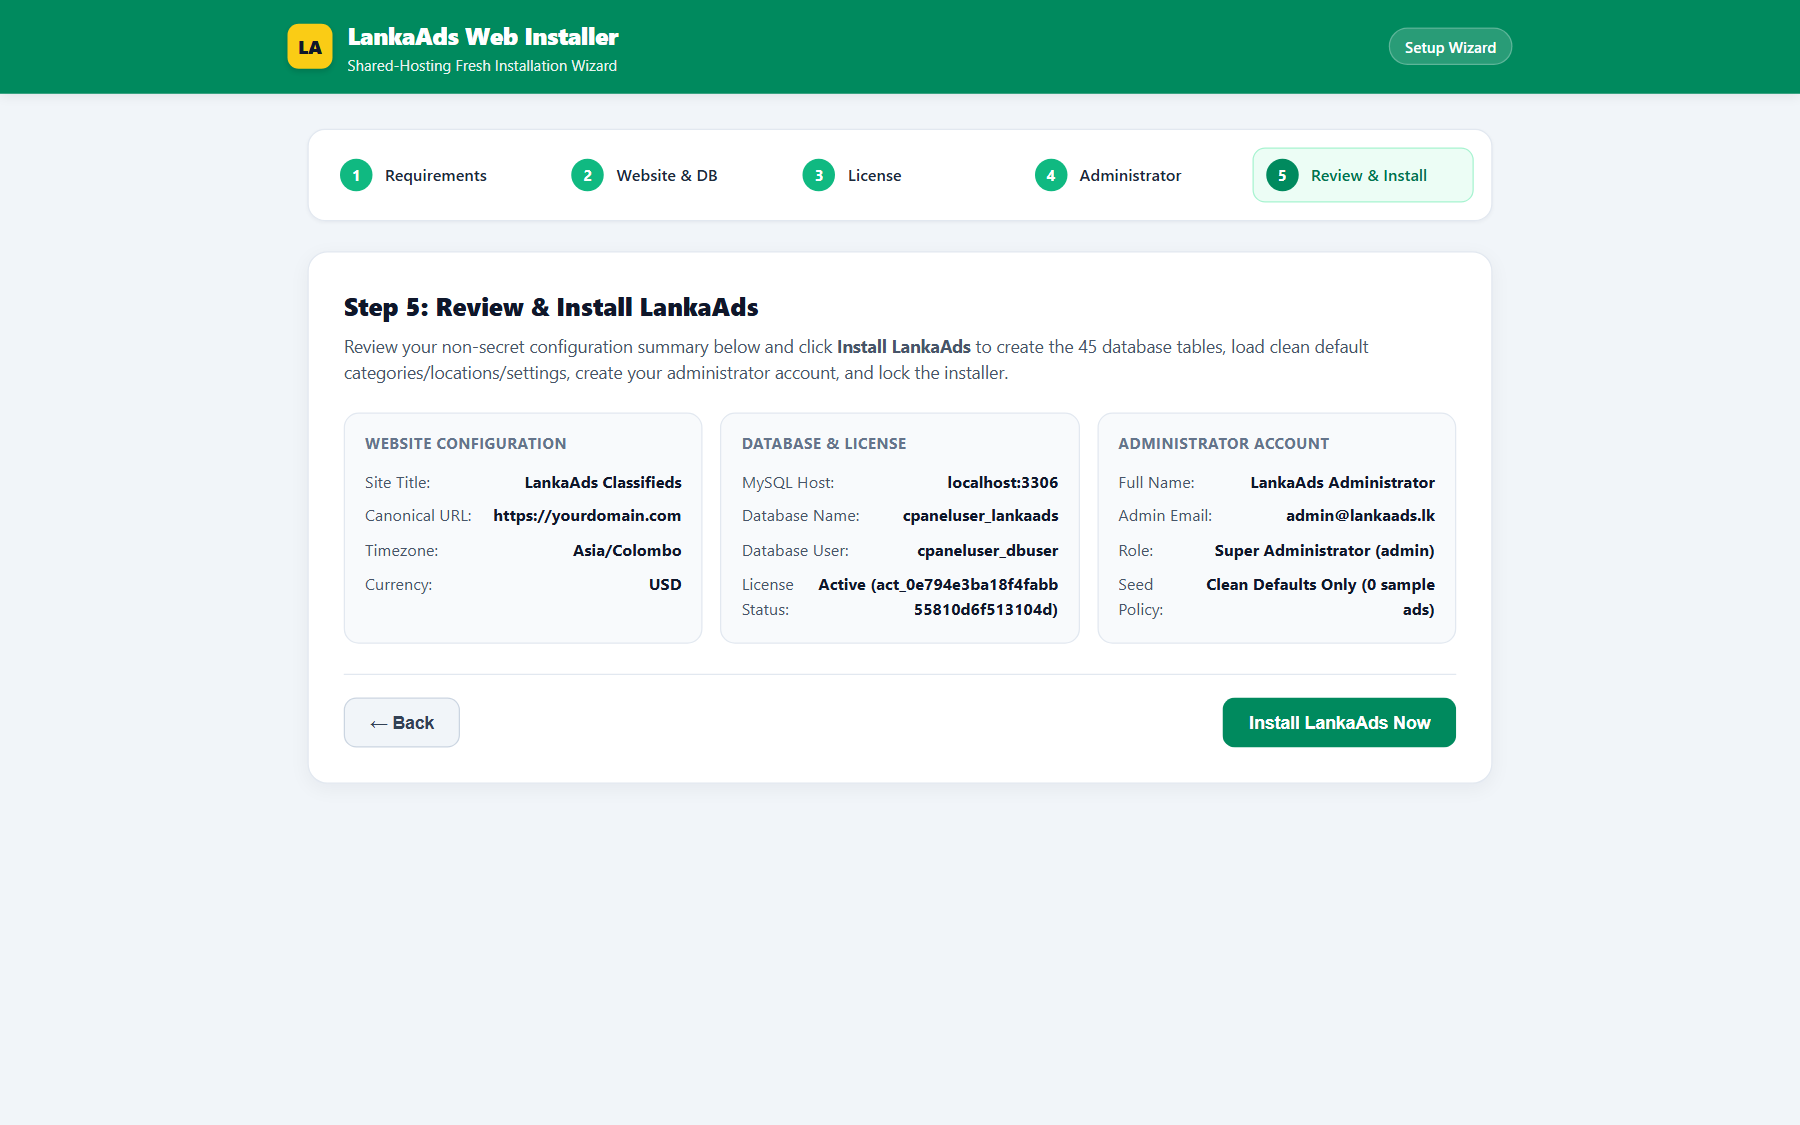
Click Install LankaAds Now. The installer will:
- Acquire an exclusive file mutex lock (
storage/installer/install.lock) to prevent duplicate submissions. - Execute
database/install/schema.sql, creating all 45 InnoDB tables in foreign-key order. - Execute
database/install/seed.sql(curated Sri Lanka districts, categories, email templates, and system pages — with 0 sample ads or fake users). - Apply your chosen Currency, Timezone, and Site Title to
system_settingsandcurrencies. - Create your initial Super Administrator account (
usr-admin-1). - Generate fresh application encryption keys (
APP_SECRET,MEMBERSHIP_PAYMENT_WEBHOOK_SECRET) and write.envwith0600permissions. - Write
storage/installer/installed.lock, deletesetup_token.txt, and lock the installer permanently.
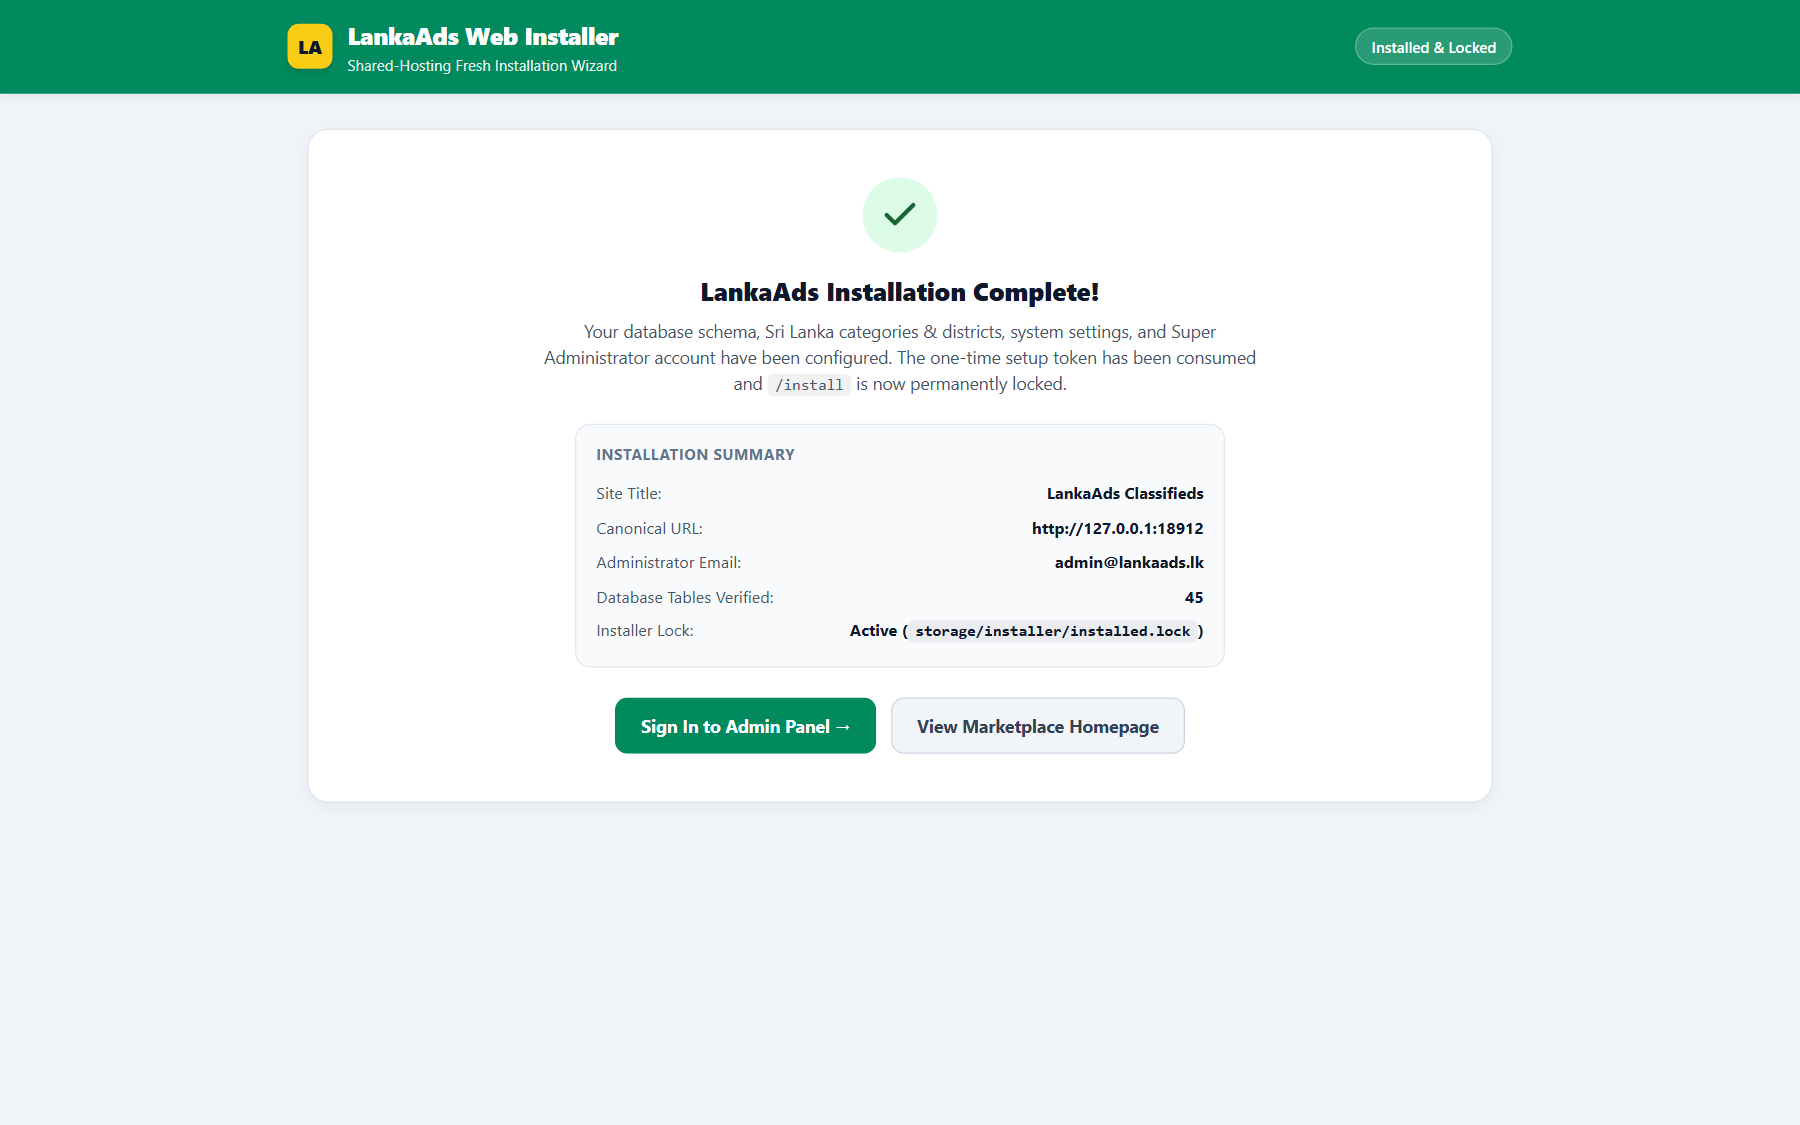
Installation Complete & Locked
Ready for LaunchUpon completion, the installer presents the confirmation card verifying that all 45 database tables have been created and the installer lock is engaged.
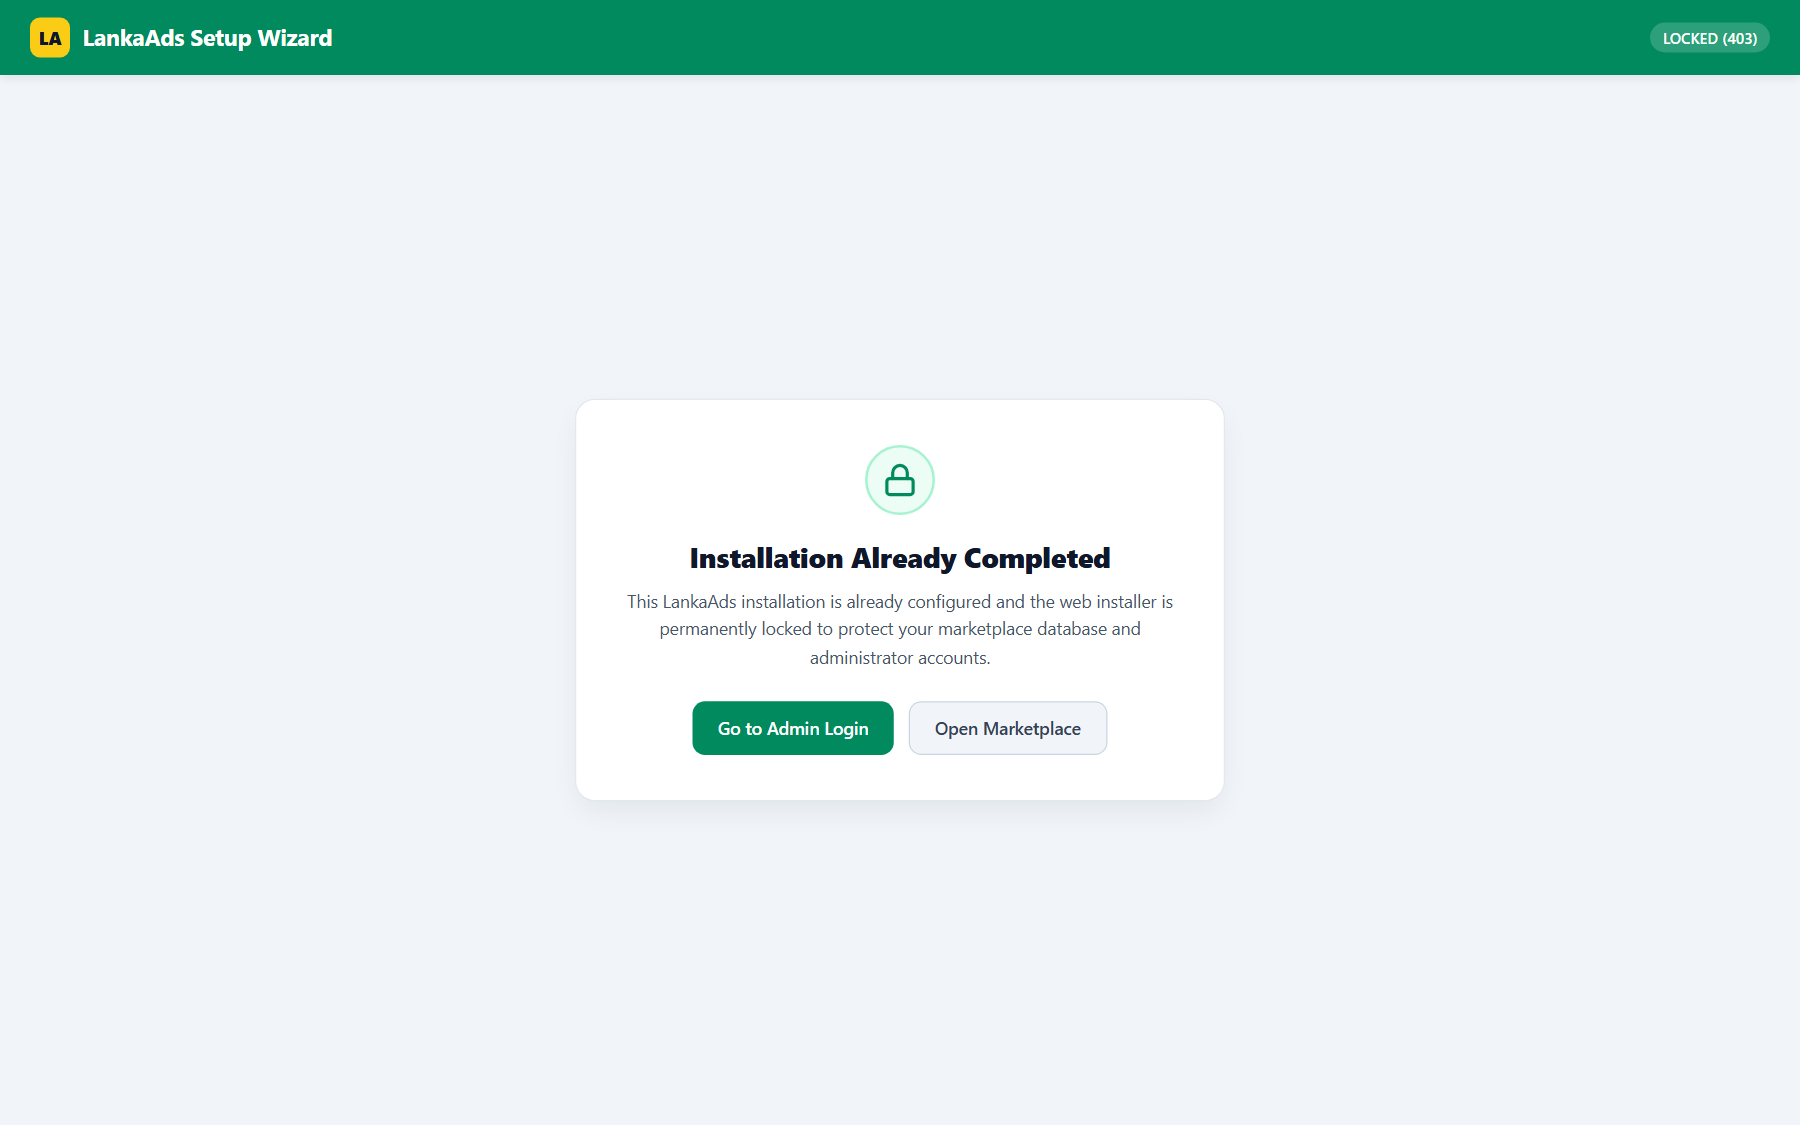
Any subsequent attempt to access /install displays the locked screen and blocks re-execution:
4. License Activation, Limits & Domain Migration
LankaAds validates your software license upon installation and caches the verified status locally in storage/license/license_state.json, ensuring your marketplace continues to run at maximum speed with zero external network delays on customer page visits.
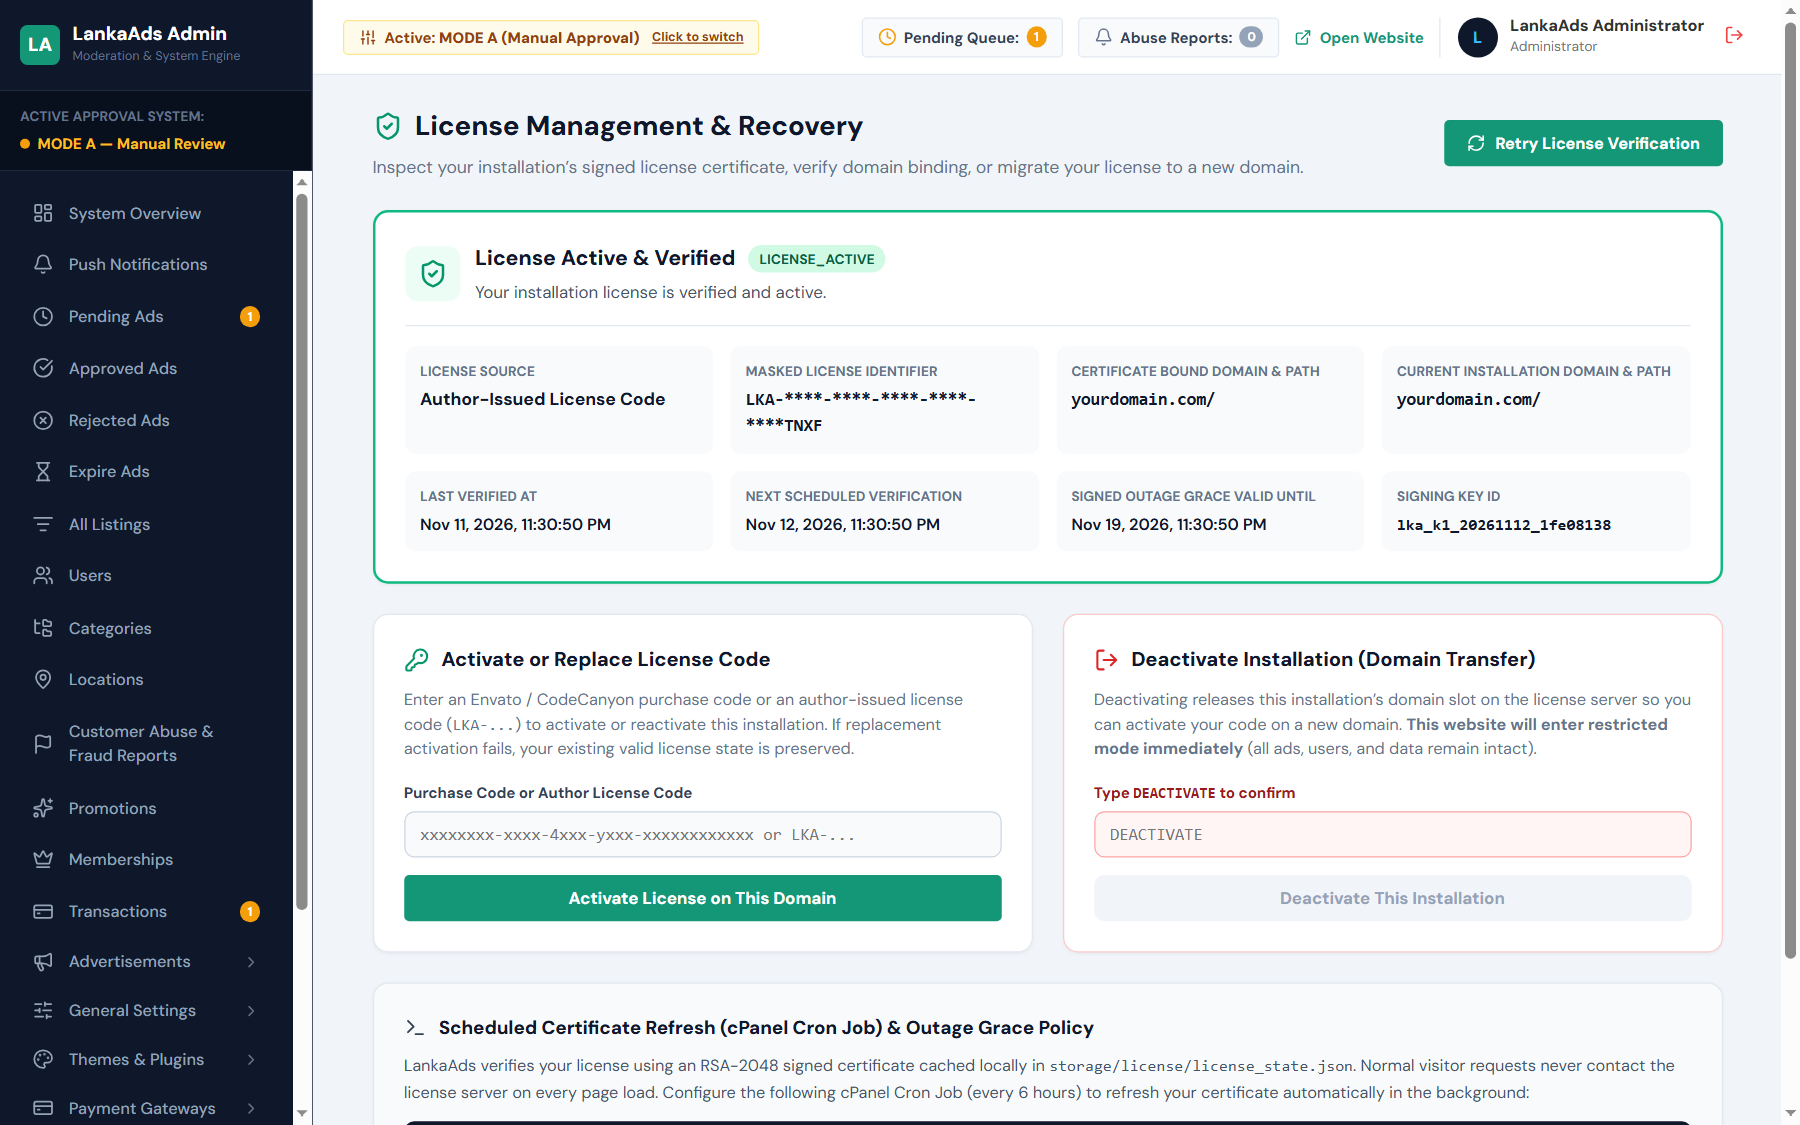
/admin/license).Supported License Formats & Verification Path
Author-Issued Manual License
Format: LKA-MAN-XXXX-XXXX-XXXX-XXXX
Direct licenses issued by the author for custom marketplace deployments, staging environments, or multi-domain volume clients.
Envato Purchase Code
Format: xxxxxxxx-xxxx-xxxx-xxxx-xxxxxxxxxxxx (UUID)
The standard 36-character purchase code provided upon purchasing LankaAds through CodeCanyon / Envato Market.
License Runtime States & Outage Grace Policy
| Runtime State | Condition | Customer / Public Behavior | Admin Behavior |
|---|---|---|---|
| active | Valid license certificate matching current domain and within the 24-hour recheck window. | Normal marketplace operation (200 OK). Zero remote calls. |
Full dashboard access. |
| active_grace | Certificate past 24h recheck window, but within 7-day outage grace period (valid_until). |
Normal marketplace operation (200 OK). Visitors never see warnings. |
Normal access + top banner notifying admin to re-verify license. |
| restricted | Domain mismatch (BINDING_HOST_MISMATCH), expired 7-day grace window, or revoked license. |
Neutral 503 Service Temporarily Unavailable maintenance page. Zero listings or customer data are deleted. |
Admins can still log in at /admin/login and access /admin/license to reactivate or update the key. |
- Log in to your Admin Panel on the current domain and go to Settings → License (
/admin/license). - Click the red Deactivate / Release Slot button. This releases the slot on the central license server.
- On your new domain, enter the license code during the Web Installer or in
/admin/licenseto bind the new domain. - Server already decommissioned? If you lost access to the old server before releasing the slot, submit a support request with your purchase code to have the slot reset manually.
5. Initial Setup & Platform Identity
After installation, sign in to your administrator dashboard at https://yourdomain.com/admin/login using your administrator email and password.
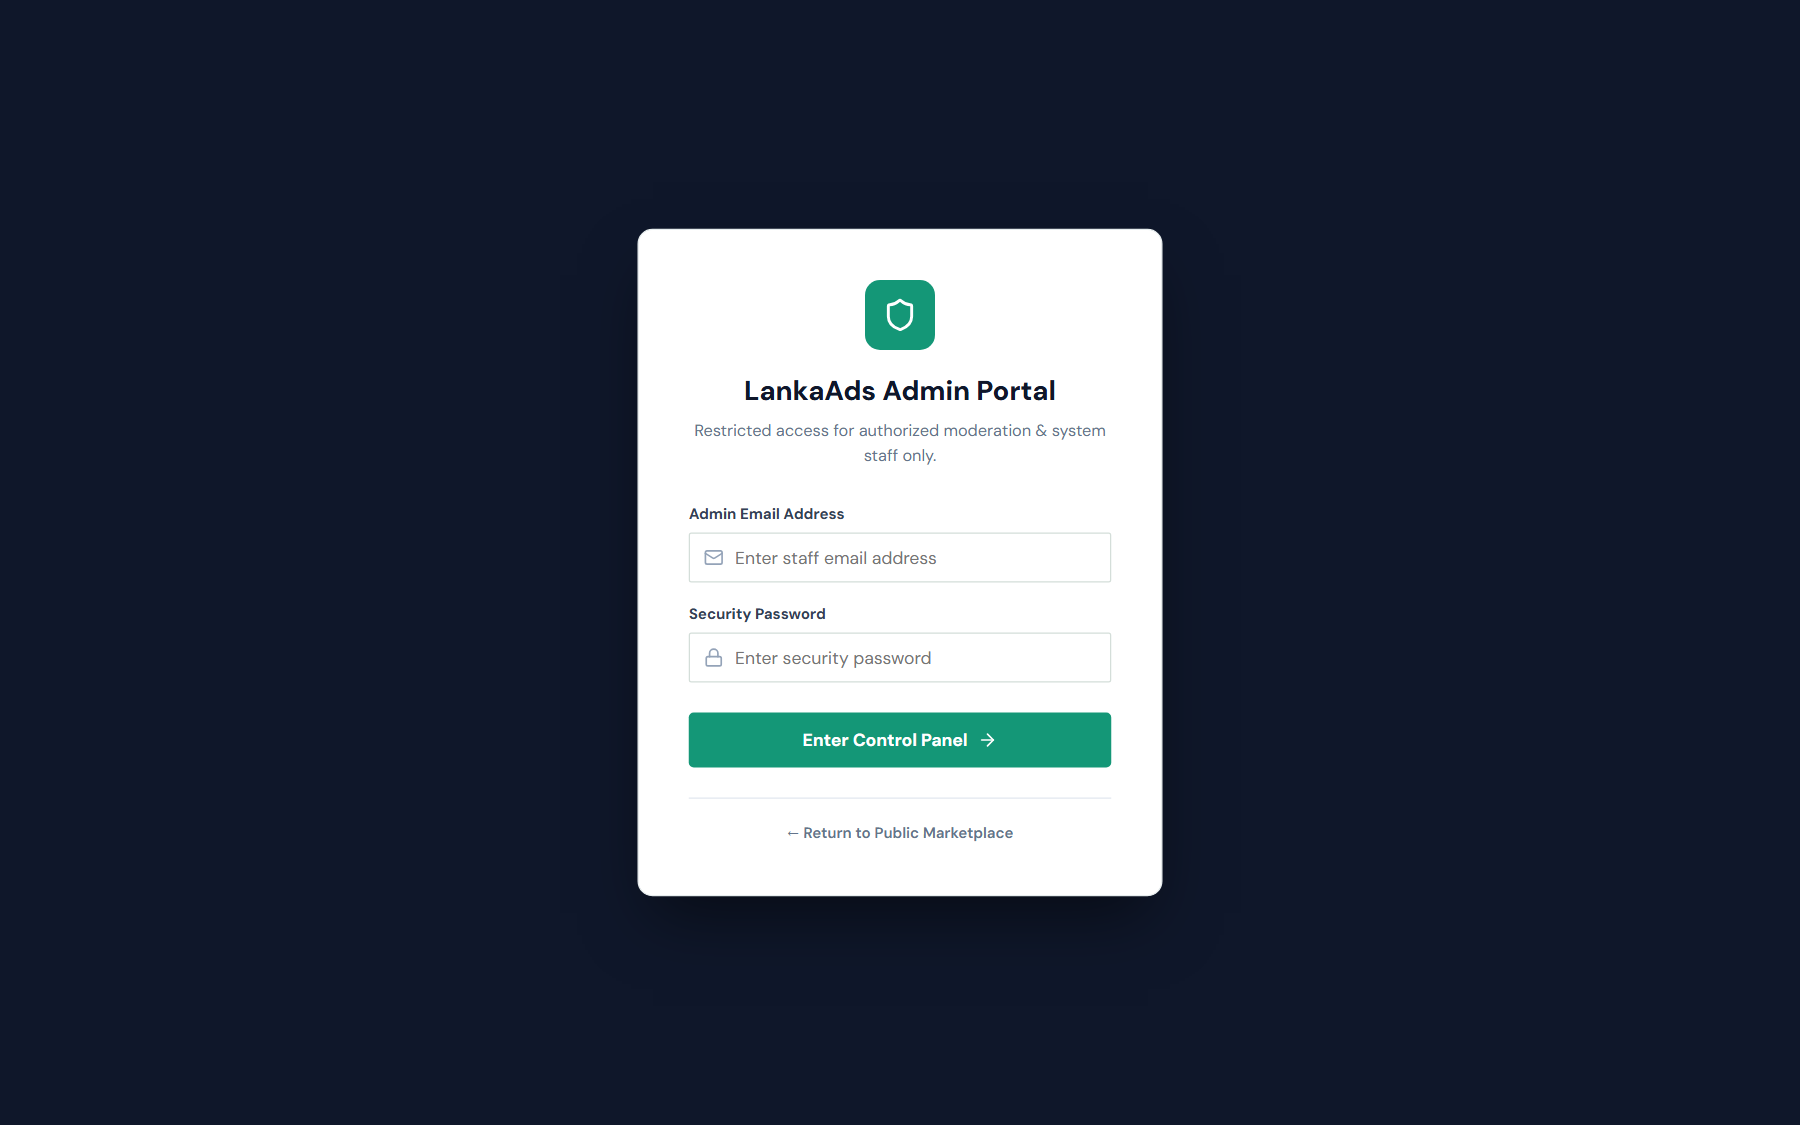
/admin/login).
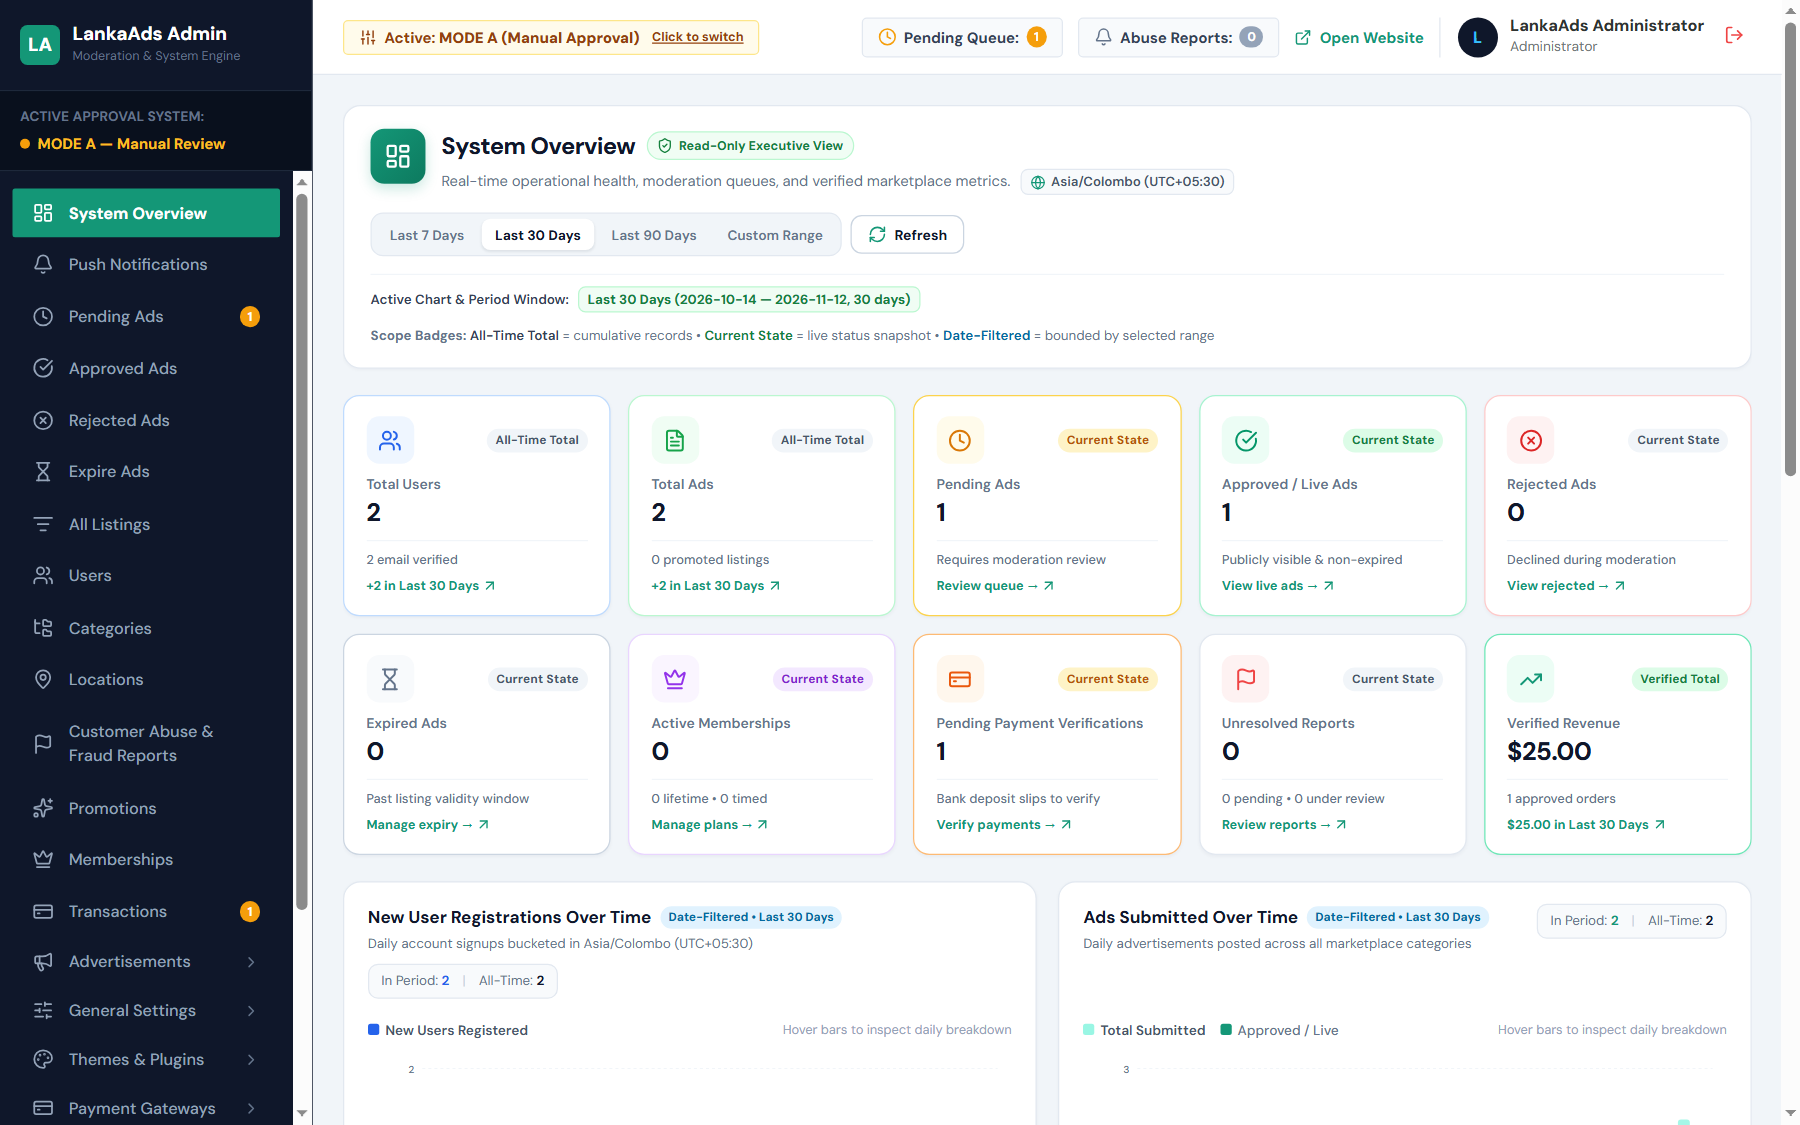
Upon signing in, you are greeted by the System Overview Dashboard (/admin/system-overview), displaying real-time metrics for total ads, pending moderation items, approved ads, registered users, and active revenue.
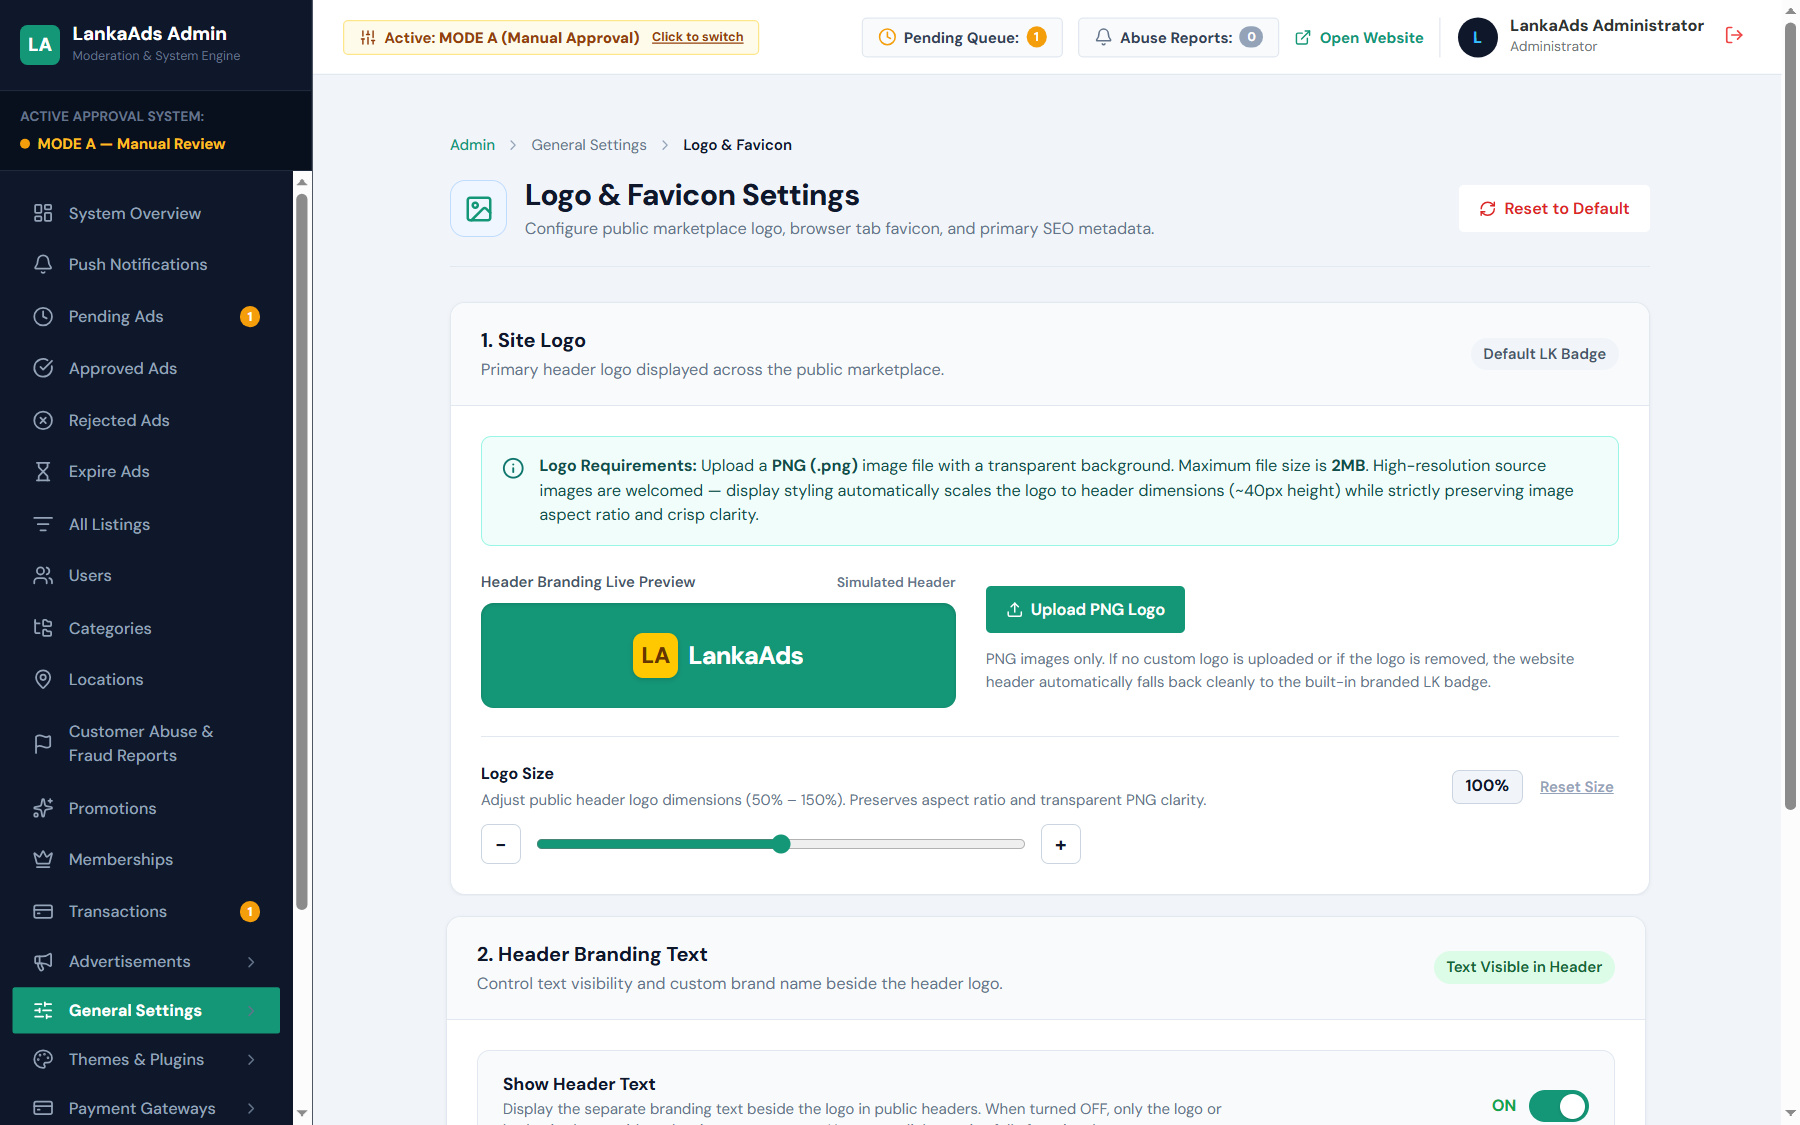
Platform Identity & Branding (Logo & Favicon)
Navigate to General Settings → Identity & Branding (/admin/general-settings?tab=logo-favicon) to customize your site appearance:
- Site Title: Displayed across browser tabs, emails, and OpenGraph social share cards.
- Header Logo: Upload your marketplace header logo (recommended: transparent PNG or SVG, max height 48px).
- Admin Sidebar Logo: Compact logo rendered in the top-left of the admin navigation pane.
- Favicon: 32x32 PNG or ICO icon displayed in web browser tabs.
Single-Currency Settlement Model (No Exchange Rate Drift)
LankaAds implements a Single Active Currency model (configured in /admin/general-settings?tab=currency-timezones). By design, there are no live exchange rate feeds or currency drift calculations. All listings, membership subscriptions, urgent/featured promotions, and bank transfer receipts settle strictly in your designated platform currency.
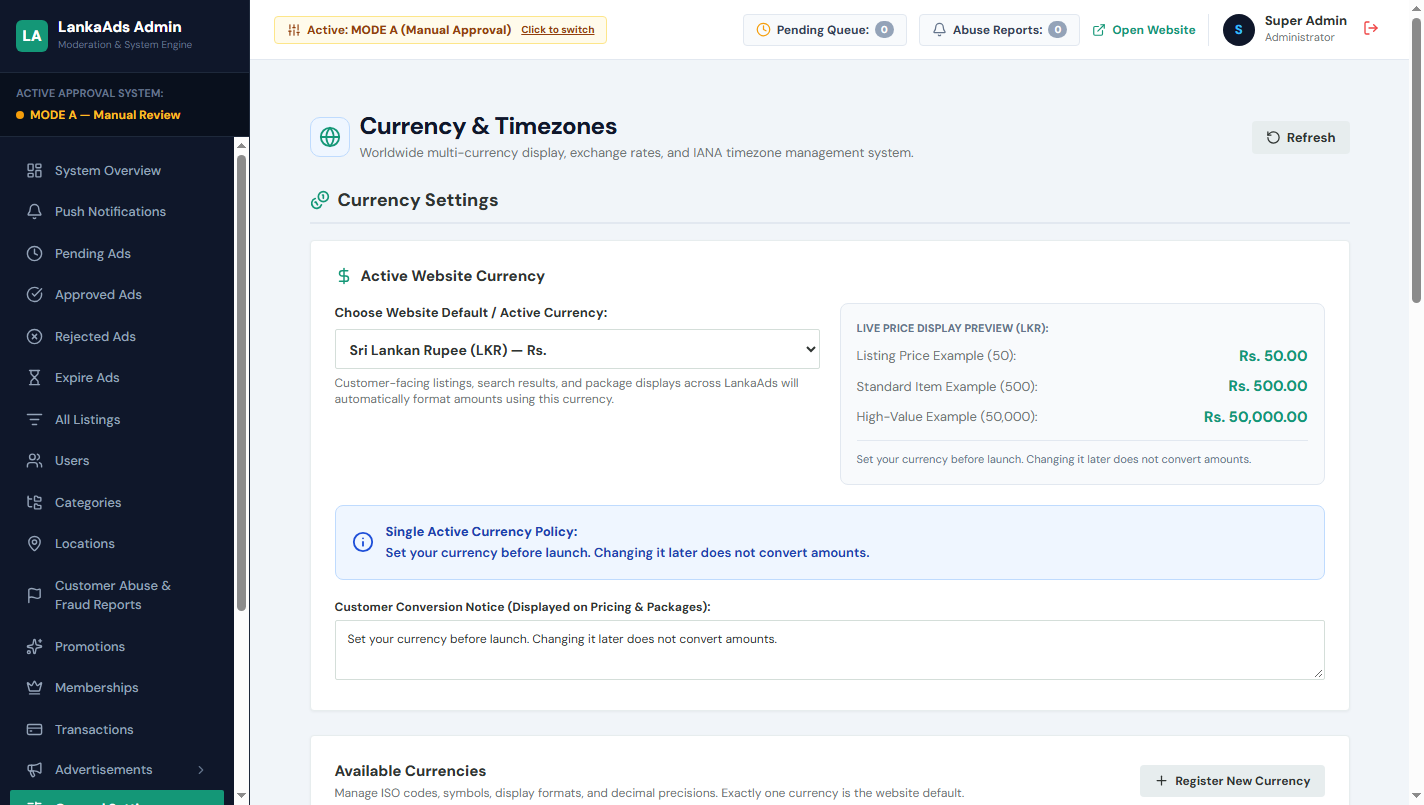
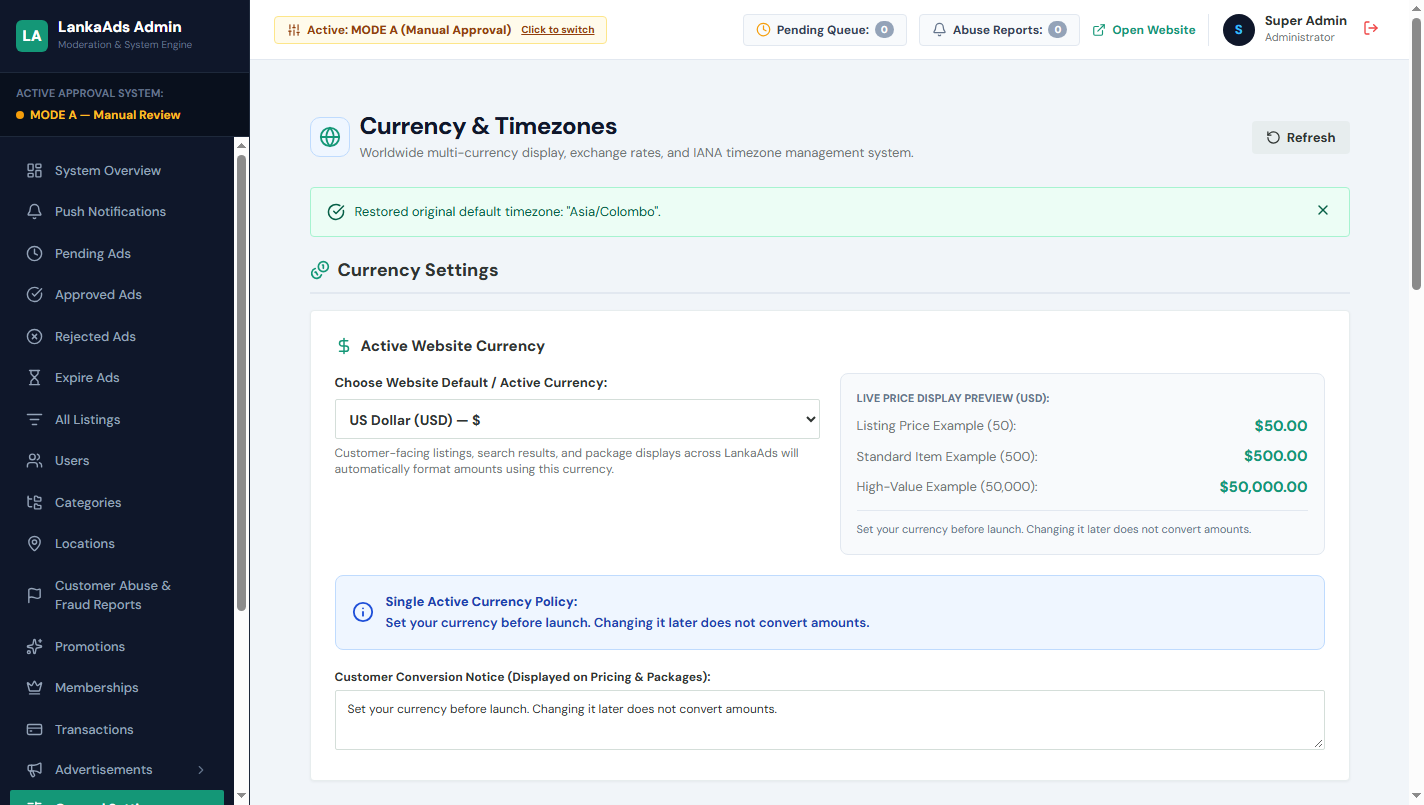
Timezone Baseline & International Adaptation
LankaAds defaults to Asia/Colombo (UTC+05:30) as its baseline default timezone, synchronized across:
- PHP runtime date-time formatting (
date_default_timezone_set()). - MySQL session timezone (e.g.
SET time_zone = '+05:30'). - Classified ad expiry countdowns and moderation audit timestamps.
You can select any valid IANA timezone worldwide in /admin/general-settings?tab=currency-timezones (e.g. America/New_York, Europe/London, Asia/Dubai, Australia/Sydney) or click Reset to Baseline at any time to restore Asia/Colombo.
Email & SMTP Configuration
To deliver transactional notifications (welcome emails, password resets, ad approval/rejection notices, bank slip verifications), configure your SMTP credentials in Settings → Email Settings:
- SMTP Host: (e.g.
mail.yourdomain.comorsmtp.sendgrid.net). - SMTP Port:
587(STARTTLS) or465(SSL/TLS). - SMTP Username & Password: Encrypted securely in the database using
CryptoService. - Sender Name & Email: (e.g.
LankaAds Notifications <noreply@yourdomain.com>).
Click Send Test Email to verify outbound connectivity before enabling mandatory email verification.
6. Users, Roles & Permissions
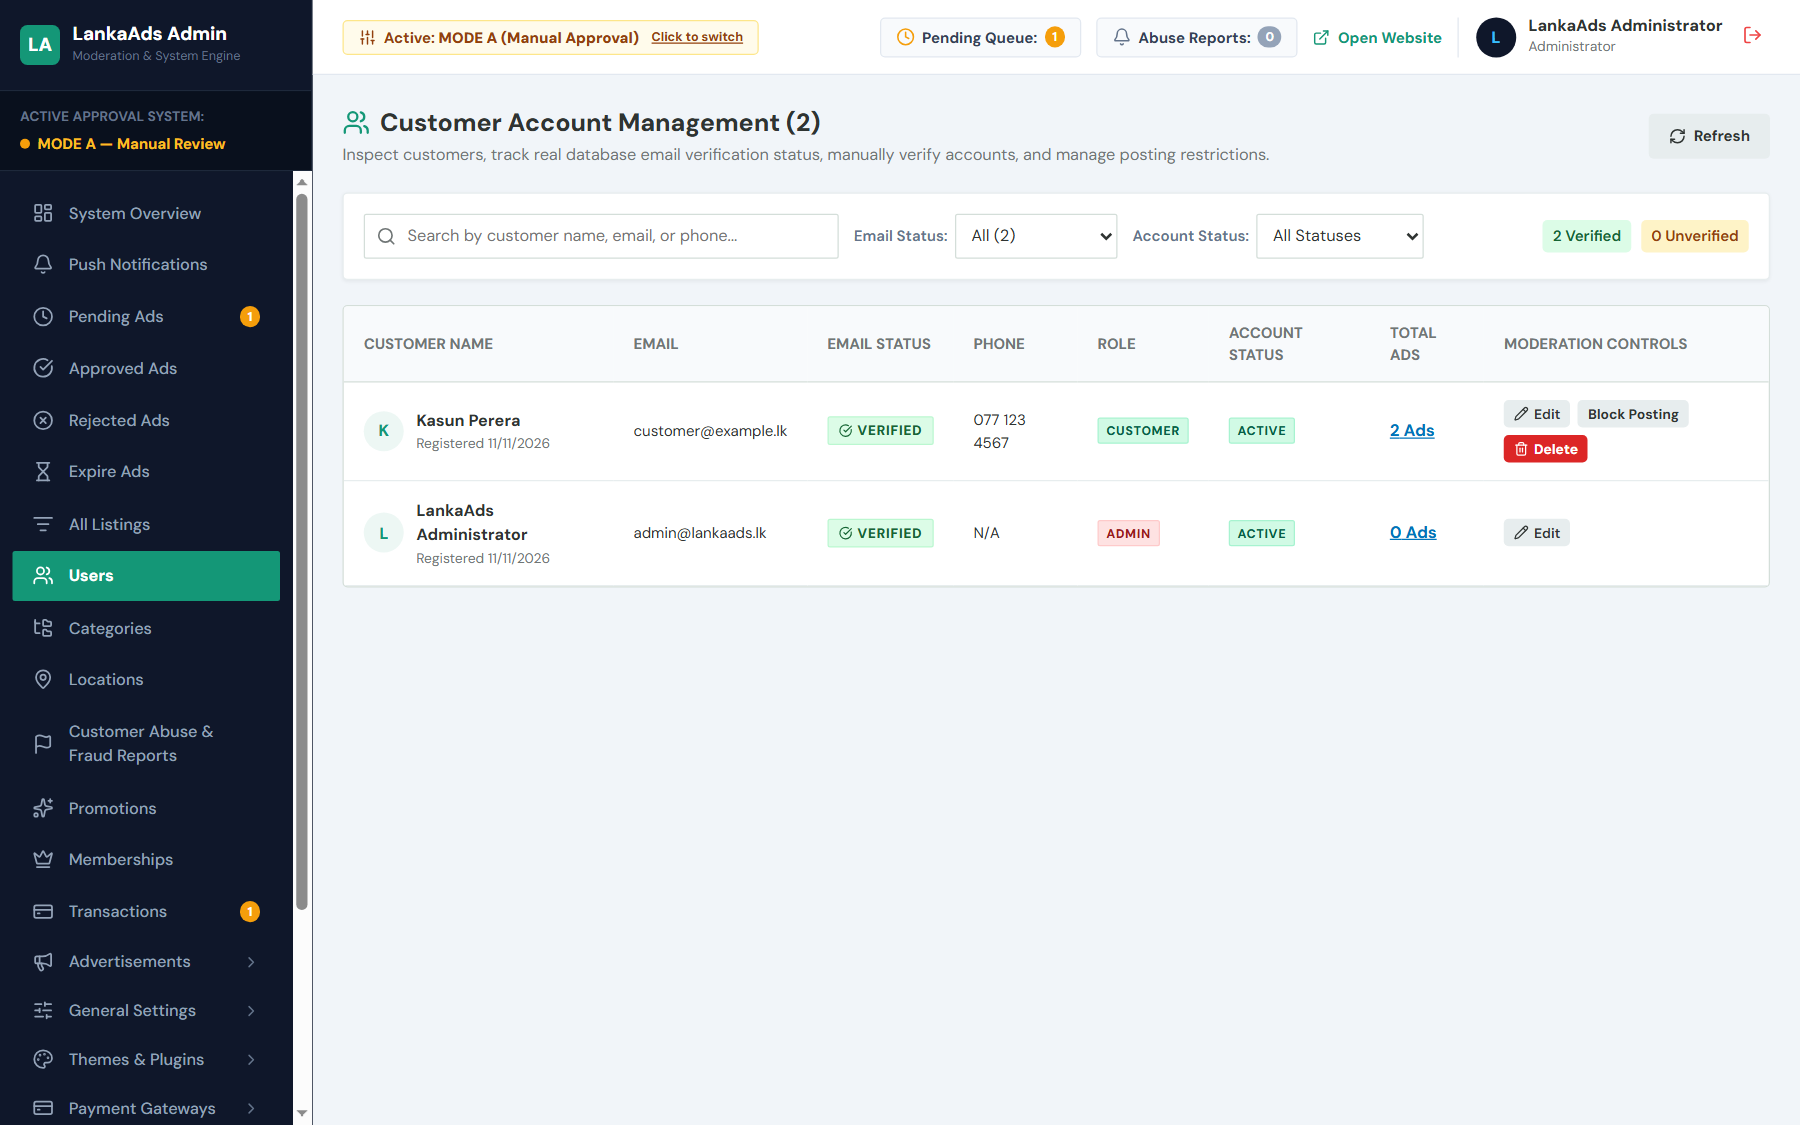
LankaAds enforces strict Role-Based Access Control (RBAC) defined in App\Services\PermissionPolicy. Every user is assigned exactly one role:
| Role | Access Boundary | Default Landing Path & Description |
|---|---|---|
| admin | Full Super Administrator access across all 22 backend sections. | /admin/system-overview — Can manage users, categories, locations, themes, payment gateways, system updates, and licenses. |
| moderator | Strictly restricted to exactly 11 operational sections. Denied from system core settings. | /admin/pending-ads — Operational staff who review ads, manage promotions, memberships, transactions, and banners. |
| customer | Public marketplace and customer account portal only. | /my-account — Registered sellers and buyers who post ads, upload bank slips, and purchase memberships. |
The 11 Moderator Allowed Sections
When hiring community moderators to review listings, you can create accounts with the moderator role. Moderators are permitted into exactly these 11 areas:
1. Push Notifications
Send and schedule browser push notifications to subscribers (/admin/push-notifications).
2. Pending Ads
The primary review queue for newly submitted or edited listings (/admin/pending-ads).
3. Approved Ads
Search and inspect live active marketplace listings (/admin/approved-ads).
4. Rejected Ads
View declined advertisements and recorded rejection reasons (/admin/rejected-ads).
5. Expire Ads
Inspect expired listings and manually trigger cleanup/archival (/admin/expire-ads).
6. All Listings
Global listing search across all statuses with quick edit capability (/admin/listings).
7. User Reports
Investigate visitor reports regarding spam, counterfeit items, or abuse (/admin/reports).
8. Promotions
Manage active Urgent and Featured listing promotions (/admin/promotions).
9. Memberships
Review user membership packages and active customer subscriptions (/admin/memberships).
10. Transactions
Verify uploaded bank deposit slips and approve/reject orders (/admin/transactions).
11. Advertisements & Banners
Upload and manage custom promotional banners (/admin/settings/banners).
403 Forbidden) from:
System Overview (financial totals), User Accounts (/admin/users), Categories (/admin/categories), Locations (/admin/locations), General Settings (/admin/general-settings), Themes & Colors (/admin/themes), Payment Gateways Configuration (/admin/payment-gateways), Audit Logs (/admin/audit-logs), License Management (/admin/license), and Signed System Updates (/admin/system-updates).
Listing Moderation Workflow
If Approval Mode is enabled in /admin/approval-settings, newly posted listings and seller edits are routed to Pending Ads (/admin/pending-ads):
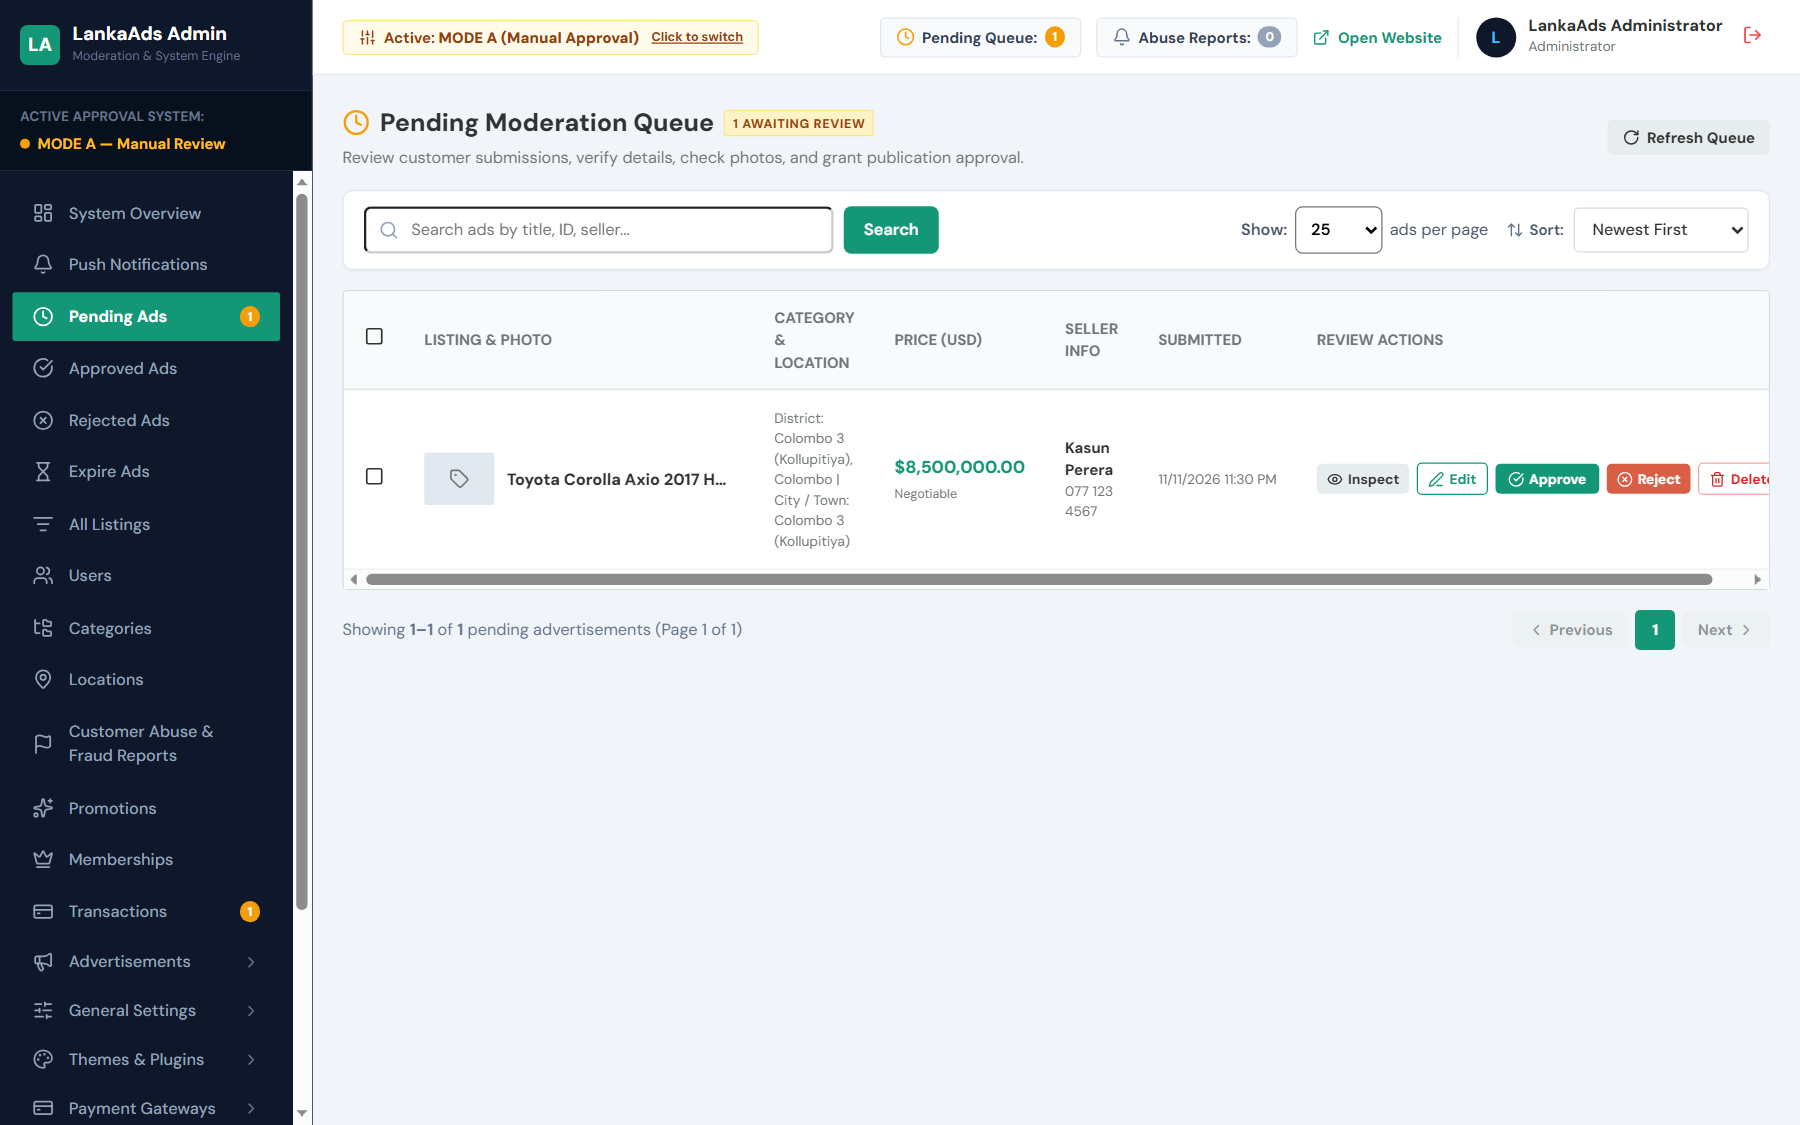
- Approve: Immediately publishes the listing to the public marketplace, generates watermarked images, stamps the moderator ID, and sends an approval email to the seller.
- Reject: Opens a rejection modal to select or type a specific reason (e.g. "Low resolution photos" or "Incorrect district selected"). LankaAds automatically dispatches the
advertisement_rejectedemail with the reason so the seller can edit and resubmit their ad from/my-account.
7. Categories, Locations & Ad Management
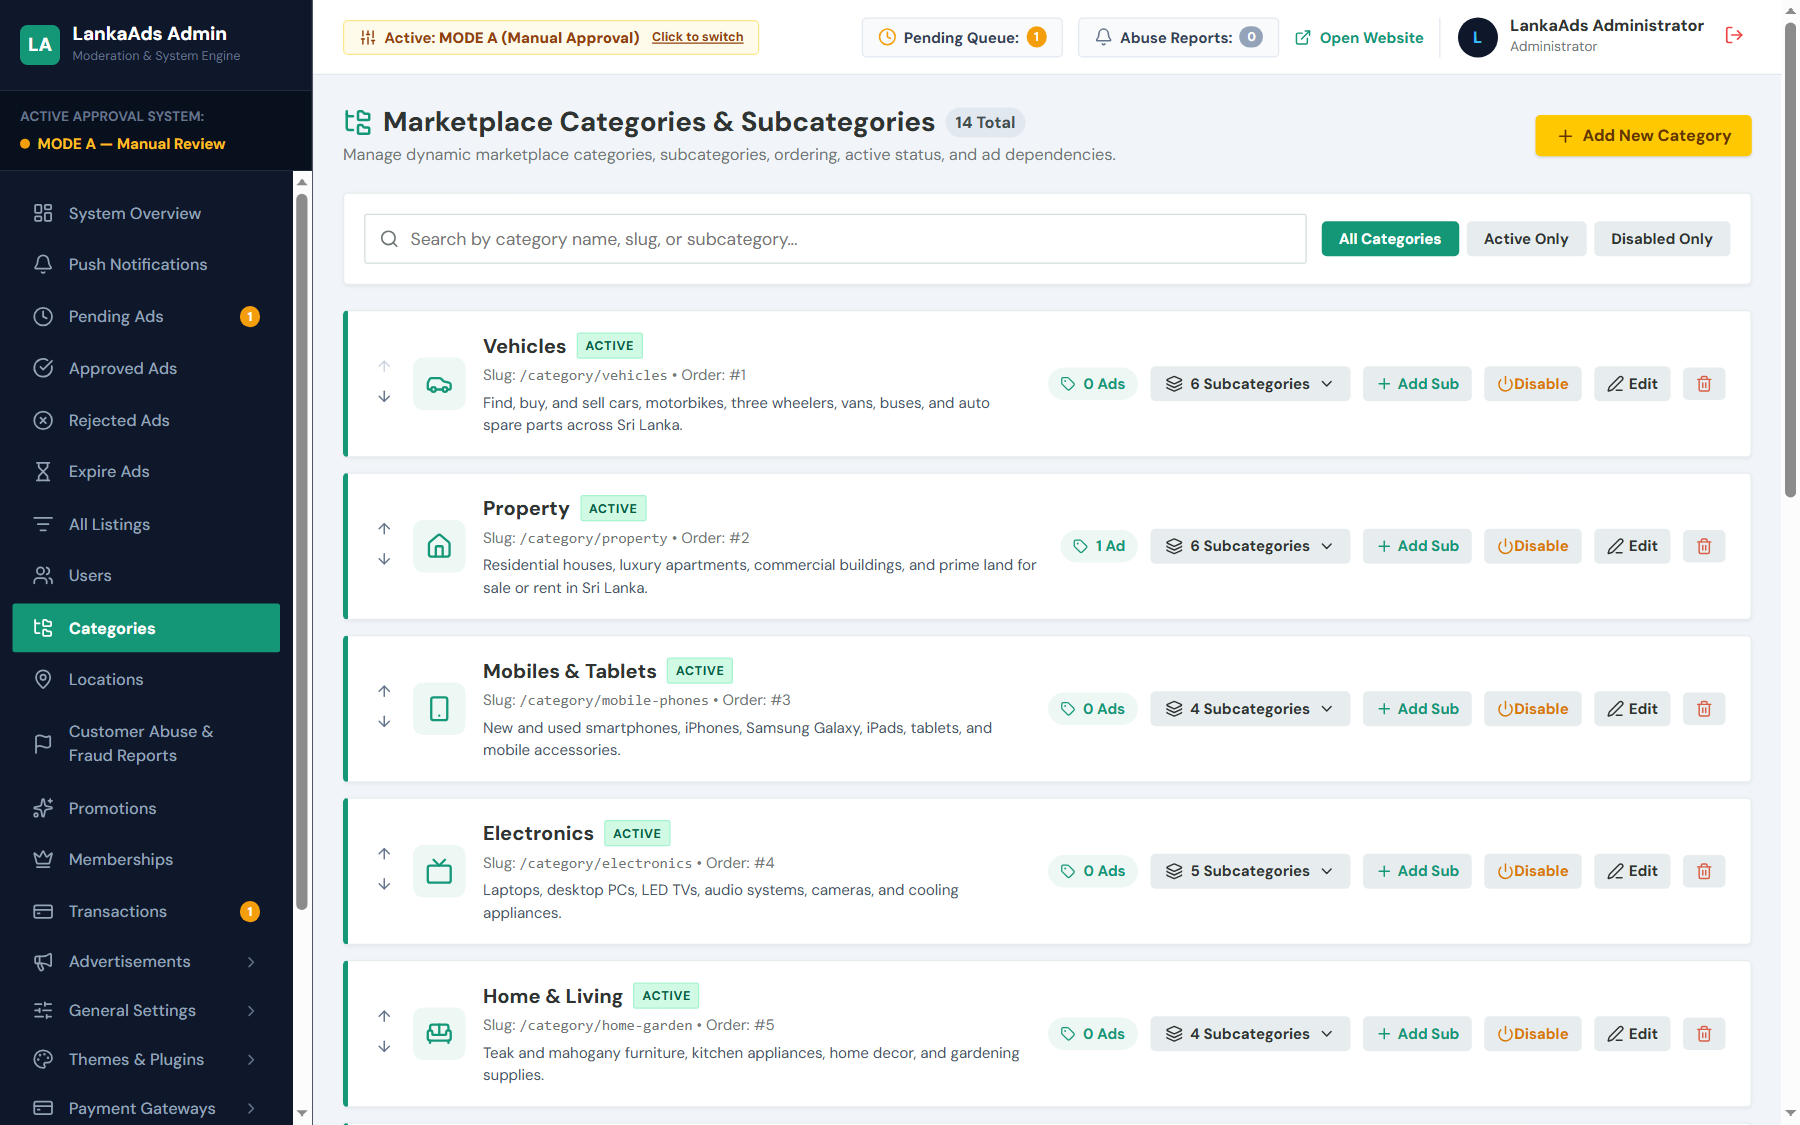
LankaAds includes a flexible categorization engine that supports unlimited categories, nested subcategories, and category-specific custom specifications:
Locations & Geographical Hierarchy
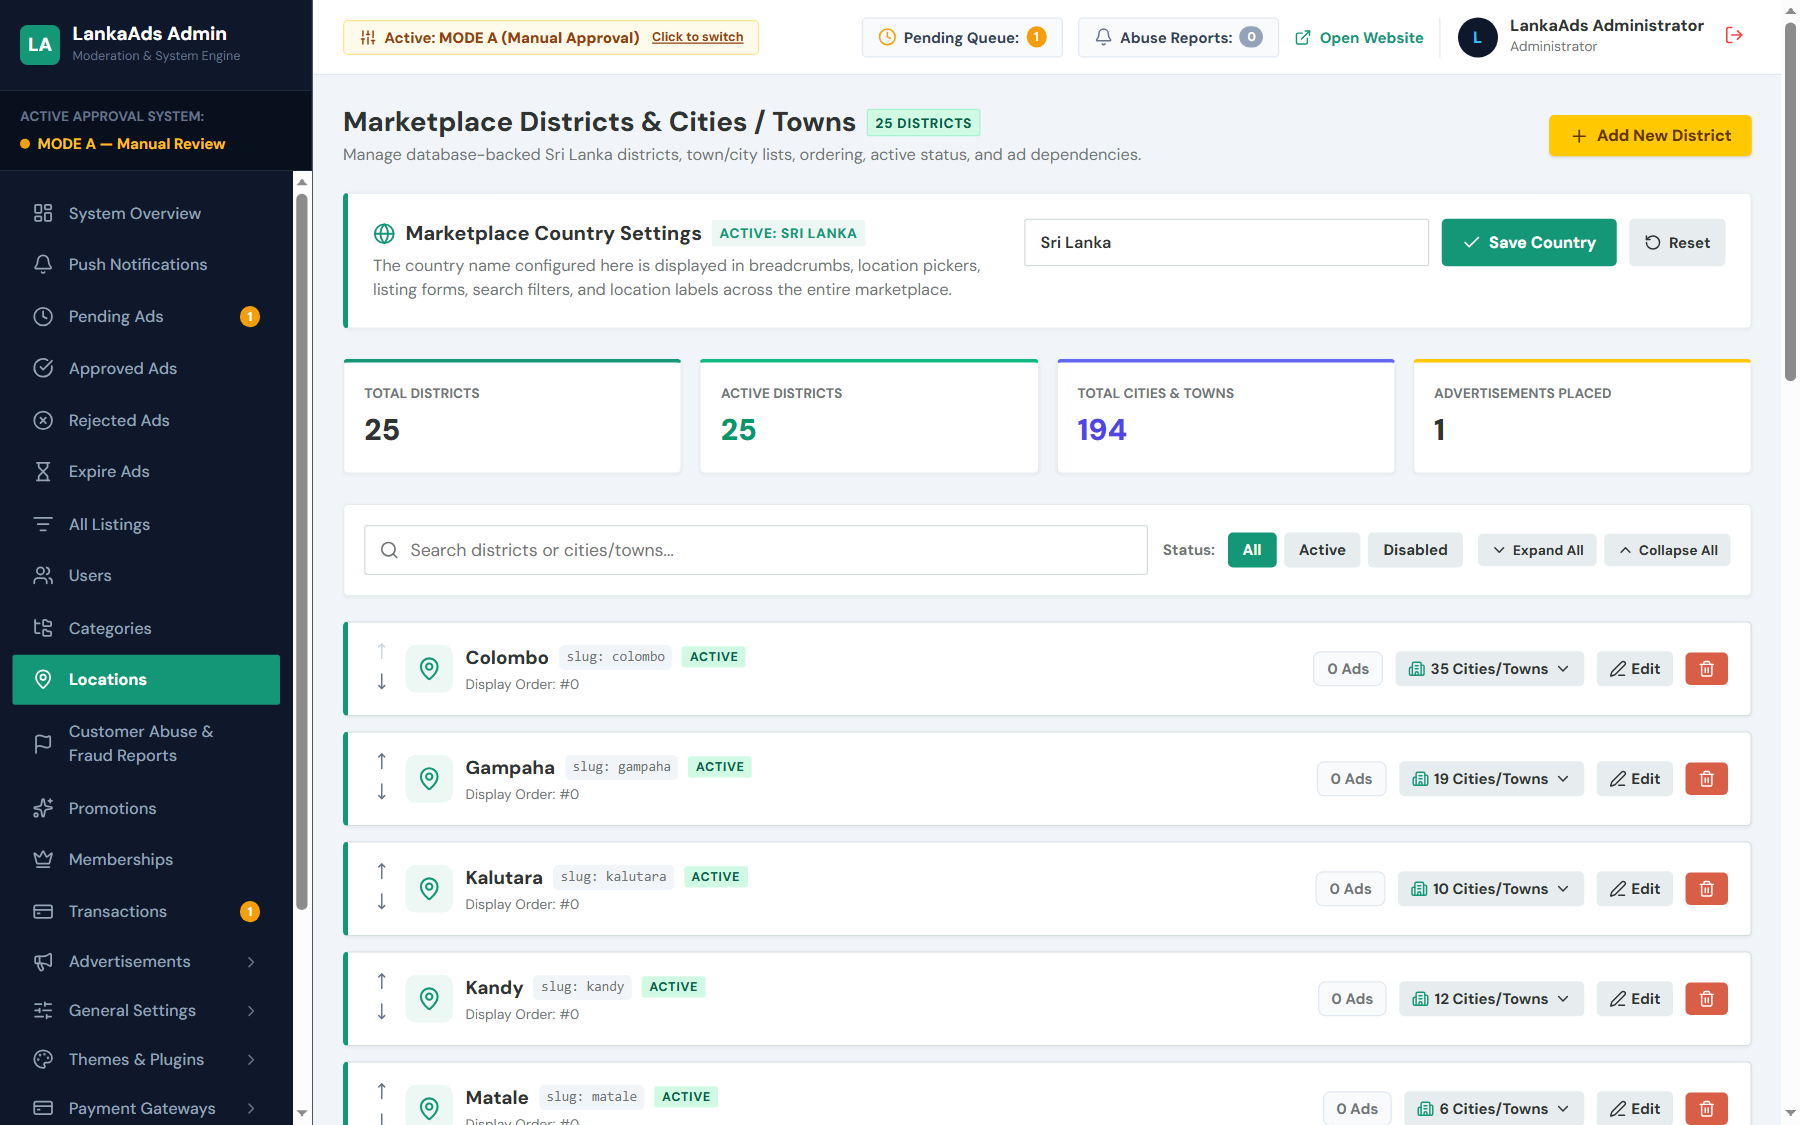
The software ships with the complete administrative geography of Sri Lanka (9 Provinces, 25 Districts, and hundreds of cities) as its default blueprint. In Settings → Locations (/admin/locations), operators can edit, delete, or create new countries, provinces, states, districts, and cities for any regional market:
The Public Ad Posting Workflow (/post-ad)
Customers submit classified listings through a visual multi-step wizard:
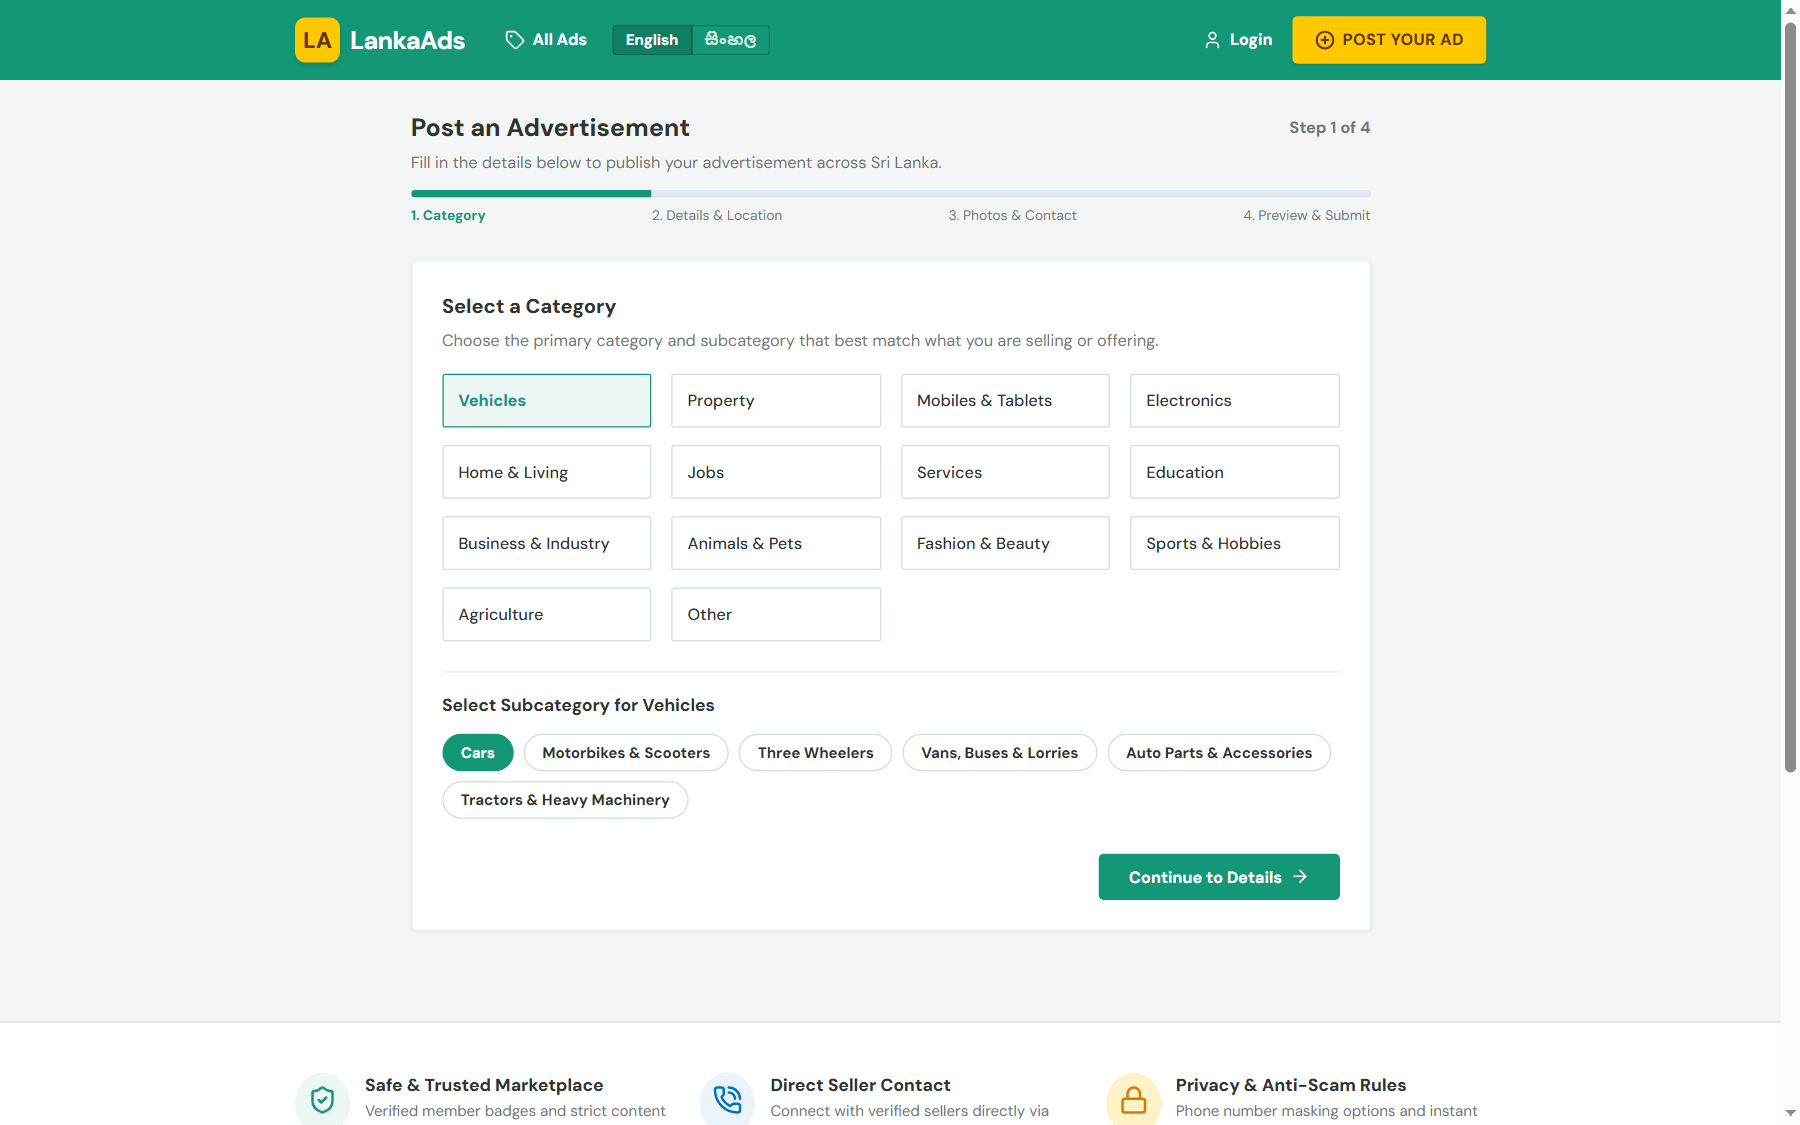
/post-ad).- Category Selection: Choose primary category (e.g. Vehicles) and subcategory (e.g. Cars).
- Location Selection: Select District and City/Town.
- Specifications: Dynamically generated custom fields (e.g. Brand, Model, Year of Manufacture, Mileage, Fuel Type, Transmission).
- Pricing: Enter price with an optional Negotiable toggle switch.
- Photos Upload: Drag & drop multiple listing photos. The server automatically optimizes image sizes and applies your custom watermark.
- Contact Details: Verified phone number and optional direct WhatsApp chat button.
8. Manual Bank Payments, Transactions & Memberships
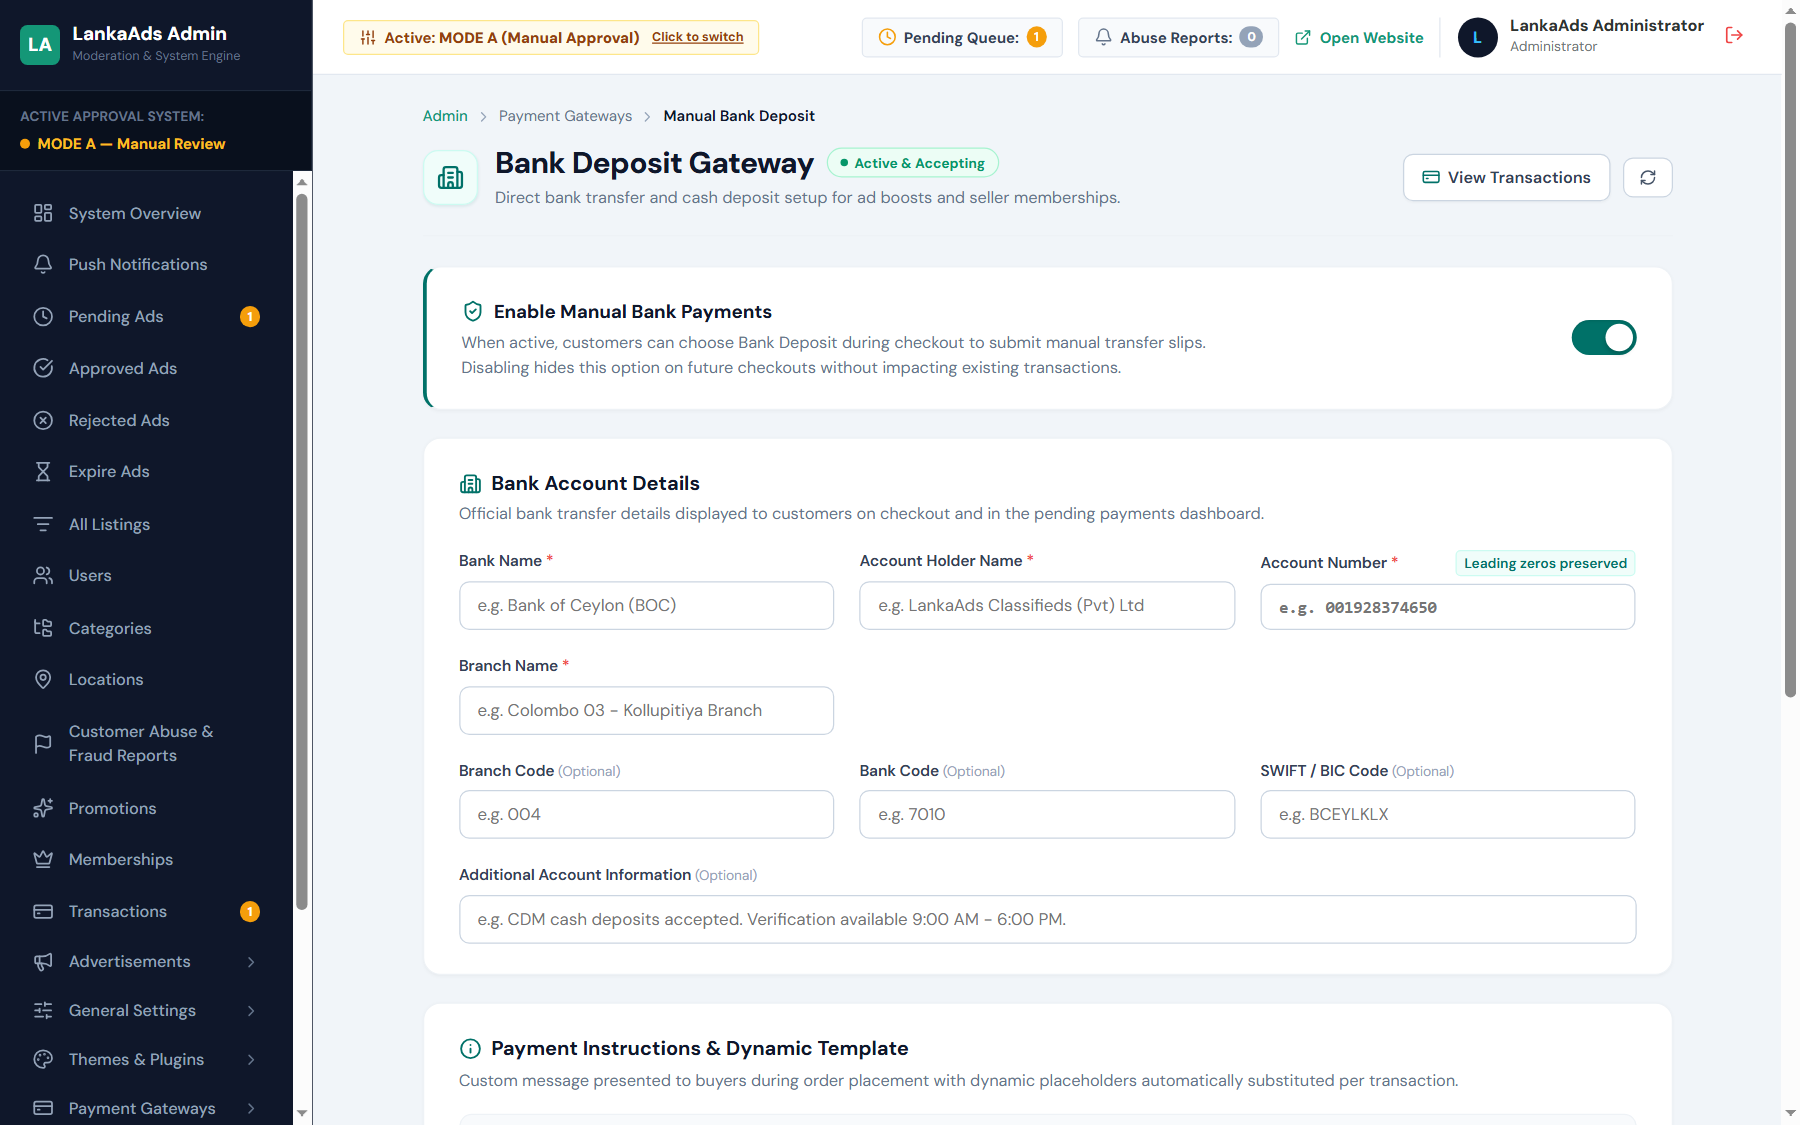
LankaAds includes an offline Bank Transfer / Direct Deposit Gateway designed for local banks and direct wire transfers.
/admin/payment-gateways).Bank Transfer Receipt Submission & Verification Workflow
- When purchasing a membership or ad promotion, the customer selects Bank Transfer.
- The system displays your account details (Bank Name, Account Number, Branch, and Reference Code instructions).
- The customer deposits funds at a bank branch, online banking portal, or CDM kiosk and uploads a photo or PDF of the deposit slip.
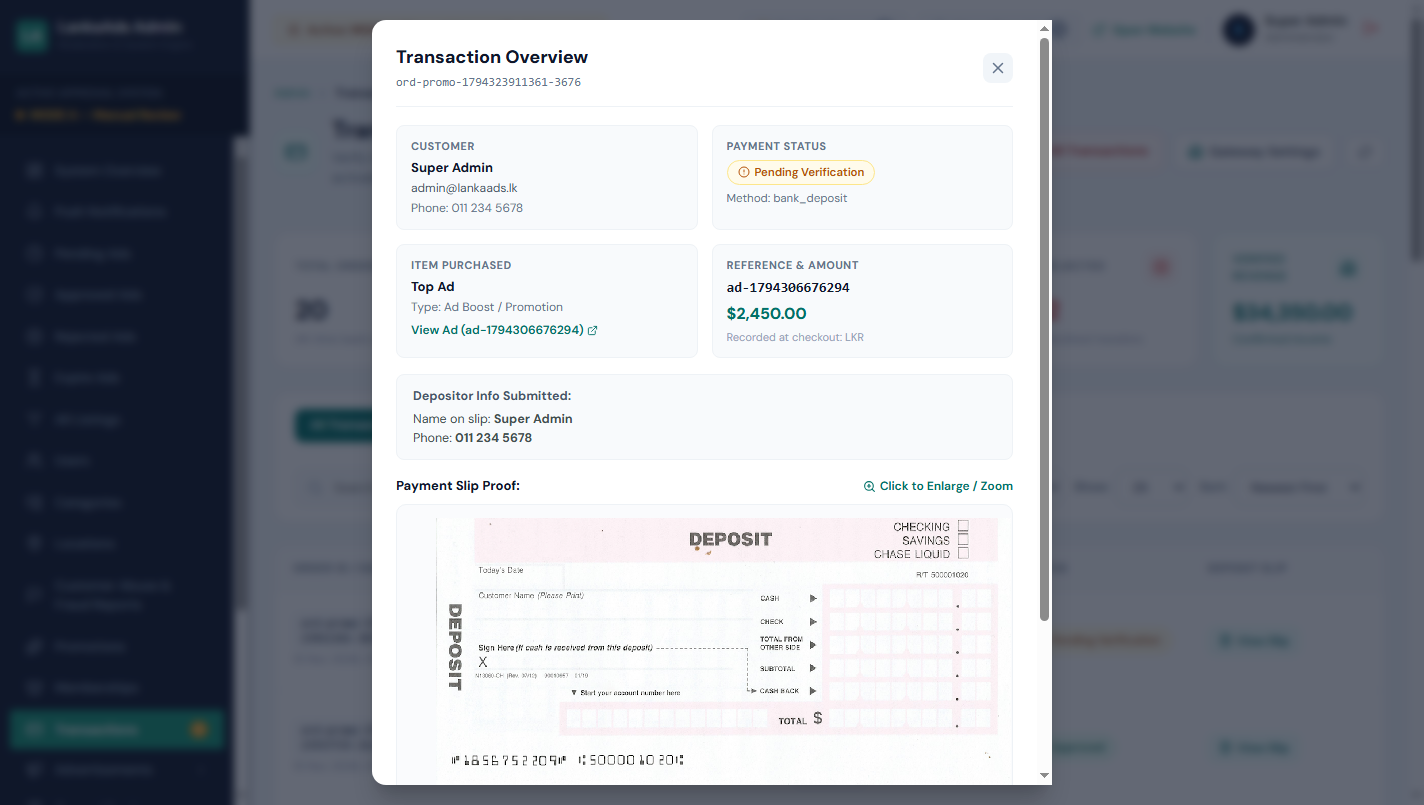
- The transaction appears in Admin → Transactions (
/admin/transactions) marked aspending_verification. - The admin or moderator inspects the slip in the Transaction Detail Modal and clicks Approve or Reject.
- Upon approval, the system automatically activates the membership package or applies the Urgent/Featured promotion badges to the listing.
Membership Packages (Free, Silver, Gold, Platinum)
Monetize your marketplace by offering tiered subscription packages for volume dealers, real estate agents, and commercial stores:
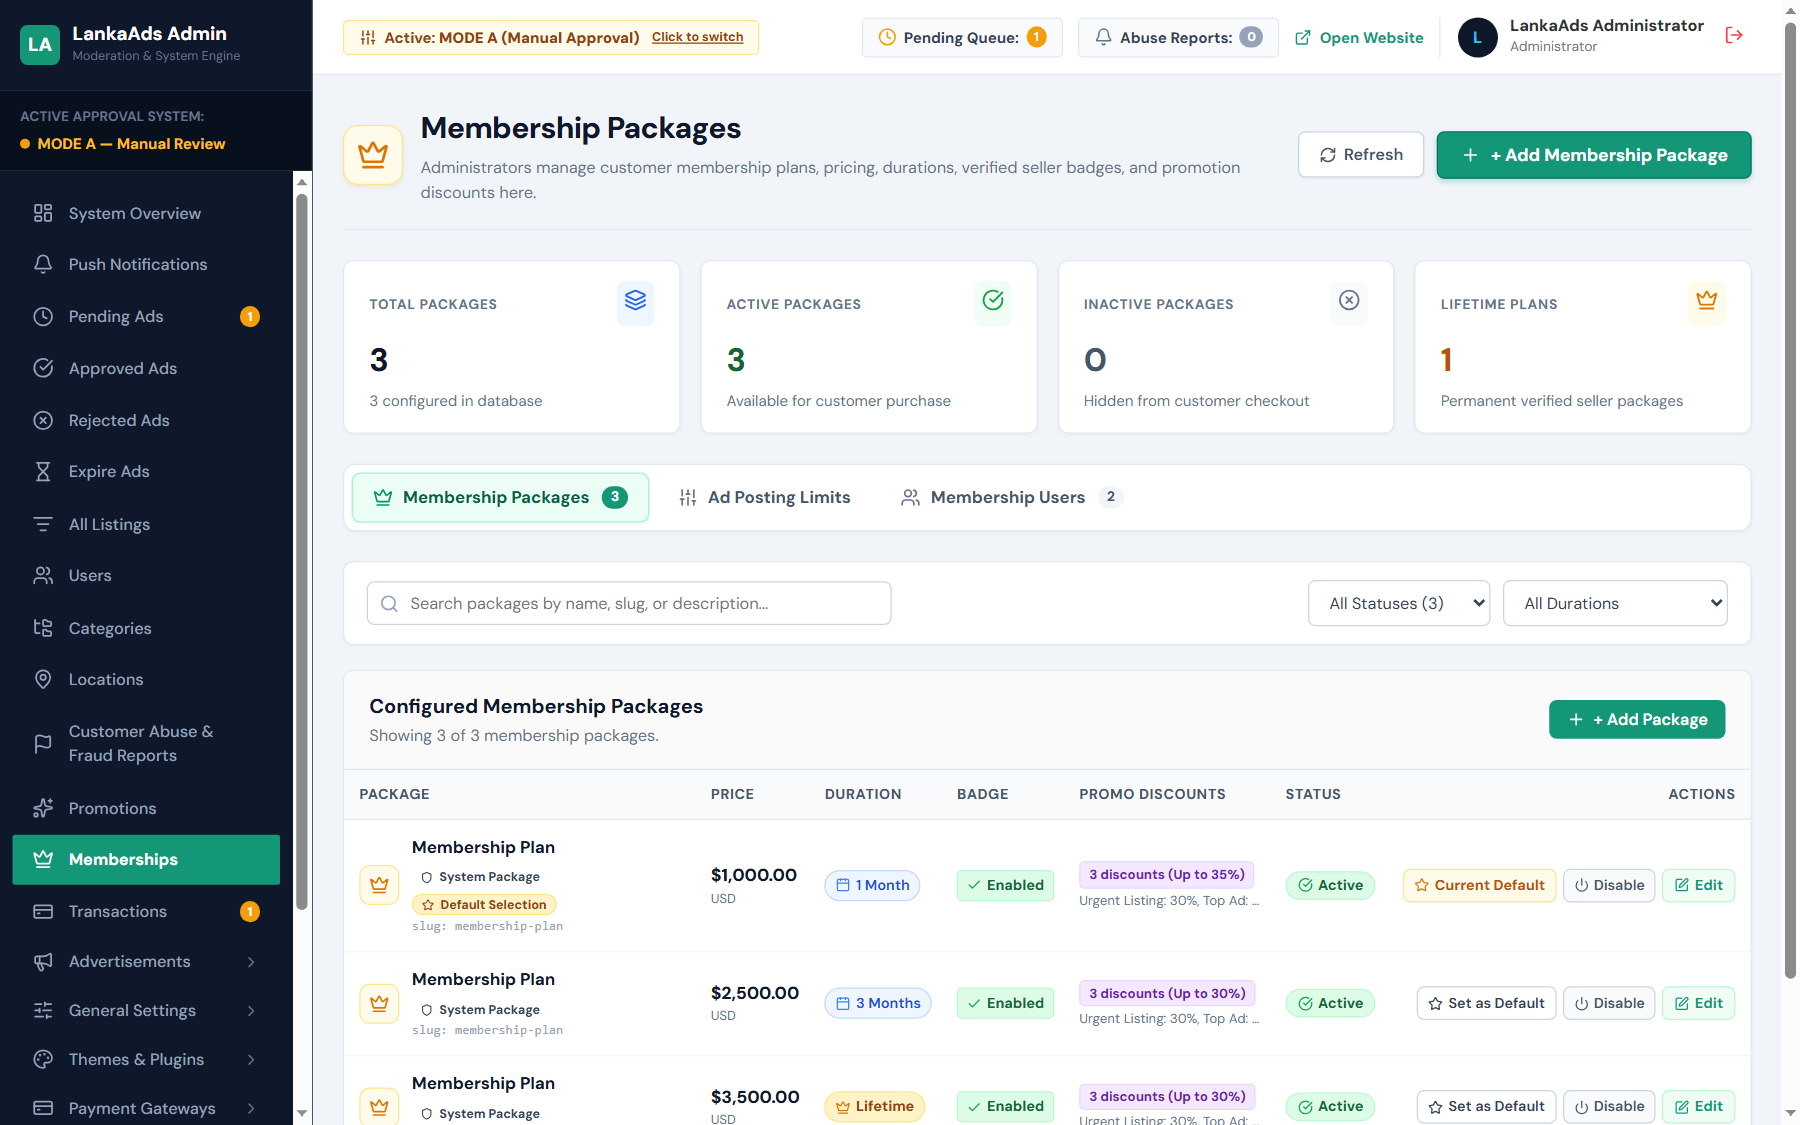
/admin/memberships).| Tier | Ad Limit | Duration | Badge | Features Included |
|---|---|---|---|---|
| Free / Starter | 3 Active Ads | 30 Days | Standard | Standard listing duration, basic store profile. |
| Silver Member | 15 Active Ads | 30 Days | Silver | Silver verified dealer badge, priority customer support. |
| Gold Member | 50 Active Ads | 30 Days | Gold | Gold badge, dedicated store page, 2 free Urgent bumps. |
| Platinum Dealer | Unlimited | 30 Days | Platinum | Top search placement, custom store banner, direct WhatsApp button. |
Listing Promotions: Featured & Urgent Badges
Sellers can boost individual listings without subscribing to a monthly membership:
- Featured Ad: Pinned to the top of category search results and displayed in the homepage Featured Ads Carousel with a prominent golden badge.
- Urgent Ad: Displays a high-contrast red URGENT badge, signaling immediate availability to interested buyers.
9. CMS & Customization
LankaAds includes comprehensive visual styling, content management, and localization controls so you can match your company's corporate branding and regional preferences without touching code:
Theme Package Information & Preview (/admin/themes)
The Themes section in the administrator console provides an overview of your active marketplace layout, theme package metadata, and author attribution:
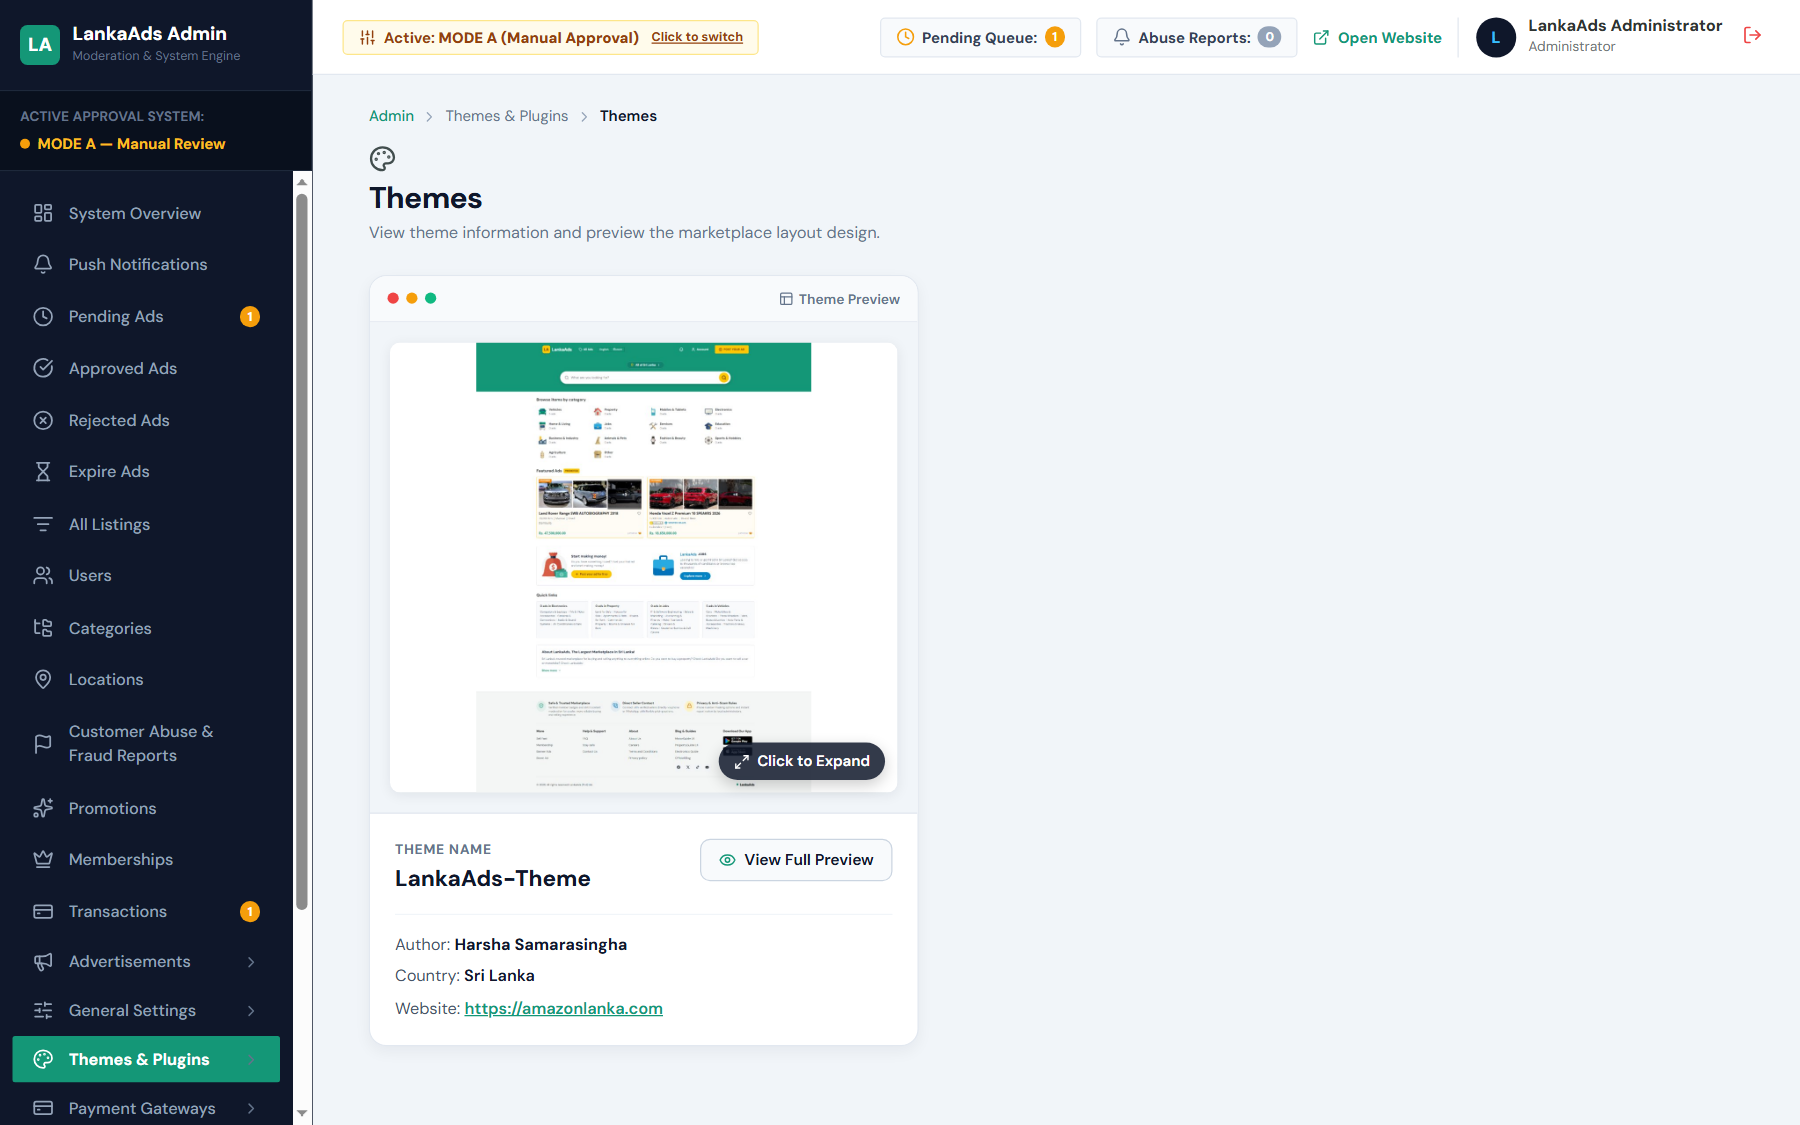
/admin/themes) displaying theme package details and author attribution.- Theme Identification: Displays current active theme name, author, release version, and feature summary.
- Responsive Preview: Open the built-in preview modal to inspect the theme across desktop, tablet, and mobile viewport simulations before applying changes.
Website Colors Management (/admin/website-colors)
Live marketplace color customization is managed independently from the theme card on the dedicated Website Colors page (/admin/website-colors). This interface gives you fine-grained control over public styling with real-time preview and accessibility contrast checking:
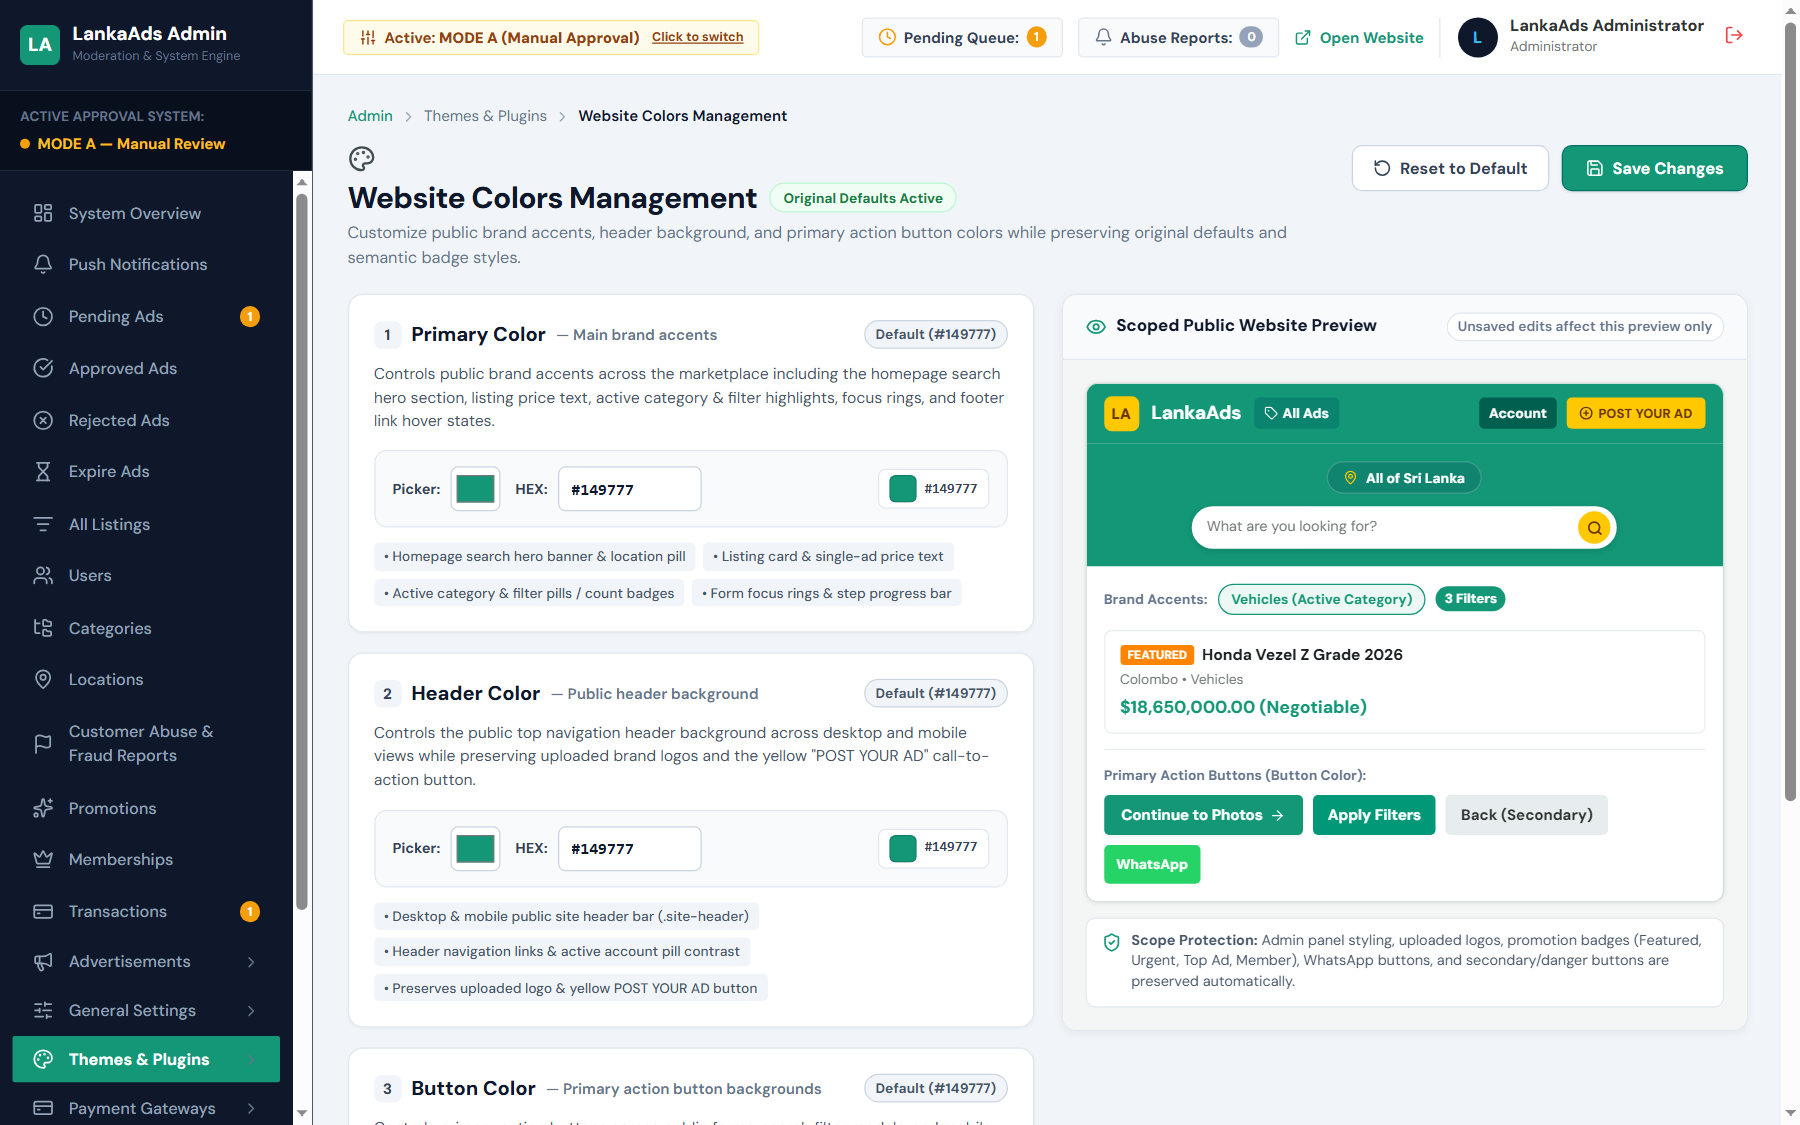
/admin/website-colors) with live palette controls, HEX code inputs, and real-time contrast preview.LankaAds provides 3 primary visual brand color controls:
-
Primary Color (
primaryColor, Default:#10b981):
Controls public brand accents across the entire marketplace, including the homepage search hero banner, listing price labels on cards and detail views, active category and filter pills, count badges, focus rings on form inputs, and step progress indicators. -
Header Color (
headerColor, Default:#0f172a):
Controls the top fixed navigation header background color. The engine dynamically calculates font contrast to ensure navigation links, category menus, and user account buttons remain crisp and readable against both light and dark backgrounds. -
Button Color (
buttonColor, Default:#10b981):
Controls primary high-visibility call-to-action buttons, including the prominent Post Free Ad button in the header, search submission buttons, form submit buttons, and active category badges.
Interactive Tools: Use the live visual color picker or input exact 6-character hex codes (e.g. #2563eb). An interactive preview card displays exactly how listings, price tags, and buttons will appear to your customers. Click Reset to Defaults at any time to restore the factory color palette, or click Save Changes to store and apply the new styles platform-wide.
Automatic Listing Watermark Branding (/admin/settings/watermark)
Protect your sellers from image scrapers. LankaAds automatically applies a transparent PNG watermark across all newly uploaded photos:
- Default Watermark: LankaAds ships with a clean, pre-seeded transparent watermark graphic (
/uploads/watermarks/default-watermark.png). - Custom Watermark Upload: In Settings → Watermark (
/admin/settings/watermark), upload your custom logo (transparent PNG, recommended 400x100px). - 9 Valid Grid Positions: Position the watermark at
center,top-left,top-center,top-right,middle-left,middle-right,bottom-left,bottom-center, orbottom-right. - Precision Sizing & Opacity: Adjust watermark size (10% to 80% of canvas width, default 38%), opacity (0% to 100%, default 50%), and outer margin (0px to 60px, default 24px).
Promotional Banner Management & Ad Modes
Monetize your website traffic by placing advertising banners across high-traffic sections in Settings → Banners (/admin/settings/banners) and Mobile Banners (/admin/settings/mobile-banners):
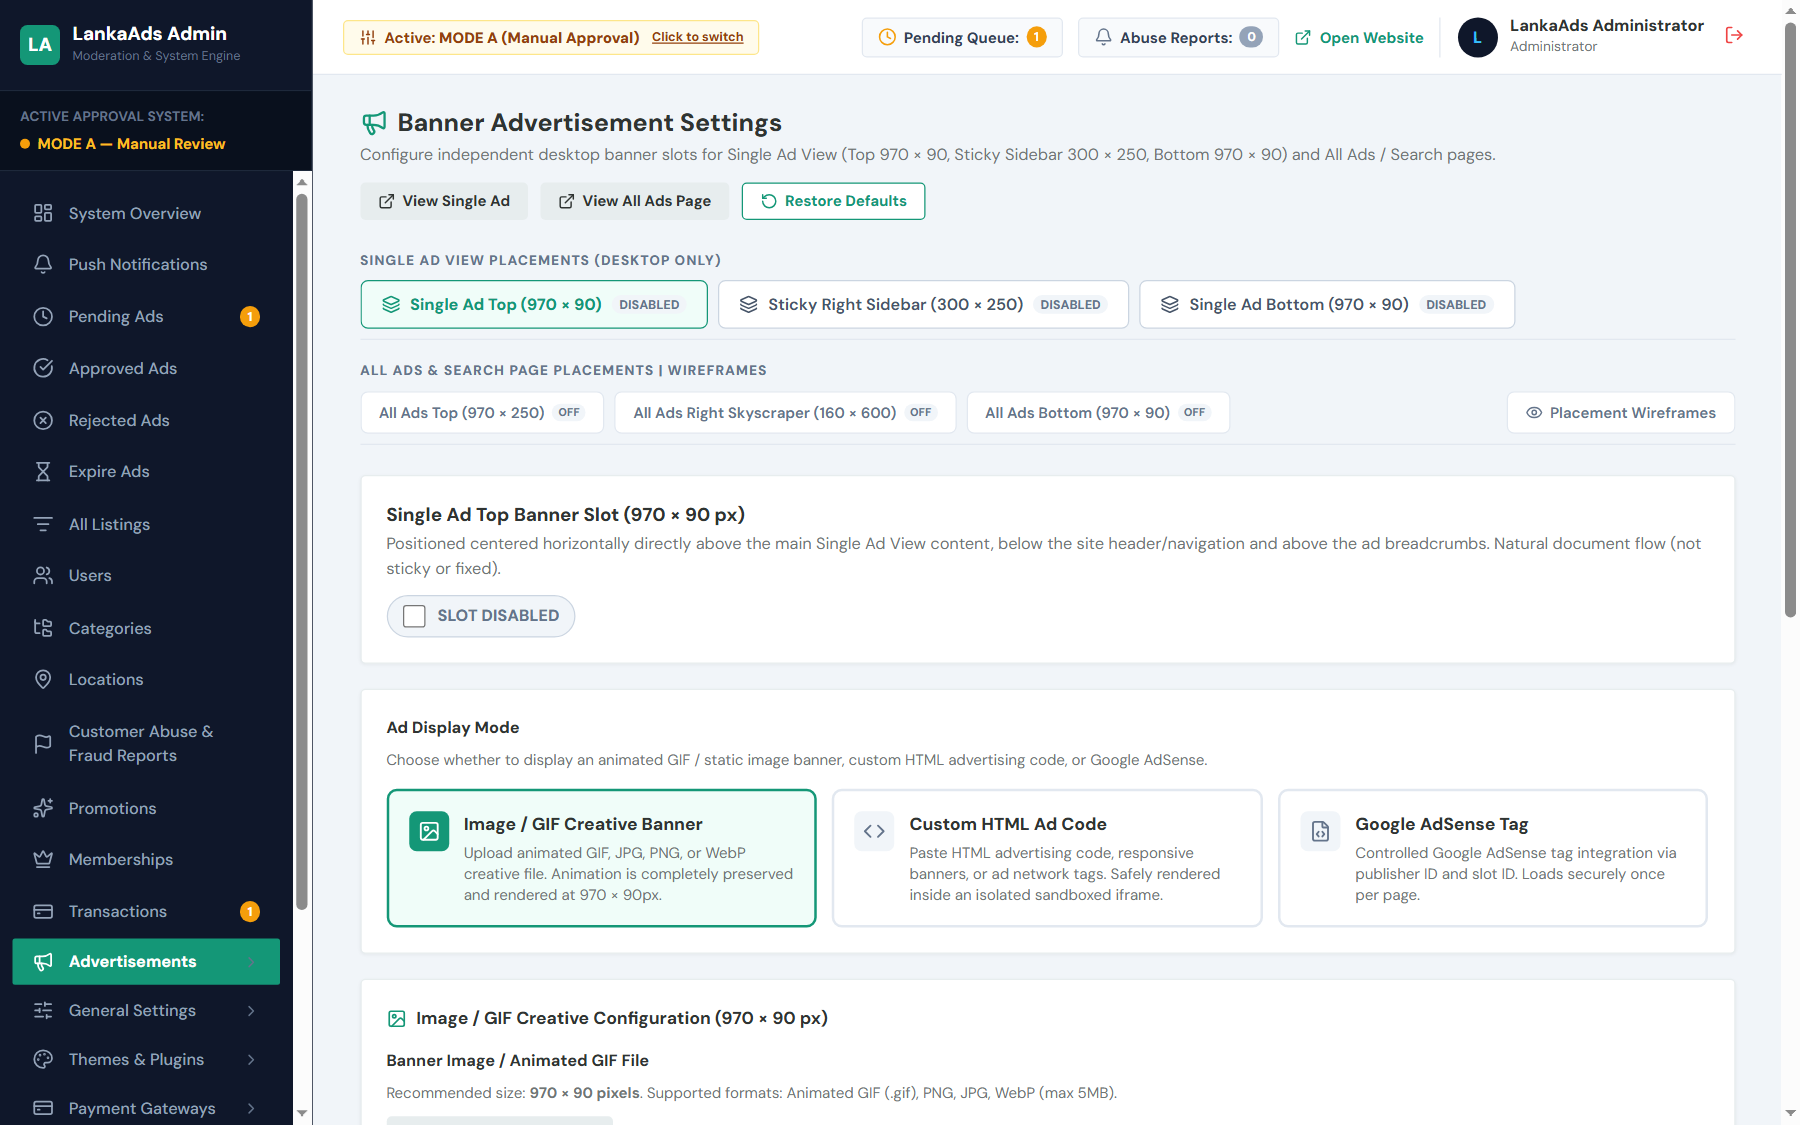
/admin/settings/banners).LankaAds supports 4 distinct banner advertising modes for each slot:
- Image Mode: Upload image banners (max 5MB, JPG/PNG/WebP/GIF) with custom click-through destination URLs and optional Open in New Tab.
- Custom HTML Ad Code: Embed sandboxed HTML/JavaScript snippets from affiliate networks, sponsors, or third-party ad exchanges.
- Google AdSense: Enter your Google Ad Client ID (
ca-pub-xxx) and Ad Slot ID for automated banner delivery. - Google Mobile AdSense: Dedicated responsive mobile ad format optimized for smartphones and tablets.
Available Banner Slots:
- All Ads Browsing: Top Banner, Sidebar/Right Banner, and Bottom Banner.
- Single Ad Detail Page: Top Banner, Sidebar Banner, and Bottom Banner.
System CMS Pages Management (/admin/settings/pages)
Create and edit legal, informational, and marketing pages in Settings → Pages (/admin/settings/pages). Footer links can be grouped and ordered in /admin/settings/footer:
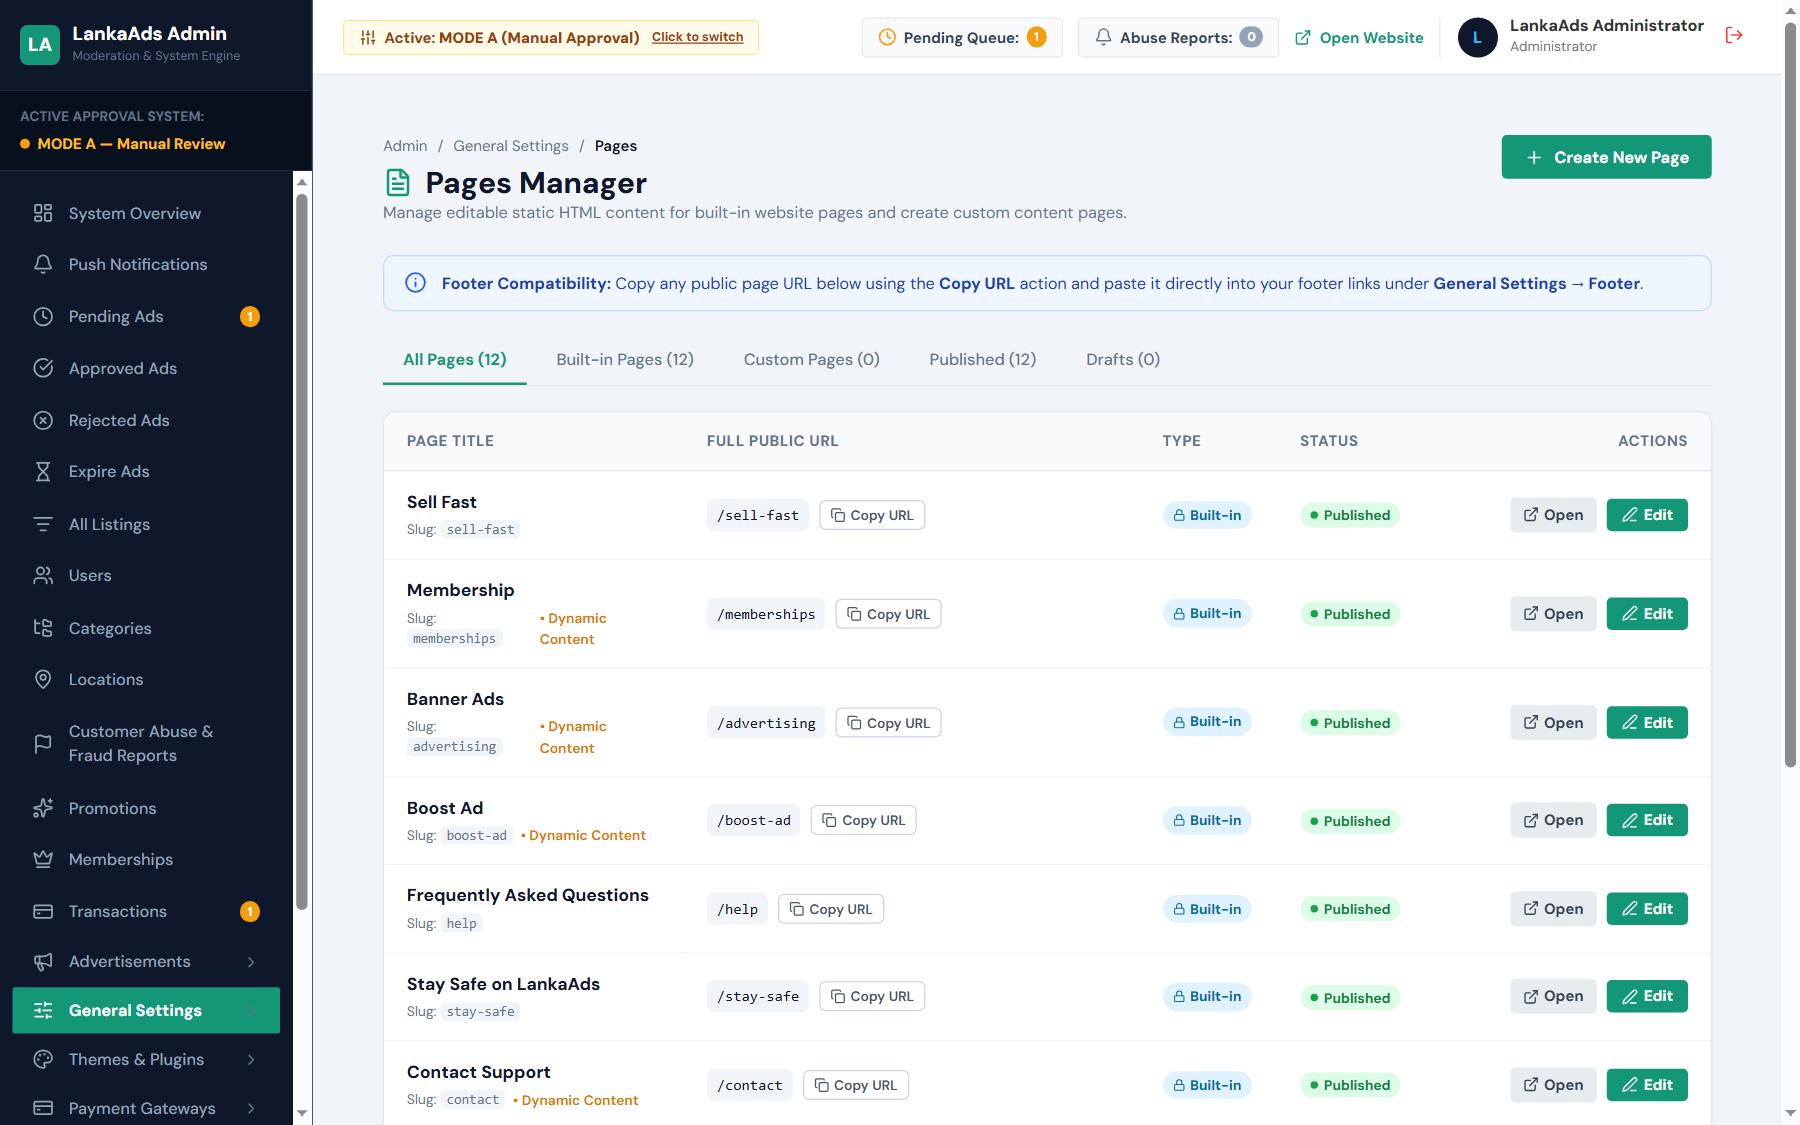
/admin/settings/pages) showing system pages, custom page creation, and status filters.- Pre-Seeded Core Pages: Ships with standard content for About Us (
/pages/about), Terms & Conditions (/pages/terms), Privacy Policy (/pages/privacy), Safety & Anti-Fraud Tips (/pages/stay-safe), and Contact Us (/pages/contact). - Dynamic System Workflows: Pages such as Memberships (
/pages/memberships), Advertising (/pages/advertising), and Boost Ad (/pages/boost-ad) automatically bind to backend databases and active pricing plans. - Rich WYSIWYG Content Editor: Create custom informational pages with headings, bold/italic typography, bullet/numbered lists, inline links, embedded images, tables, and blockquotes.
- Placement & Status Controls: Choose display locations (Header navigation, Footer Column 1, Footer Column 2, or standalone direct link) and toggle between Draft and Published status. System pages also include a Reset to Factory Content action.
Multilingual Translation & Languages Management (/admin/general-settings?tab=languages)
LankaAds is built from the ground up for internationalization and regional localization. The Languages tab under General Settings (/admin/general-settings?tab=languages) provides full control over supported marketplace languages and translations:
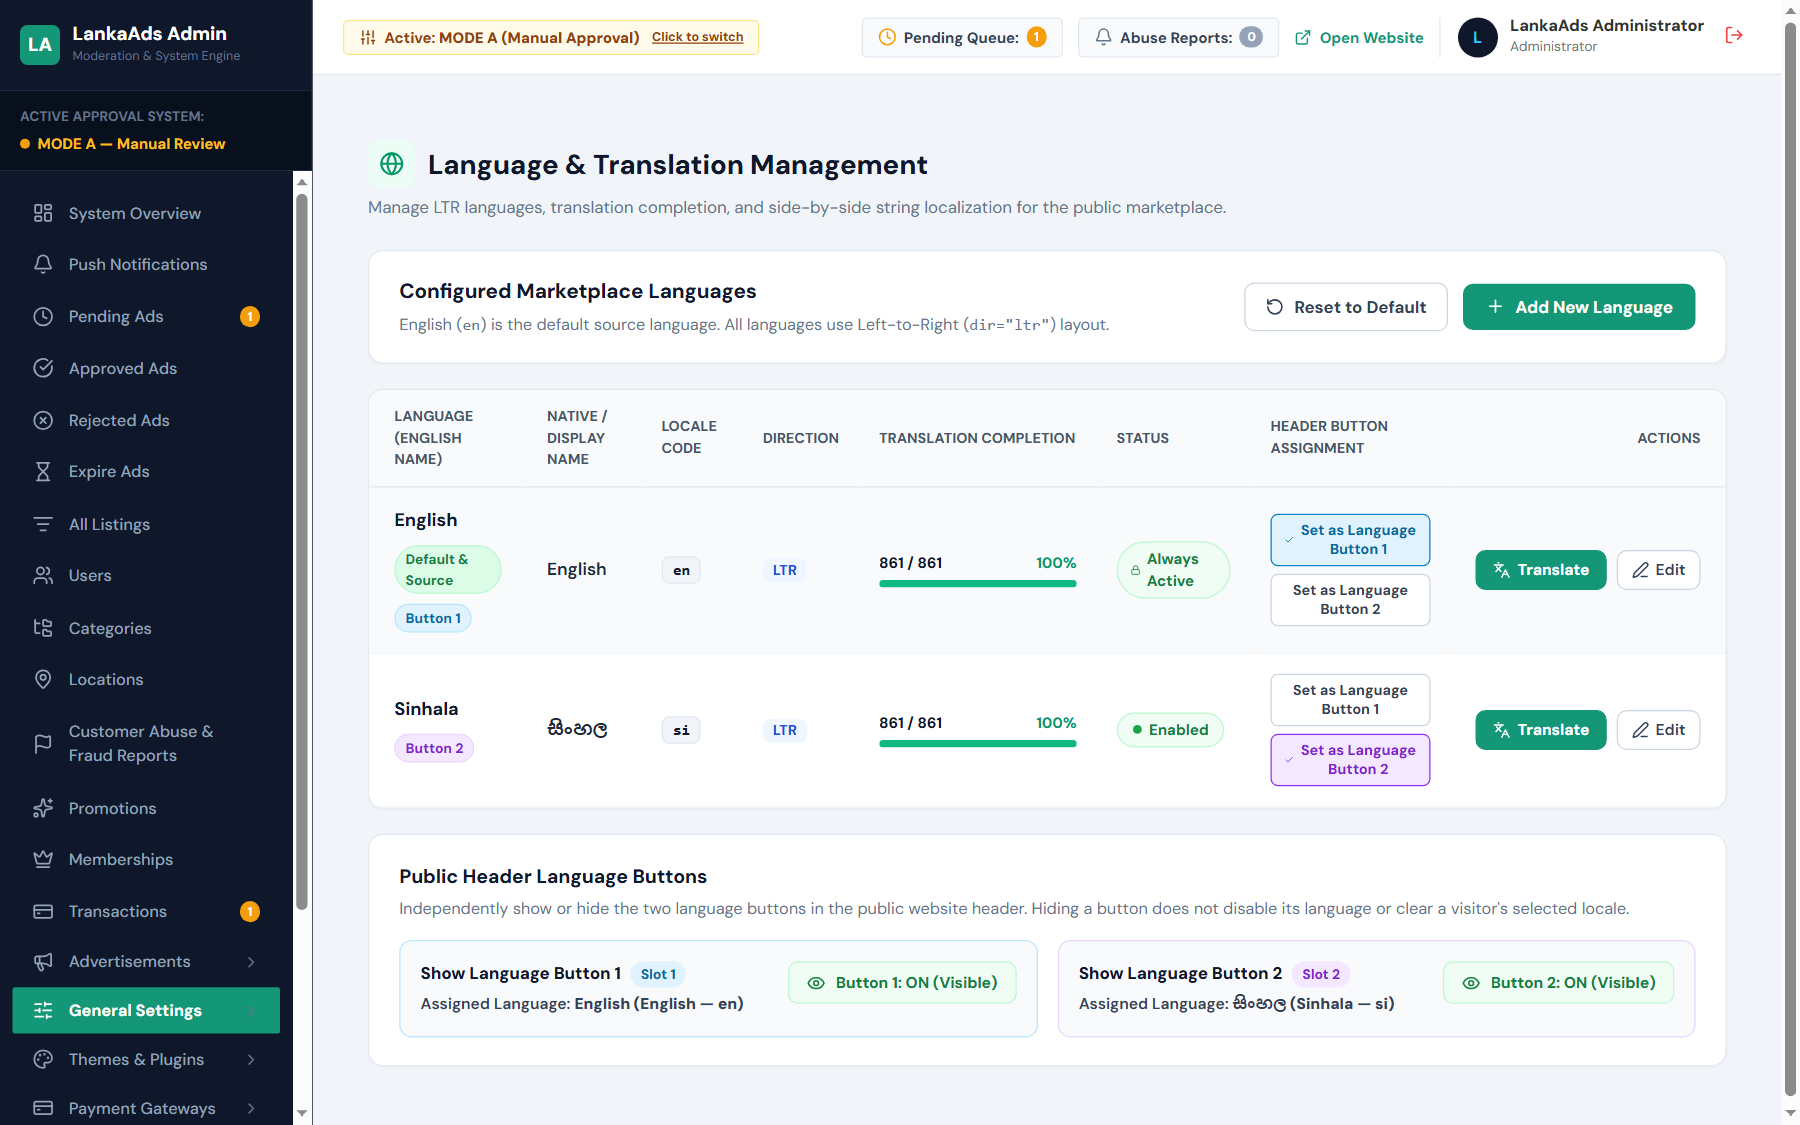
/admin/general-settings?tab=languages) showing configured languages, status toggles, and translation editor access.Key Language Capabilities:
-
Pre-Configured Language Catalogs:
Ships with complete, pre-configured English (en) and Sinhala (si, සිංහල) language catalogs ready out of the box. -
Default Marketplace Language:
Select which language is automatically served to new, unauthenticated visitors when they first arrive at your site. -
Header Language Button Slots & Visibility Controls:
The public navigation header supports two dedicated quick-switch button slots: Language Button 1 (default:enEnglish) and Language Button 2 (default:siSinhala).- Slot Assignment: In the language table, click Set as Language Button 1 or Set as Language Button 2 on any enabled language row to assign it to that header slot. A single language cannot be assigned to both slots simultaneously, and disabled languages cannot be assigned until re-enabled.
- Visibility Controls: In the Public Header Language Buttons card below the table, independent toggles control whether each button is displayed in the public header (
Button 1: ON (Visible)/Button 2: ON (Visible)). Toggling a button to hidden conceals that specific header button without disabling the language or affecting visitor translation catalogs.
-
Adding New Languages:
Click + Add Language to open the modal. Enter the English Name (e.g. Tamil), Native Script Name (e.g. தமிழ்), ISO Locale Code (e.g.ta), and initial visibility state. -
In-Browser Translation Catalog Editor:
Click Translate / Edit on any language row to open the interactive translation studio. It features over 320 categorized translation keys divided across functional groups: Common, Header & Navigation, Footer, Authentication, Classified Ads, User Dashboard, Admin Panel, and Notifications. -
Search, Filter & Placeholder Validation:
Use the live search box to find strings instantly. Filter by section or view only Missing Translations. Built-in variable validation protects dynamic tokens (e.g.{name},{count},{amount}) so translation edits cannot break site functionality. -
Save & Reset to Defaults:
Click Save Translations to commit updates directly to the database. If you ever need to revert custom edits, click Reset to System Defaults to restore factory catalog strings.
10. Signed System Updates & Disaster Recovery
LankaAds includes a built-in, cryptographically signed Manual System Updater (/admin/system-updates). It allows you to update your live installation in place without reinstalling or losing your listings, customer accounts, uploaded photos, payment receipts, memberships, or custom settings.
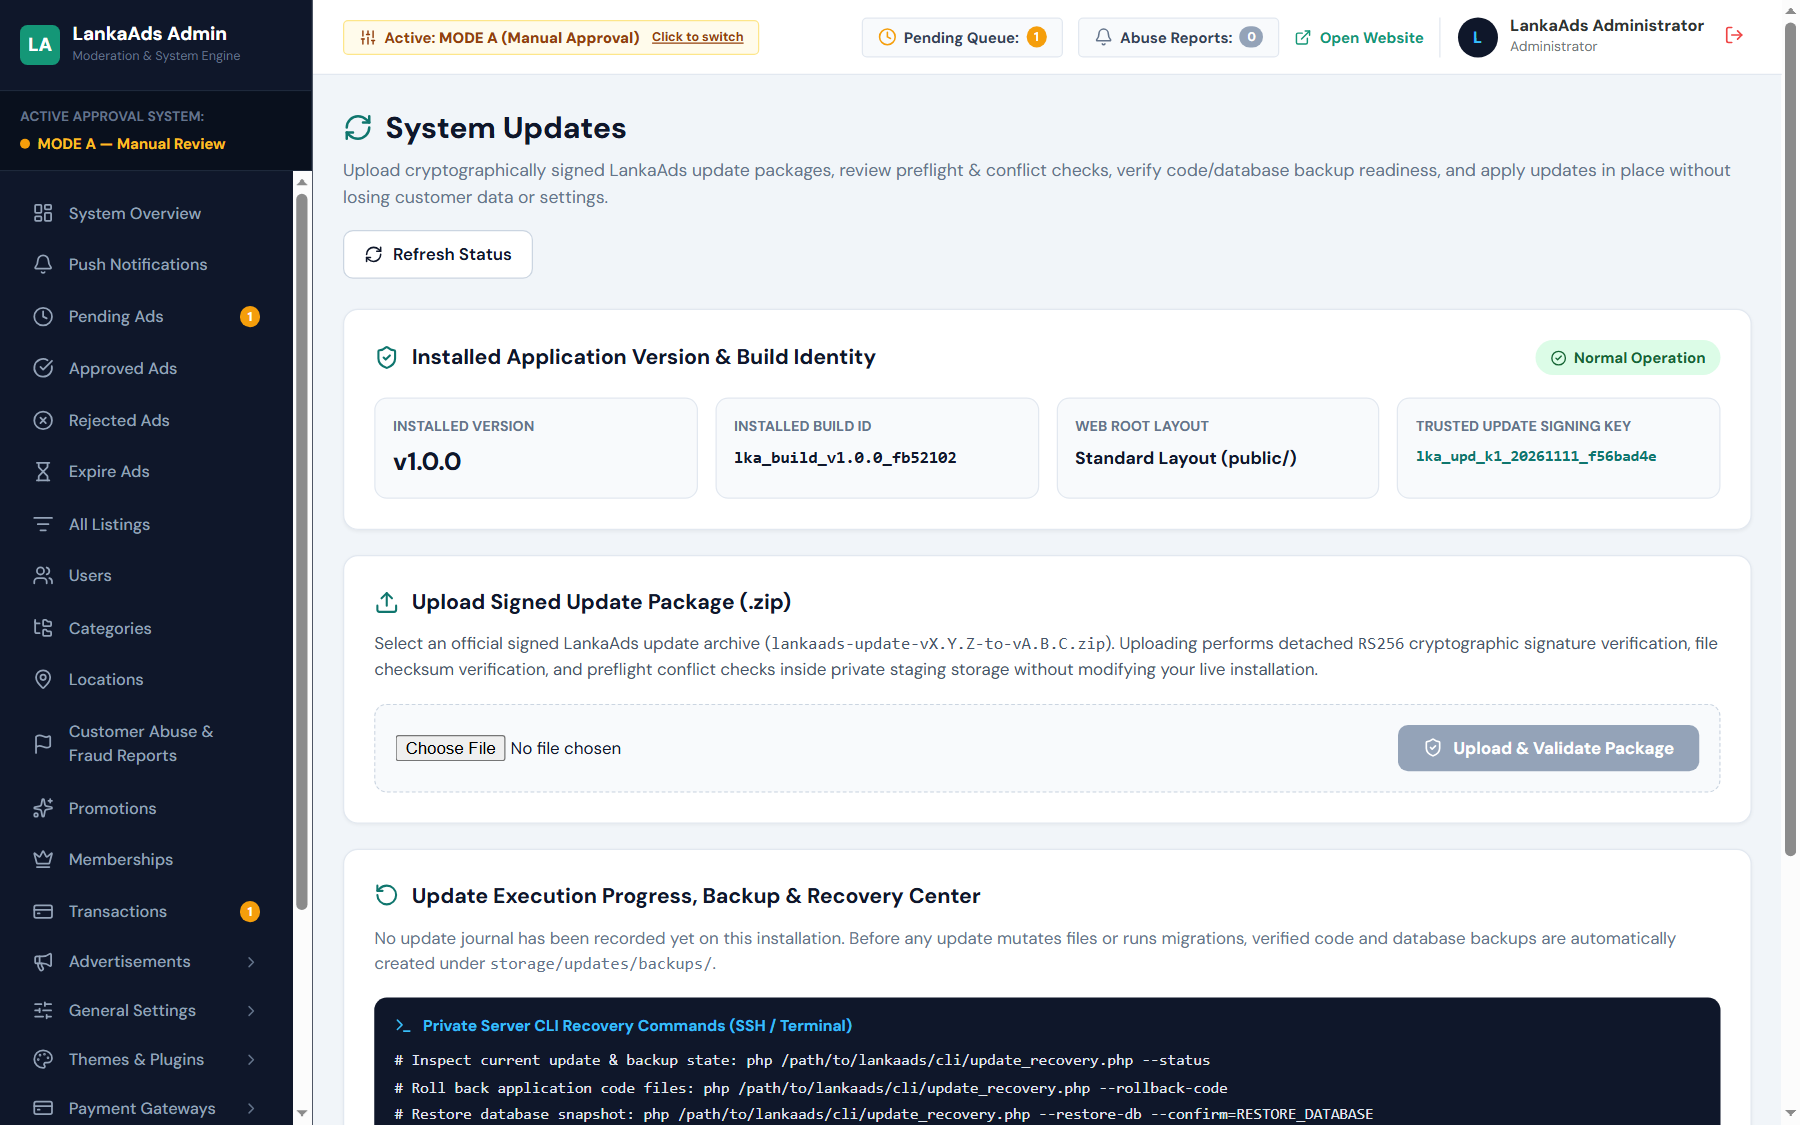
lka_build_v1.0.0_f688268).Step-by-Step Update Procedure
- Download Official Signed ZIP: Obtain the official update archive published by the author for your version path (e.g.
lankaads-update-v1.0.0-to-v1.0.1.zip). Customers must upload the original official signed archive directly without modifying, extracting, or repacking it. - Upload Package: In the admin panel, navigate to System Updates (
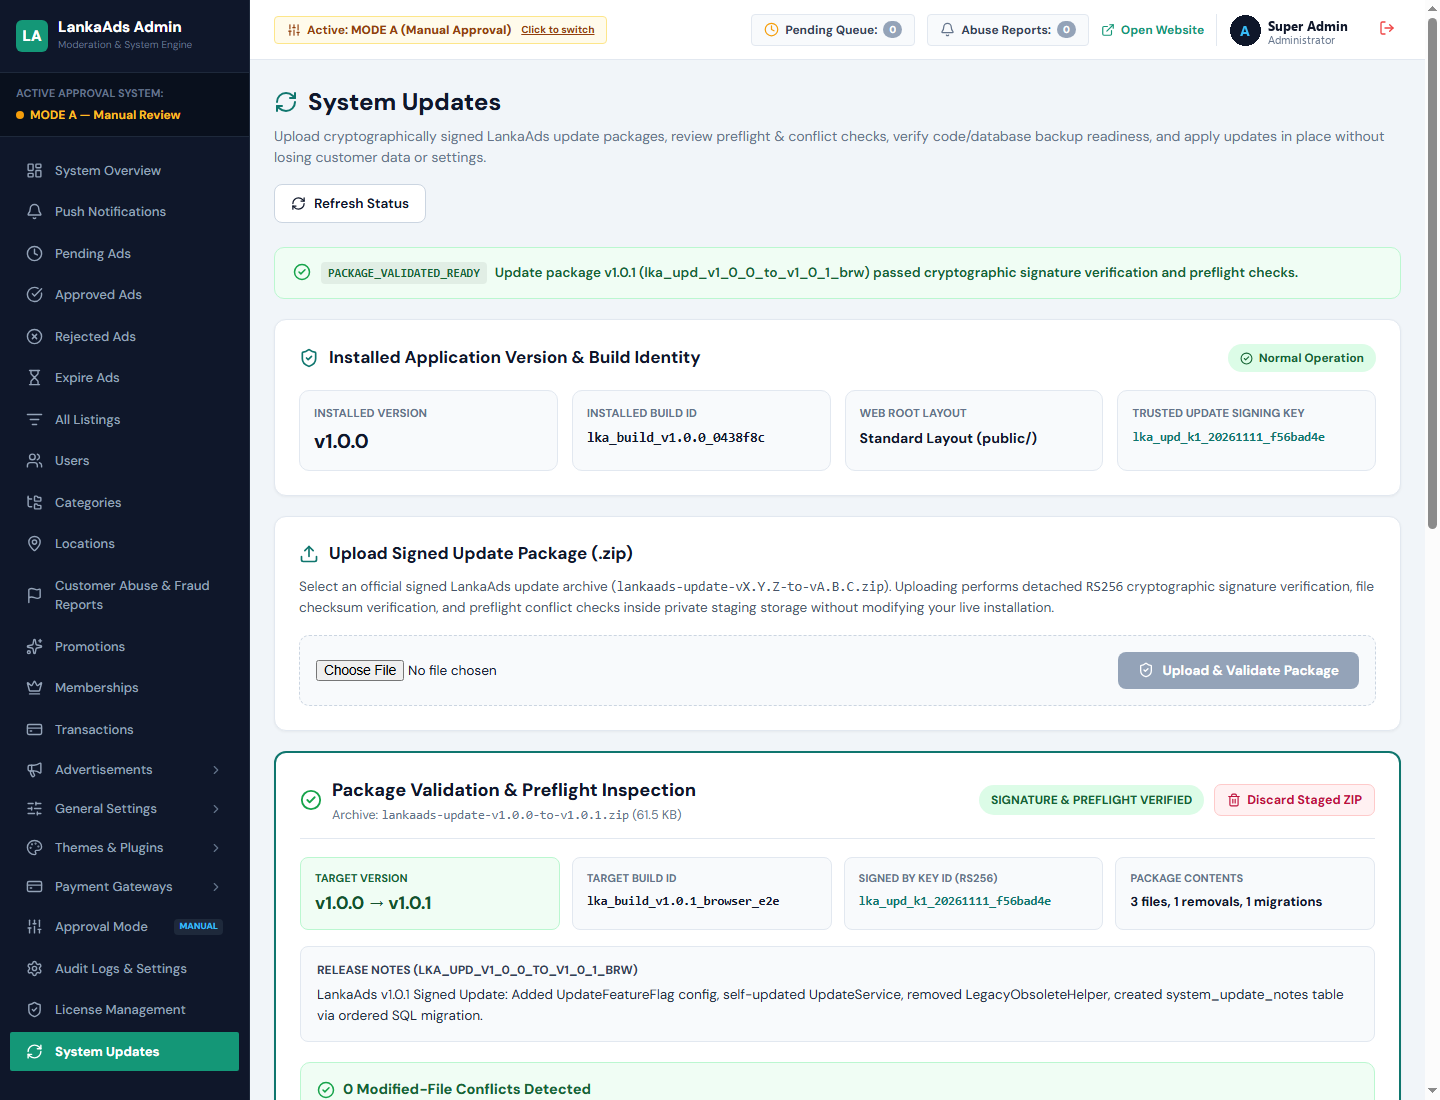
/admin/system-updates), select the ZIP archive, and click Upload & Validate Package. - Preflight Verification: The server verifies the author's detached cryptographic signature (
update-manifest.sig), checks minimum PHP and MySQL version requirements, tests storage directory write permissions, checks database connectivity, and audits the code tree for modified-file conflicts.
-
Mandatory Confirmation Checkbox & Install Trigger:
Review the staged preflight verification summary, target version, build ID, and backup plan. You must explicitly check the confirmation checkbox:
“I confirm that I have reviewed the preflight checks and wish to proceed with the update”
Once checked, the green Install Update button becomes active. Click it to begin durable, checkpointed execution. -
Durable Execution Pipeline & Verified Backups:
The system updater initiates an automated, checkpointed execution pipeline in the following verified order:- Step 1 — Prepare & Engage Maintenance Mode: Re-validates directory permissions and manifest signature, then puts the website into Maintenance Mode (
503 Service Unavailable) to prevent concurrent customer writes while keeping the admin update screen accessible. - Step 2 — Pre-Mutation Backups: Under active maintenance mode, creates and SHA-256 verifies a code archive (
code_backup.zip) and consistent database snapshot (db_backup.sql) in private storage (storage/updates/backups/) before any mutations occur. If a backup fails before changes are made, maintenance mode is safely disabled and the update is aborted with zero mutations. - Step 3 — Apply Files: Copies update files individually to their target paths across the codebase, ordering ordinary files first and deferring updater core files to the final phase.
- Step 4 — Database Migrations: Executes bundled incremental SQL schema migrations in strict sequence, recording applied migration tracking numbers.
- Step 5 — Finalize & Release Maintenance Mode: Runs post-update health verification, updates
installed_manifest.jsonandinstalled.lock, resets OPcache/bytecode caches, marks the update journalCOMPLETED, and automatically releases Maintenance Mode to restore public access.
- Step 1 — Prepare & Engage Maintenance Mode: Re-validates directory permissions and manifest signature, then puts the website into Maintenance Mode (
-
Post-Update Health Verification:
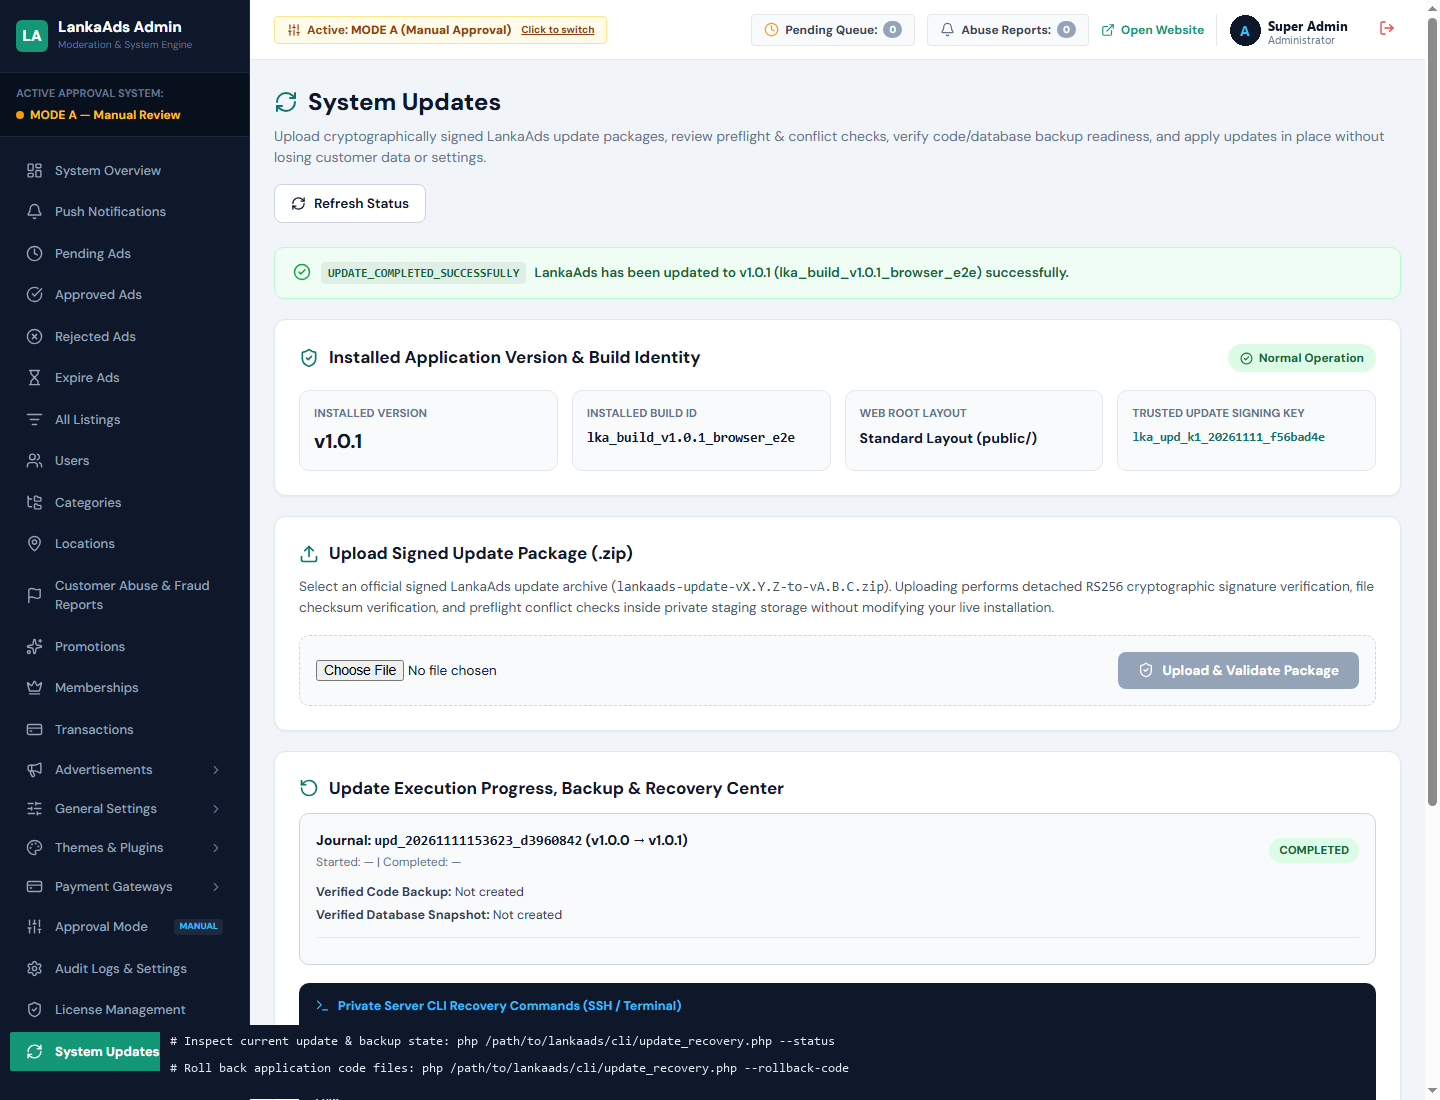
Verify that the System Updates interface displays the new target version and build ID with a verified journal state (Figure 10.3). Next, visit your public marketplace homepage (/), browse listings, and test submitting an ad (/post-ad) to confirm that web requests, React components, and database queries are functioning flawlessly.
Understanding Rollback Options & Schema Migration Compatibility
1. Rollback Code Files Only:
Restores application PHP, JavaScript, and CSS files from
code_backup.zip without modifying database rows. Caution: Code rollback is fully clean and non-destructive only if database migrations have not altered existing schema tables. If the update executed schema migrations (e.g. altering columns or tables), rolling back code alone leaves older PHP code running on a modified database schema, which can cause runtime errors. If an update fails during or after schema migrations, consult the author release notes or seek author guidance before deciding between code-only or full rollback.
2. Restore Database Backup:
Restores the pre-update MySQL snapshot (
db_backup.sql). Warning: Restoring the database backup completely overwrites all database tables. Any newly posted ads, buyer inquiries, or customer memberships recorded after the update started will be permanently erased. LankaAds includes a built-in safety lock (NEWER_BUSINESS_WRITES_DETECTED) that halts restoration if newer customer records are detected, requiring an explicit confirmation override.
Private Server CLI Recovery (cli/update_recovery.php)
If a server timeout, network drop, or unexpected hosting failure interrupts an update mid-execution, run the private CLI tool directly from your application root directory over SSH or cPanel Terminal.
The commands below are individual, mutually exclusive emergency actions for distinct failure scenarios. They are not a sequential script to run together. Never execute multiple rollback commands in succession. Always run
--status first to inspect the system, understand what failed, and then select exactly ONE appropriate recovery action.
Step 1: Navigate to Root & Inspect System Status
Always begin by navigating to your application root directory and inspecting the active journal status, maintenance state, and verified backup files:
cd /path/to/lankaads
php cli/update_recovery.php --status
The --status output will display:
- Current Installed Version & Build ID: The live codebase state.
- Maintenance Mode: Whether the site is locked (
ENABLED) or open (DISABLED). - Active Journal ID: A unique identifier (e.g.
upd_jnl_v1.0.1_20261111_a1b2c3d4) recording the staged update checkpoints. - Available Backups: Absolute paths to verified
code_backup.zipanddb_backup.sqlwith their exact row counts and SHA-256 hashes.
Reading status is an informational inspection tool only. If maintenance mode is active, it is deliberately safeguarding your live site from public traffic while an update is incomplete. Do not run
--disable-maintenance immediately after checking status. Keep maintenance mode engaged until you either resume the update or complete a rollback.
How to Substitute <JOURNAL_ID>
In the recovery commands below, replace the placeholder <JOURNAL_ID> with the exact Journal ID printed in your --status output (for example, upd_jnl_v1.0.1_20261111_a1b2c3d4). Do not include the angle brackets. Explicit journal identification prevents accidental rollbacks from targeting the wrong backup archive.
Select ONE Appropriate Recovery Action
Action Option A: Resume an Interrupted Update (Recommended for Timeouts)
If your update was interrupted by a PHP execution timeout (e.g. max_execution_time reached) or temporary server drop while extracting files, this command resumes execution cleanly from the last durable checkpoint without repeating completed steps:
php cli/update_recovery.php --resumeAction Option B: Roll Back Application Code Files Only (Non-Destructive)
Restores application PHP, JavaScript, and CSS files from code_backup.zip while leaving all database tables and customer records untouched. Use this if an update fails during file staging or asset caching, provided database schema migrations have not altered tables:
php cli/update_recovery.php --rollback-code --journal-id=<JOURNAL_ID>Action Option C: Restore Database Snapshot (Destructive to New Customer Writes)
Restores database tables from the pre-update db_backup.sql snapshot. Warning: Completely overwrites database tables. Any listings, customer accounts, or payment records created after the snapshot will be permanently lost. Requires explicit confirmation token:
php cli/update_recovery.php --restore-db --confirm=RESTORE_DATABASE --journal-id=<JOURNAL_ID>Action Option D: Full Rollback (Code Files and Database Snapshot)
Reverts the entire installation to its pre-update baseline by restoring both code files from code_backup.zip and database tables from db_backup.sql, updates the journal to ROLLED_BACK, and exits maintenance mode. Requires explicit confirmation token:
php cli/update_recovery.php --full-rollback --confirm=FULL_ROLLBACK --journal-id=<JOURNAL_ID>Releasing Maintenance Lock After Verification
Once you have successfully completed an update, resumed execution, or finished a rollback, verify that your site is operating normally. If maintenance mode was not released automatically, run this utility to clear the lock:
php cli/update_recovery.php --disable-maintenance11. Troubleshooting & Common Error Solutions
Consult this quick reference table if you encounter common error codes or installation blockers:
| Error / Symptom | Root Cause | Exact Verified Resolution |
|---|---|---|
403 Forbidden on /install |
The application is already installed and storage/installer/installed.lock is active. |
This is a normal security protection to prevent unauthorized re-installation. Never delete .env or installed.lock on a live site. If you genuinely need to perform a fresh reinstall, back up your files and database, deactivate your license in /admin/license, and perform a fresh install in a separate clean directory on a newly created empty database. |
403 Forbidden on Admin sections |
The logged-in account has the moderator role and is attempting to access an Administrator-only section (e.g. /admin/users). |
Sign in with your Super Administrator account. Moderators are strictly restricted to the 11 operational moderation sections. |
503 LICENSE_RESTRICTED |
License domain mismatch (BINDING_HOST_MISMATCH) or the 7-day outage grace window has expired. |
Sign in to /admin/login as Administrator and visit /admin/license. Click Verify Now to refresh the certificate, or release the slot to transfer your license to the new domain. |
503 MAINTENANCE_MODE_ACTIVE |
A system update was started and either interrupted or is currently executing. | Admins can access /admin/system-updates to complete an interrupted update, or run php cli/update_recovery.php --status via terminal to inspect the active journal. If the update was interrupted by a timeout, run php cli/update_recovery.php --resume to finish it, or execute an appropriate rollback. Once the issue is resolved and system health is verified, disable maintenance mode with php cli/update_recovery.php --disable-maintenance. |
| MySQL Connection Failed (Step 2) | Incorrect database host, port, or user credentials in cPanel. | Verify that you created the database and user in cPanel → MySQL Databases and assigned standard table privileges. Try using 127.0.0.1 instead of localhost (or vice versa). |
| Database Contains Existing Tables (Step 2) | The selected database already contains tables from another application. | LankaAds requires an empty database to prevent data loss. Create a new, empty database in cPanel → MySQL Databases and provide the clean database name. |
| Setup Token Invalid (Gate 0) | The token entered in the browser does not match storage/installer/setup_token.txt. |
Check storage/installer/setup_token.txt in cPanel File Manager. Ensure there are no accidental leading/trailing spaces or linebreaks copied with the token. |
| Image Upload Error (HTTP 413 / 500) | File permissions on public/uploads/ or PHP upload_max_filesize limits. |
Set permissions on public/uploads/ and subdirectories to 0755. In cPanel → Select PHP Version, increase upload_max_filesize to 16M and post_max_size to 32M. |
12. Support, Changelog & Third-Party Credits
Customer Package Opening & First Steps
When you download your purchased customer release package, follow these initial steps:
- Extract the Downloaded ZIP: Extract the archive on your local computer using standard archive tools (Windows Explorer, 7-Zip, or macOS Archive Utility).
- Review the Documentation Locally: Double-click
Documentation/index.html. It opens directly in any web browser without an internet connection or web server. - Upload to Hosting: Upload the application files to your hosting server via cPanel File Manager, SFTP, or rsync.
- Run the Web Installer: Create your private setup token in
storage/installer/setup_token.txt, create an empty MySQL database, and navigate tohttps://yourdomain.com/install.
Official Customer Support
If you need assistance with installation, have questions regarding configuration, or encounter a software bug, please reach out through the author's confirmed item support tab and contact channel on the purchase marketplace where you bought LankaAds.
Changelog — Version 1.0.0 (Baseline Release)
v1.0.0 Initial Production Release
Build lka_build_v1.0.0_f688268- Classifieds marketplace engine with custom PHP 8.1+ MVC architecture and pre-compiled React frontend.
- Self-contained 5-step Web Installer Wizard with private setup token ownership protection.
- Internationally configurable with pre-seeded Sri Lanka administrative geography (9 provinces, 25 districts, hundreds of cities).
- Curated 12-category commercial classification with dynamic specification fields.
- Single-Currency Settlement Model eliminating currency conversion drift.
- Timezone management with verified
Asia/Colombobaseline default and instant reset. - 3-tier RBAC system: Super Admin, 11-section limited Moderator, and Customer portal.
- Manual Bank Transfer payment gateway with customer slip upload and admin inspection modal.
- Subscription memberships (Free, Silver, Gold, Platinum) with badge rendering and post limits.
- Urgent and Featured classified listing promotion boost engine.
- Pre-seeded and custom listing image watermark branding with 9-position placement and opacity controls.
- 4-mode banner advertising manager (Image, Sandboxed HTML, Google AdSense, Mobile AdSense).
- Manual Signed System Updater with detached cryptographic signatures, conflict checks, and explicit journal recovery.
- Offline license certificate verification with 7-day outage grace window.
Third-Party Notices & Open Source Credits
LankaAds is built with gratitude to the open-source community and utilizes the following software:
- React & React-DOM (v19.3.0): Copyright © Meta Platforms, Inc. and affiliates (MIT License).
- Lucide Icons (
lucide-reactv1.56.0): Copyright © Lucide Contributors (ISC License). - TypeScript (Build-time): Copyright © Microsoft Corporation (Apache License, Version 2.0).
- Webpack (Build-time): Copyright © JS Foundation and other contributors (MIT License).
- PHP Core Extensions: Copyright © The PHP Group (PHP License & OpenSSL/Apache-2.0 License).
About the Author
- Author: Harsha Samarasingha
- Country: Sri Lanka
- Website: https://amazonlanka.com
- CodeCanyon: https://codecanyon.net/user/amazonlanka